1:以前用jmi发布服务,实现分布式的一种方式,远程调用,据说rmi的性能是最好的,维护起来有点麻烦,现在改Hessian
各种远程调用的比较:
http://www.cnblogs.com/jifeng/archive/2011/07/20/2111183.html
spring 文档中关于远程调用的
转:http://ryxxlong.iteye.com/blog/1563359
使用Spring的RMI支持,你可以通过RMI基础设施透明的暴露你的服务。设置好Spring的RMI支持后,你会看到一个和远程EJB接口类似的配置,只是没有对安全上下文传递和远程事务传递的标准支持。当使用RMI调用器时,Spring对这些额外的调用上下文提供了钩子,你可以在此插入安全框架或者定制的安全证书。
1.使用RmiServiceExporter暴露服务
使用RmiServiceExporter,我们可以把AccountService对象的接口暴露成RMI对象。可以使用 RmiProxyFactoryBean 或者在传统RMI服务中使用普通RMI来访问该接口。RmiServiceExporter 显式地支持使用RMI调用器暴露任何非RMI的服务。当然,我们首先需要在Spring容器中设置我们的服务:
<bean id="accountService" class="example.AccountServiceImpl">
- <!--其他属性,或者一个DAO对象?-->
- lt;/bean>
然后我们要使用RmiServiceExporter来暴露我们的服务:
- <bean class="org.springframework.remoting.rmi.RmiServiceExporter">
- <!-- 不一定要与要输出的bean同名-->
- <property name="serviceName" value="AccountService"/>
- <property name="service" ref="accountService"/>
- <property name="serviceInterface" value="example.AccountService"/>
- <!-- 默认为1199-->
- <property name="registryPort" value="1199"/>
- </bean>
本例中,服务绑定在 rmi://HOST:1199/AccountService。在客户端我们将使用这个URL来链接到服务。
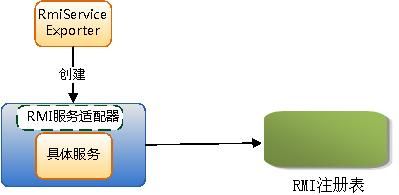
RmiServiceExporter把任何Spring管理的Bean输出成一个RMI服务。通过把Bean包装在一个适配器类中工作。适配器类被绑定到RMI注册表中,并且将请求代理给服务类。
我们的客户端是一个使用AccountService来管理account的简单对象:
- public class SimpleObject {
- private AccountService accountService;
- public void setAccountService(AccountService accountService) {
- this.accountService = accountService;
- }
- }
为了把服务连接到客户端上,我们将创建一个单独的Spring容器,包含这个简单对象和链接配置位的服务:
- <bean class="example.SimpleObject">
- <property name="accountService" ref="accountService"/>
- </bean>
- <bean id="accountService" class="org.springframework.remoting.rmi.RmiProxyFactoryBean">
- <property name="serviceUrl" value="rmi://HOST:1199/AccountService"/>
- <property name="serviceInterface" value="example.AccountService"/>
- </bean>
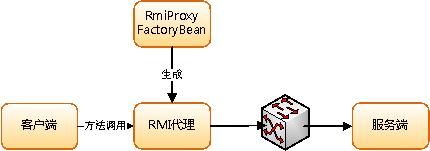
客户端的核心是RmiProxyFactoryBean,包含serviceURL属性和serviceInterface属性。
通过JRMP访问服务。JRMP JRMP:java remote method protocol,Java特有的,基于流的协议。
3.服务端配置与开发
1)开发服务的接口
2)开发服务的实现类
3)配置spring,配置实现类
4)配置spring,注册rmi服务,其中需要说明
a.远程调用服务名
b.提供服务的实现类
c.提供服务的接口
d.提供服务的端口
具体的程序如下所示:
1)HelloWorld.java
- package com.ipi.rmi.test.service;
- public interface HelloWorld
- {
- public String helloWorld();
- public String sayHelloToSomeBody(String someBodyName);
- }
2)HelloWorldImpl.java
- package com.ipi.rmi.test.service.impl;
- import com.ipi.rmi.test.service.HelloWorld;
- public class HelloWorldImpl implements HelloWorld
- {
- @Override
- public String helloWorld()
- {
- return "Hello World!";
- }
- @Override
- public String sayHelloToSomeBody(String someBodyName)
- {
- return "Hello World!" + someBodyName;
- }
- }
3)Spring配置文件
- <?xml version="1.0" encoding="UTF-8"?>
- <beans xmlns="http://www.springframework.org/schema/beans" xmlns:xsi="http://www.w3.org/2001/XMLSchema-instance" xmlns:context="http://www.springframework.org/schema/context" xmlns:aop="http://www.springframework.org/schema/aop" xmlns:tx="http://www.springframework.org/schema/tx"
- xsi:schemaLocation="
- http://www.springframework.org/schema/beans
- http://www.springframework.org/schema/beans/spring-beans-3.0.xsd
- http://www.springframework.org/schema/context
- http://www.springframework.org/schema/context/spring-context-3.0.xsd
- http://www.springframework.org/schema/tx
- http://www.springframework.org/schema/tx/spring-tx-3.0.xsd
- http://www.springframework.org/schema/aop
- http://www.springframework.org/schema/aop/spring-aop-3.0.xsd">
- <!--服务端bean-->
- <bean id="helloWorld" class="com.ipi.rmi.test.service.impl.HelloWorldImpl" scope="prototype"/>
- <!-- 将类暴露成为一个RMI服务 -->
- <bean id="springRmiTest" class="org.springframework.remoting.rmi.RmiServiceExporter">
- <!-- 服务类 -->
- <property name="service" ref="helloWorld" />
- <!-- 服务名 -->
- <property name="serviceName" value="helloWorldService" />
- <!-- 服务接口 -->
- <property name="serviceInterface" value="com.ipi.rmi.test.service.HelloWorld" />
- <!-- 服务端口 -->
- <property name="registryPort" value="9999" />
- <!-- 其他属性自己查看org.springframework.remoting.rmi.RmiServiceExporter的类,就知道支持的属性了-->
- </bean>
- </beans>
4)SpringRmiServer程序
- package com.ipi.rmi.test.server;
- import org.springframework.context.ApplicationContext;
- import org.springframework.context.support.ClassPathXmlApplicationContext;
- public class SpringRmiServer
- {
- public static void main(String[] args) {
- //初始化工作只能运行一次;运行多次的话,会启动多个服务
- ApplicationContext context = new ClassPathXmlApplicationContext("applicationContext.xml");
- System.out.println("Spring rmi 测试程序服务已启动");
- }
- }
服务器端程序如附件中的SpringRmiServer.rar
4 客户端配置与开发
1) 将服务端的接口进行打包(注:不需要实现类,只是客户端访问服务端的一个存根)
2) 配置spring
a.指定访问服务的地址
b.指定服务的接口
- <?xml version="1.0" encoding="UTF-8"?>
- <beans xmlns="http://www.springframework.org/schema/beans" xmlns:xsi="http://www.w3.org/2001/XMLSchema-instance" xmlns:context="http://www.springframework.org/schema/context" xmlns:aop="http://www.springframework.org/schema/aop" xmlns:tx="http://www.springframework.org/schema/tx"
- xsi:schemaLocation="
- http://www.springframework.org/schema/beans
- http://www.springframework.org/schema/beans/spring-beans-3.0.xsd
- http://www.springframework.org/schema/context
- http://www.springframework.org/schema/context/spring-context-3.0.xsd
- http://www.springframework.org/schema/tx
- http://www.springframework.org/schema/tx/spring-tx-3.0.xsd
- http://www.springframework.org/schema/aop
- http://www.springframework.org/schema/aop/spring-aop-3.0.xsd">
- <!--客户端-->
- <bean id="helloWorld" class="org.springframework.remoting.rmi.RmiProxyFactoryBean">
- <property name="serviceUrl" value="rmi://127.0.0.1:9999/helloWorldService"/>
- <property name="serviceInterface" value="com.ipi.rmi.test.service.HelloWorld"/>
- </bean>
- </beans>

