Spring3开发实战 之 第二章:IoC/DI开发(2)
通过<list/>、<set/>、<map/>及<props/>元素可以定义和设置与Java Collection类型对应List、Set、Map及Properties的值 ,示例如下:
java代码:
- <bean id="moreComplexObject" class="example.ComplexObject">
- <property name="adminEmails">
- <props>
- <prop key="administrator">admin@somecompany.org</prop>
- <prop key="support">support@somecompany.org</prop>
- </props>
- </property>
- <property name="someList">
- <list>
- <value>a list element followed by a reference</value>
- <ref bean="myDataSource" />
- </list>
- </property>
- <property name="someMap">
- <map>
- <entry>
- <key> <value>yup an entry</value> </key>
- <value>just some string</value>
- </entry>
- <entry>
- <key> <value>yup a ref</value> </key>
- <ref bean="myDataSource" />
- </entry>
- </map>
- </property>
- <property name="someSet">
- <set>
- <value>just some string</value>
- <ref bean="myDataSource" />
- </set>
- </property>
- </bean>
可以定义parent-style和child-style的<list/>、<map/>、<set/>或<props/>元素,子集合的值从其父集合继承和覆盖而来;也就是说,父子集合元素合并后的值就是子集合中的最终结果,而且子集合中的元素值将覆盖父集全中对应的值。
java代码:
- <beans>
- <bean id="parent" abstract="true" class="example.ComplexObject">
- <property name="adminEmails">
- <props>
- <prop key="administrator">administrator@somecompany.com</prop>
- <prop key="support">support@somecompany.com</prop>
- </props>
- </property>
- </bean>
- <bean id="child" parent="parent" class= " example.Child" >
- <property name="adminEmails">
- <props merge="true">
- <prop key="sales">sales@somecompany.com</prop>
- <prop key="support">support@somecompany.co.uk</prop>
- </props>
- </property>
- </bean>
- <beans>
在上面的例子中,childbean的adminEmails属性的<props/>元素上使用了merge=true属性。当child bean被容器实际解析及实例化时,其 adminEmails将与父集合的adminEmails属性进行合并 。
注意到这里子bean的Properties集合将从父<props/>继承所有属性元素。同时子bean的support值将覆盖父集合的相应值
不同的集合类型是不能合并(如map和 list是不能合并的),否则将会抛出相应的Exception。merge属性必须在继承的子bean中定义,而在父bean的集合属性上指定的merge属性将被忽略
在JDK5以上的版本里,Spring支持强类型集合
<null/>用于处理null值,Spring会把属性的空参数当作空字符串处理。
1:以下的xml片断将email属性设为空字符串。
<bean class="ExampleBean">
<property name="email"><value></value></property>
</bean>
这等同于Java代码: exampleBean.setEmail(“”)。
2:而null值则可以使用<null>元素可用来表示。例如:
<bean class="ExampleBean">
<property name="email"><null/></property>
</bean>
上述的配置等同于Java代码:exampleBean.setEmail(null)。
针对常见的value值或bean的引用,Spring提供了简化格式用于替代<value/>和<ref/>元素 。如下:
完全等同于
<property name="myProperty" value="hello"/>
<property name="myProperty" ref="myBean"/>
<entry key-ref="myKeyBean" value-ref="myValueBean"/>
强调一点
只有<ref bean=“xxx”>元素的简写形式,没有<ref local=“xxx”>的简写形式。也就是说<property name=“myProperty” ref=“myBean”/> 里面的ref是相当于<ref bean=“”>的形式。
组合属性名称
当设置bean的组合属性时,除了最后一个属性外,只要其他属性值不为null,组合或嵌套属性名是完全合法的。例如,下面bean的定义:
java代码:
bean有个fred属性,此属性有个bob属性,而bob属性又有个sammy属性,最后把sammy属性设置为123。为了让此定义能工作, foo的fred属性及fred的bob属性在bean被构造后都必须非空,否则将抛出NullPointerException异常。
depends-on,用于当前bean初始化之前显式地强制一个或多个bean被初始化。
示例:
若需要表达对多个bean的依赖,可以在'depends-on'中将指定的多个bean名字用分隔符进行分隔,分隔符可以是逗号、空格及分号等。下面的例子中使用了'depends-on'来表达对多个bean的依赖。
延迟初始化bean
1:ApplicationContext实现的默认行为就是在启动时将所有singleton bean提前进行实例化,这样可能会增大资源的消耗,但会加快程序的运行速度。
2:可以将bean设置为延迟实例化。在XML配置文件中,延迟初始化将通过<bean/>元素中的lazy-init属性来进行控制。例如:
<bean id="lazy" class="com.foo.ExpensiveToCreateBean" lazy-init="true">
</bean>
3:在容器层次中通过在<beans/>元素上使用'default-lazy-init'属性来控制延迟初始化也是可能的。如下面的配置:
<beans default-lazy-init="true">
</beans>
自动装配的优缺点
1:优点:
(1)自动装配能显著减少配置的数量。
(2)自动装配可以使配置与java代码同步更新。例如,如果你需要给一个java类增加一个依赖,那么该依赖将被自动实现而不需要修改配置。
2:缺点:
(1)尽管自动装配比显式装配更神奇,但是,正如上面所提到的,Spring会尽量避免在装配不明确的时候进行猜测,因为装配不明确可能出现难以预料的结果,而且Spring所管理的对象之间的关联关系也不再能清晰的进行文档化。
(2)对于那些根据Spring配置文件生成文档的工具来说,自动装配将会使这些工具没法生成依赖信息。
(3)当根据类型进行自动装配的时候,容器中可能存在多个bean定义跟自动装配的setter方法和构造器参数类型匹配。虽然对于数组、集合以及Map,不存在这个问题,但是对于单值依赖来说,就会存在模棱两可的问题。如果bean定义不唯一,装配时就会抛出异常
将bean排除在自动装配之外
1:<bean/>元素的 autowire-candidate属性可被设为false,这样容器在查找自动装配对象时将不考虑该bean。
2:另一个做法就是使用对bean名字进行模式匹配来对自动装配进行限制。其做法是在<beans/>元素的‘default-autowire-candidates’属性中进行设置。
比如,将自动装配限制在名字以
'Repository'结尾的bean,那么可以设置为"*Repository“。对于多个匹配模式则可以使用逗号进行分隔。注意,如果在bean定义中的'autowire-candidate'属性显式的设置为'true' 或 'false',那么该容器在自动装配的时候优先采用该属性的设置,而模式匹配将不起作用。
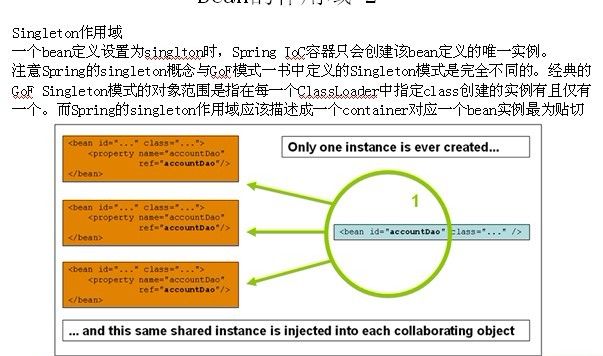
singleton
在每个Spring IoC容器中一个bean定义对应一个对象实例,在读取配置文件创建IoC容器的时候就会根据配置初始化singleton的Bean实例
prototype
一个bean定义对应多个对象实例
request
在一次HTTP请求中,一个bean定义对应一个实例;即每次HTTP请求将会有各自的bean实例,它们依据某个bean定义创建而成。该作用域仅在基于web的Spring ApplicationContext情形下有效。
session
在一个HTTP Session中,一个bean定义对应一个实例。该作用域仅在基于web的Spring ApplicationContext情形下有效。
global session
在一个全局的HTTP Session中,一个bean定义对应一个实例。典型情况下,仅在使用portlet context的时候有效。该作用域仅在基于web的Spring ApplicationContext情形下有效。
request、session以及global session仅在基于web的应用中使用
初始化web配置,Servlet 2.4及以上的web容器,如下配置:
request作用域说明
等同于Http的Request
session作用域说明
针对某个HTTP Session,Spring容器会根据bean定义创建一个全新的bean实例,且该bean仅在当前HTTP Session内有效。与request作用域一样,你可以根据需要放心的更改所创建实例的内部状态,而别的HTTP Session中创建的实例,将不会看到这些特定于某个HTTP Session的状态变化。当HTTP Session最终被废弃的时候,在该HTTP Session作用域内的bean也会被废弃掉
global session
等同于标准的HTTP Session
问题:比如在调用一个singleton类型bean A的某个方法时,需要引用另一个非singleton(prototype)类型的bean B,对于bean A来说,容器只会创建一次,这样就没法在需要的时候每次让容器为bean A提供一个新的的bean B实例
解决方案:Lookup方法注入,示例如下:
java代码:
- Java类
- public abstract class HelloImpl implements HelloApi{
- private T2 t2;
- public String helloSpring3(int a){
- getT2().t1();
- System.out.println("hello Spring3==="+a);
- return "Ok,a="+a;
- }
- public abstract T2 getT2();
- }
- public class T2 {
- public void t1(){
- System.out.println("now in t1");
- }
- }
配置文件:
Lookup方法注入的内部机制是Spring利用了CGLIB库在运行时生成二进制代码功能,通过动态创建Lookup方法bean的子类而达到复写Lookup方法的目的
初始化回调
有两种方法,如下:
1:实现org.springframework.beans.factory.InitializingBean接口,这种方法不被推荐,因为这样和Spring耦合起来了。可以采用声明式的方法,如下:
2:在Bean定义中指定一个普通的初始化方法,即在XML配置文件中通过指定init-method属性来完成,配置如下:
<bean id="initBean" class="examples.ExampleBean" init-method="init"/>
析构回调
也有两种方法,如下:
1:实现org.springframework.beans.factory.DisposableBean接口,这种方法不被推荐,因为这样和Spring耦合起来了。可以采用声明式的方法,如下:
<bean id="initBean" class="ex.ExampleBean" destroy-method="cleanup"/>
缺省的初始化和析构方法
配置在beans上,这样就不用每个Bean都配了,如下:
<beans default-init-method="init">
context包的核心是ApplicationContext接口。它由BeanFactory接口派生而来,除了提供了BeanFactory所有的功能,还提供了以下的功能:
1:MessageSource, 提供国际化的消息访问
2:资源访问,如URL和文件
3:事件传播,实现了ApplicationListener接口的bean
4:载入多个(有继承关系)上下文 ,使得每一个上下文都专注于一个特定的层次,比如应用的web层
利用MessageSource实现国际化
1:在配置文件中添加
2:说明:上述配置是表示在classpath下有两个标准的properties文件。文件格式是标准的properties格式,Spring通过ResourceBundle,使用JDK中解析消息的标准方式,来处理任何解析消息的请求。
3:测试代码:
String msg = context.getMessage("testmsg",
null, "Default", Locale.CHINA);
前面getmessage方法的第二个参数是用来从程序中向消息里面传值的,如下:
前面getmessage方法的第四个参数是用来指定Locale的
对于国际化(i18n),Spring中不同的MessageResource实现与JDK标准ResourceBundle中的locale解析规则一样。比如在上面例子中定义的messageSource bean,如果你想解析British (en-GB) locale的消息,那么需要创建format_en_GB.properties的资源文件;中国的如msg_zh_CN.properties。Locale解析通常由应用程序根据运行环境来指定。
也可以把MessageSource当作资源注入到Bean中,Java类示例如下:
java代码:
- public class HelloImpl implements HelloApi{
- private MessageSource ms = null;
- public void setMs(MessageSource ms){
- this.ms = ms;
- }
- public String helloSpring3(int a){
- String msg = this.ms.getMessage("testmsg", null, "Default", Locale.CHINA);
- System.out.println("hello Spring3==="+msg);
- return "Ok,a="+a;
- }
- }
配置文件示例如下:
事件传播
ApplicationContext中的事件处理是通过ApplicationEvent类和ApplicationListener接口来提供的。如果在上下文中部署一个实现了ApplicationListener接口的bean,那么每当一个ApplicationEvent发布到ApplicationContext时,这个bean就得到通知。
Spring提供了三个标准事件,如下:
ContextRefreshedEvent
当ApplicationContext初始化或刷新时发送的事件。这里的初始化意味着:所有的bean被装载,singleton被预实例化,以及ApplicationContext已就绪可用
ContextClosedEvent
当使用ApplicationContext的close()方法结束上下文时发送的事件。这里的结束意味着:singleton bean 被销毁
RequestHandledEvent
一个与web相关的事件,告诉所有的bean一个HTTP请求已经被响应了(也就是在一个请求结束后会发送该事件)。注意,只有在Spring中使用了DispatcherServlet的web应用才能使用
示例,Java类:
配置文件
<bean id="t2" class="cn.javass.Spring3.hello.T2"></bean>
Resource 接口 :
Spring的 Resource 接口是为了提供更强的访问底层资源能力的抽象,典型的是访问文件资源。基本的定义如下:
java代码:
- public interface Resource extends InputStreamSource {
- boolean exists();
- boolean isOpen();
- URL getURL() throws IOException;
- File getFile() throws IOException;
- Resource createRelative(String relativePath) throws IOException;
- String getFilename();
- String getDescription();
- }
- public interface InputStreamSource {
- InputStream getInputStream() throws IOException;
- }
可以使用ApplicationContext直接访问资源,示例如下:
也可以向Bean里面注入资源,示例如下:
在Java类当中添加:
在配置文件中:
ApplicationContext能以声明的方式创建,在web.xml中配置如下:
视频配套PPT,视频地址【
Spring3开发实战-独家视频课程 】


