Handling Forms in Spring 3.0 MVC
Welcome to the Part 3 of Spring 3.0 MVC Series. In previous article we created a Hello World application in Spring MVC. We leaned how to configure Spring MVC in web.xml and how to use different annotations like @Controller, @RequestMapping etc. In this article let us see how to handle forms in Spring 3.0 MVC.
Spring 3.0 MVC Series
We will use the framework that we created in previous article as a base reference and add up the functionality of form in it. Also the application that we create will be a Contact Manager application.
Our Goal
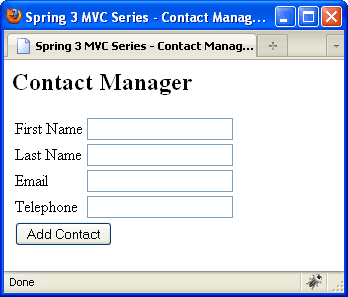
Our goal is to create basic Contact Manager application. This app will have a form to take contact details from user. For now we will just print the details in logs. We will learn how to capture the form data in Spring 3 MVC.
Getting Started
Let us add the contact form to our Spring 3 MVC Hello World application. Open the index.jsp file and change it to following:
File: WebContent/index.jsp
|
1
|
<
jsp:forward
page
=
"contacts.html"
></
jsp:forward
>
|
The above code will just redirect the user to contacts.html page.
The View- contact.jsp
Create a JSP file that will display Contact form to our users.
File: /WebContent/WEB-INF/jsp/contact.jsp
|
01
02
03
04
05
06
07
08
09
10
11
12
13
14
15
16
17
18
19
20
21
22
23
24
25
26
27
28
29
30
31
32
33
34
35
36
|
<%@taglib uri="http://www.springframework.org/tags/form" prefix="form"%>
<
html
>
<
head
>
<
title
>Spring 3 MVC Series - Contact Manager</
title
>
</
head
>
<
body
>
<
h2
>Contact Manager</
h2
>
<
form:form
method
=
"post"
action
=
"addContact.html"
>
<
table
>
<
tr
>
<
td
><
form:label
path
=
"firstname"
>First Name</
form:label
></
td
>
<
td
><
form:input
path
=
"firstname"
/></
td
>
</
tr
>
<
tr
>
<
td
><
form:label
path
=
"lastname"
>Last Name</
form:label
></
td
>
<
td
><
form:input
path
=
"lastname"
/></
td
>
</
tr
>
<
tr
>
<
td
><
form:label
path
=
"lastname"
>Email</
form:label
></
td
>
<
td
><
form:input
path
=
"email"
/></
td
>
</
tr
>
<
tr
>
<
td
><
form:label
path
=
"lastname"
>Telephone</
form:label
></
td
>
<
td
><
form:input
path
=
"telephone"
/></
td
>
</
tr
>
<
tr
>
<
td
colspan
=
"2"
>
<
input
type
=
"submit"
value
=
"Add Contact"
/>
</
td
>
</
tr
>
</
table
>
</
form:form
>
</
body
>
</
html
>
|
Here in above JSP, we have displayed a form. Note that the form is getting submitted to addContact.html page.
Adding Form and Controller in Spring 3
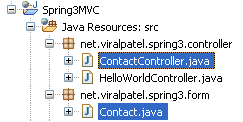
We will now add the logic in Spring 3 to display the form and fetch the values from it. For that we will create two java files. First the Contact.java which is nothing but the form to display/retrieve data from screen and second the ContactController.java which is the spring controller class.
File: net.viralpatel.spring3.form.Contact
|
01
02
03
04
05
06
07
08
09
10
11
|
package
net.viralpatel.spring3.form;
public
class
Contact {
private
String firstname;
private
String lastname;
private
String email;
private
String telephone;
//.. getter and setter for all above fields.
}
|
The above file is the contact form which holds the data from screen. Note that I haven’t showed the getter and setter methods. You can generate these methods by pressiong Alt + Shift + S, R.
File: net.viralpatel.spring3.controller.ContactController
|
01
02
03
04
05
06
07
08
09
10
11
12
13
14
15
16
17
18
19
20
21
22
23
24
25
26
27
28
29
30
31
32
|
package
net.viralpatel.spring3.controller;
import
net.viralpatel.spring3.form.Contact;
import
org.springframework.stereotype.Controller;
import
org.springframework.validation.BindingResult;
import
org.springframework.web.bind.annotation.ModelAttribute;
import
org.springframework.web.bind.annotation.RequestMapping;
import
org.springframework.web.bind.annotation.RequestMethod;
import
org.springframework.web.bind.annotation.SessionAttributes;
import
org.springframework.web.servlet.ModelAndView;
@Controller
@SessionAttributes
public
class
ContactController {
@RequestMapping
(value =
"/addContact"
, method = RequestMethod.POST)
public
String addContact(
@ModelAttribute
(
"contact"
)
Contact contact, BindingResult result) {
System.out.println(
"First Name:"
+ contact.getFirstname() +
"Last Name:"
+ contact.getLastname());
return
"redirect:contacts.html"
;
}
@RequestMapping
(
"/contacts"
)
public
ModelAndView showContacts() {
return
new
ModelAndView(
"contact"
,
"command"
,
new
Contact());
}
}
|
In above controller class, note that we have created two methods with Request Mapping /contacts and /addContact. The method showContacts() will be called when user request for a url contacts.html. This method will render a model with name “contact”. Note that in the ModelAndView object we have passed a blank Contact object with name “command”. The spring framework expects an object with name command if you are using
in your JSP file.
Also note that in method addContact() we have annotated this method with RequestMapping and passed an attribute method=”RequestMethod.POST”. Thus the method will be called only when user generates a POST method request to the url /addContact.html. We have annotated the argument Contact with annotation @ModelAttribute. This will binds the data from request to the object Contact. In this method we just have printed values of Firstname and Lastname and redirected the view to cotnacts.html.
That’s all folks
The form is completed now. Just run the application in eclipse by pression Alt + Shift + X, R. It will show the contact form. Just enter view values and press Add button. Once you press the button, it will print the firstname and lastname in sysout logs.
Download Source Code
Click here to download source code (7.43kb)
Moving on
In this article we learn how to create a form using Spring 3 MVC and display it in JSP. Also we learn how to retrieve the form values using ModelAttribute annotation. In next section we will go through form validations and different data conversion methods in Spring 3 MVC.