HypericHQ简介、Windows上HQ源码构建及环境安装
摘自:http://liu-hliang.iteye.com/blog/810949
一 Hyperic HQ 简介
(1)功能简介
Hyperic HQ 是一个开源的(General Public License,GPL授权)IT资源管理框架,让用户使用统一的界面来管理各种不同的IT资源的管理,Hyperic HQ 可以监控和管理:
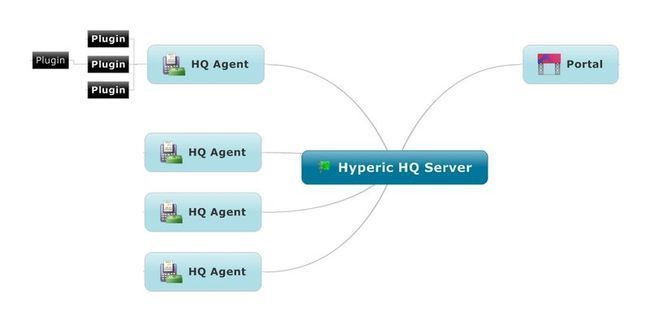
中心是一个HQ Server,一般安装在专门的服务器上,它接收来自安装在各个终端上的HQ Agent采集的数据,然后按照一种统一的方式展示在前端的HQ Portal上,并接收用户的管理指令,让用户通过web图形化的方式来监控和管理分布在网络上的不同的终端设备,同时提供了一种方便的plugin扩展机制让用户去扩展。
终端设备上的HQ Agent通过部署在自己内部的plugin(这里的plugin不同于Eclipse中的plugin,后续文章会做专门分析)组件进行设备数据的采集,一个HQ Agent上可以部署多个plugin,而每个plugin又可以引用别的plugin来完成数据的采集。
二 源码下载及构建
(1)源码下载
Hyperic HQ分开源版和企业版,企业版功能更强大丰富一些但是不提供源码,开源版的源码发布方式目前有三种:
- 直接发布源码包
- 通过Git发布
- 通过SVN发布
因此我们可以有三种方式来获取HQ的源码:
- 直接下载source package(http://www.springsource.com/landing/hyperic-open-source-download)
- 通过Git下载(git://git.springsource.org/hq/hq.git)
- 通过SVN 客户端下载(http://svn.hyperic.org/)
由于我们是要从源码从头构建来获取我们自己的二进制包,因此我们要用后两种方式来获取,后两种方式我都试验了一下,下载下来后通过日志发现SVN版的源码已经好久没人提交内容了,好像是已经没人维护了,而Git版的源码活跃度非常高,几乎天天都有提交新内容,可能是HQ的源码已经从SVN转移到Git来维护了吧,因此我们需要用第三种方式来下载源码了。Git的安装配置和使用可以参考我的这篇文章:Windows上Git的安装使用
2)构建
JDK 1.6、Maven 2.2.1、ANT 1.7.1
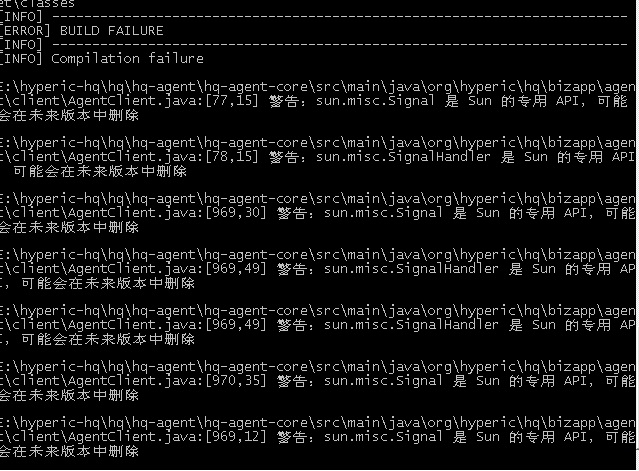
安装好以上所需软件后,进入源码主目录,用mvn clean install -Dmaven.test.skip=true 进行构建,我在构建时遇到以下异常:
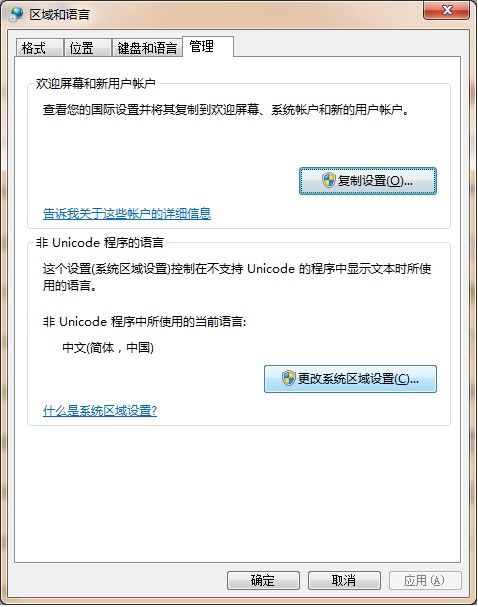
该异常是由于输出的警告中含有中文字符,导致maven构建失败,解决方法就是到控制面板的“区域和语言”中点击“管理”选项卡,然后点击右下角的”更改系统区域设置“:
三 环境安装
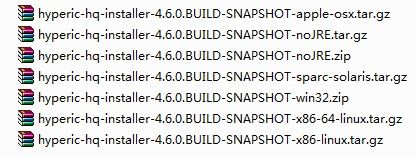
构建成功后在%HypericHQ%\dist\hyperic-hq-installer\target 目录中(%HypericHQ%是源码根目录位置)会看到各个平台和系统上的安装包:

将hyperic-hq-installer-4.6.0.BUILD-SNAPSHOT-win32.zip解压后双击里面的setup.bat进行HQ环境的安装,
在安装的一开始有时候会出现询问是否替换awt.dll,我们选择是,输入A:
- replace C:\Users\ThinkPad\AppData\Local\Temp/jre/bin/awt.dll? [y]es, [n]o, [A]ll, [N]one, [r]ename: A
replace C:\Users\ThinkPad\AppData\Local\Temp/jre/bin/awt.dll? [y]es, [n]o, [A]ll, [N]one, [r]ename: A
回车后安装程序接着会询问要安装server端还是要安装agent端:
- Please ignore references to missing tools.jar
- Unable to locate tools.jar. Expected to find it in C:\Users\ThinkPad\AppData\Local\Temp\lib\tools.jar
- Buildfile: D:\hyperic-hq-installer-4.6.0.BUILD-SNAPSHOT\installer\bin\..\data\setup.xml
- Loading taskdefs...
- Taskdefs loaded
- Initializing Hyperic HQ 4.6.0.BUILD-SNAPSHOT Installation...
- Choose which software to install:
- 1: Hyperic HQ Server
- 2: Hyperic HQ Agent
- You may enter multiple choices, separated by commas.
Please ignore references to missing tools.jar
Unable to locate tools.jar. Expected to find it in C:\Users\ThinkPad\AppData\Local\Temp\lib\tools.jar
Buildfile: D:\hyperic-hq-installer-4.6.0.BUILD-SNAPSHOT\installer\bin\..\data\setup.xml
Loading taskdefs...
Taskdefs loaded
Initializing Hyperic HQ 4.6.0.BUILD-SNAPSHOT Installation...
Choose which software to install:
1: Hyperic HQ Server
2: Hyperic HQ Agent
You may enter multiple choices, separated by commas.
这里我们server端和agent端都要安装,所以输入”1,2“,回车后会询问你的安装目录,我们输入一个已经存在的位置,如d:\hq,
- HQ server installation path [default 'C:\Program Files']:d:\hq
HQ server installation path [default 'C:\Program Files']:d:\hq
回车后接着会要求输入数据库的加密密钥,这里我们输入12345678:
- Enter an encryption key to use to encrypt the database password.:
- 12345678
Enter an encryption key to use to encrypt the database password.:
12345678
待出现以下内容时说明安装已经完成:
- Setup completed.
- A copy of the output shown above has been saved to:
- D:\hyperic-hq-installer-4.6.0.BUILD-SNAPSHOT\installer\logs\hq-install.log
- Press the Enter key to exit setup.
Setup completed.
A copy of the output shown above has been saved to:
  D:\hyperic-hq-installer-4.6.0.BUILD-SNAPSHOT\installer\logs\hq-install.log

Press the Enter key to exit setup.
输入回车后安装窗口会自动关闭,然后我们在cmd中进入D:\hq\server-4.6.0.BUILD-SNAPSHOT\bin目录下,执行以下命令将HQServer作为windows服务安装到windows系统中,这样以后我们就可以通过启停windows服务方式来管理HQServer了:
- D:\hq\server-4.6.0.BUILD-SNAPSHOT\bin>hq-server.bat install
- wrapper | Hyperic HQ Server installed.
- D:\hq\server-4.6.0.BUILD-SNAPSHOT\bin>
D:\hq\server-4.6.0.BUILD-SNAPSHOT\bin>hq-server.bat install
wrapper  | Hyperic HQ Server installed.

D:\hq\server-4.6.0.BUILD-SNAPSHOT\bin>
然后输入“hq-server.bat start”将HQServer启动起来:
- D:\hq\server-4.6.0.BUILD-SNAPSHOT\bin>hq-server.bat start
- wrapper | Starting the Hyperic HQ Server service...
- wrapper | Hyperic HQ Server started.
- D:\hq\server-4.6.0.BUILD-SNAPSHOT\bin>
D:\hq\server-4.6.0.BUILD-SNAPSHOT\bin>hq-server.bat start
wrapper  | Starting the Hyperic HQ Server service...
wrapper  | Hyperic HQ Server started.

D:\hq\server-4.6.0.BUILD-SNAPSHOT\bin>
同样的方法进入D:\hq\agent-4.6.0.BUILD-SNAPSHOT\bin目录将HQAgent安装并启动起来,Agent在第一次启动时要进行一些配置如下所示:
- D:\hq\agent-4.6.0.BUILD-SNAPSHOT\bin>hq-agent.bat install
- wrapper | Hyperic HQ Agent installed.
- D:\hq\agent-4.6.0.BUILD-SNAPSHOT\bin>hq-agent.bat start
- wrapper | Starting the Hyperic HQ Agent service...
- wrapper | Hyperic HQ Agent started.
- WARNING: Default charset GBK not supported, using ISO-8859-1 instead
- [ Running agent setup ]
- What is the HQ server IP address: 192.168.80.26
- Should Agent communications to HQ always be secure [default=no]:
- What is the HQ server port [default=7080]: 8080
- - Testing insecure connection ... Success
- What is your HQ login [default=hqadmin]:
- What is your HQ password: #此处输入HQServer的登录密码,默认是hqadmin
- What IP should HQ use to contact the agent [default=192.168.80.26]:
- What port should HQ use to contact the agent [default=2144]:
- - Received temporary auth token from agent
- - Registering agent with HQ
- - HQ gave us the following agent token
- 1289704636238-6857093313778729522-2717720819577533419
- - Informing agent of new HQ server
- - Validating
- - Successfully setup agent
- D:\hq\agent-4.6.0.BUILD-SNAPSHOT\bin>
D:\hq\agent-4.6.0.BUILD-SNAPSHOT\bin>hq-agent.bat install
wrapper  | Hyperic HQ Agent installed.

D:\hq\agent-4.6.0.BUILD-SNAPSHOT\bin>hq-agent.bat start
wrapper  | Starting the Hyperic HQ Agent service...
wrapper  | Hyperic HQ Agent started.
WARNING: Default charset GBK not supported, using ISO-8859-1 instead
[ Running agent setup ]
What is the HQ server IP address: 192.168.80.26
Should Agent communications to HQ always be secure [default=no]:
What is the HQ server port     [default=7080]: 8080
- Testing insecure connection ... Success
What is your HQ login [default=hqadmin]:
What is your HQ password:         #此处输入HQServer的登录密码,默认是hqadmin
What IP should HQ use to contact the agent [default=192.168.80.26]:
What port should HQ use to contact the agent [default=2144]:
- Received temporary auth token from agent
- Registering agent with HQ
- HQ gave us the following agent token
    1289704636238-6857093313778729522-2717720819577533419
- Informing agent of new HQ server
- Validating
- Successfully setup agent

D:\hq\agent-4.6.0.BUILD-SNAPSHOT\bin> 然后打开浏览器,访问http://localhost:8080,输入用户名和密码(hqadmin:hqadmin),会看到HQServer的监控Portal平台:
总结:至此,HQServer从源码下载、构建到安装配置、运行都已经完成了,HQ的监控平台中各个面板的含义、HQ的插件如何扩展、 HQ插件的运行机制等等有时间的话会陆续补充!


