声明:本系列都是原创内容,觉得好就顶一个,让更多人知道!!写博客不容易,写原创更不容易!!
6.5、请求映射
处理器定义好了,那接下来我们应该定义功能处理方法,接收用户请求处理并选择视图进行渲染。首先我们看一下图6-1:

http请求信息包含六部分信息:
①请求方法,如GET或POST,表示提交的方式;
②URL,请求的地址信息;
③协议及版本;
④请求头信息(包括Cookie信息);
⑤回车换行(CRLF);
⑥请求内容区(即请求的内容或数据),如表单提交时的参数数据、URL请求参数(?abc=123 ?后边的)等。
想要了解HTTP/1.1协议,请访问http://tools.ietf.org/html/rfc2616。
那此处我们可以看到有①、②、④、⑥一般是可变的,因此我们可以这些信息进行请求到处理器的功能处理方法的映射,因此请求的映射分为如下几种:
URL路径映射:使用URL映射请求到处理器的功能处理方法;
请求方法映射限定:如限定功能处理方法只处理GET请求;
请求参数映射限定:如限定只处理包含“abc”请求参数的请求;
请求头映射限定:如限定只处理“Accept=application/json”的请求。
接下来看看具体如何映射吧。
6.5.1、URL路径映射
6.5.1.1、普通URL路径映射
@RequestMapping(value={"/test1", "/user/create"}):多个URL路径可以映射到同一个处理器的功能处理方法。
6.5.1.2、URI模板模式映射
@RequestMapping(value="/users/{userId}"):{×××}占位符, 请求的URL可以是 “/users/123456”或
“/users/abcd”,通过6.6.5讲的通过@PathVariable可以提取URI模板模式中的{×××}中的×××变量。
@RequestMapping(value="/users/{userId}/create"):这样也是可以的,请求的URL可以是“/users/123/create”。
@RequestMapping(value="/users/{userId}/topics/{topicId}"):这样也是可以的,请求的URL可以是“/users/123/topics/123”。
6.5.1.3、Ant风格的URL路径映射
@RequestMapping(value="/users/**"):可以匹配“/users/abc/abc”,但“/users/123”将会被【URI模板模式映射中的“/users/{userId}”模式优先映射到】【详见4.14的最长匹配优先】。
@RequestMapping(value="/product?"):可匹配“/product1”或“/producta”,但不匹配“/product”或“/productaa”;
@RequestMapping(value="/product*"):可匹配“/productabc”或“/product”,但不匹配“/productabc/abc”;
@RequestMapping(value="/product/*"):可匹配“/product/abc”,但不匹配“/productabc”;
@RequestMapping(value="/products/**/{productId}"):可匹配“/products/abc/abc/123”或“/products/123”,也就是Ant风格和URI模板变量风格可混用;
此处需要注意的是【4.14中提到的最长匹配优先】,Ant风格的模式请参考4.14。
6.5.1.4、正则表达式风格的URL路径映射
从Spring3.0开始支持正则表达式风格的URL路径映射,格式为{变量名:正则表达式},这样我们就可以通过6.6.5讲的通过@PathVariable提取模式中的{×××:正则表达式匹配的值}中的×××变量了。
@RequestMapping(value="/products/{categoryCode:\\d+}-{pageNumber:\\d+}"):可以匹配“/products/123-1”,但不能匹配“/products/abc-1”,这样可以设计更加严格的规则。
正则表达式风格的URL路径映射是一种特殊的URI模板模式映射:
URI模板模式映射是{userId},不能指定模板变量的数据类型,如是数字还是字符串;
正则表达式风格的URL路径映射,可以指定模板变量的数据类型,可以将规则写的相当复杂。
6.5.1.5、组合使用是“或”的关系
如 @RequestMapping(value={"/test1", "/user/create"}) 组合使用是或的关系,即“/test1”或“/user/create”请求URL路径都可以映射到@RequestMapping指定的功能处理方法。
以上URL映射的测试类为:cn.javass.chapter6.web.controller.mapping.MappingController.java。
到此,我们学习了Spring Web MVC提供的强大的URL路径映射,而且可以实现非常复杂的URL规则。Spring Web MVC不仅仅提供URL路径映射,还提供了其他强大的映射规则。接下来我们看一下请求方法映射限定吧。
6.5.2、请求方法映射限定
一般我们熟悉的表单一般分为两步:第一步展示,第二步提交,如4.9、SimpleFormController那样,那如何通过@RequestMapping来实现呢?
6.5.2.1、请求方法映射限定
我们熟知的,展示表单一般为GET请求方法;提交表单一般为POST请求方法。但6.5.1节讲的URL路径映射方式对任意请求方法是全盘接受的,因此我们需要某种方式来告诉相应的功能处理方法只处理如GET请求方法的请求或POST请求方法的请求。
接下来我们使用@RequestMapping来实现SimpleFormController的功能吧。
- package cn.javass.chapter6.web.controller.method;
- //省略import
- @Controller
- @RequestMapping("/customers/**") //①处理器的通用映射前缀
- public class RequestMethodController {
- @RequestMapping(value="/create", method = RequestMethod.GET)//②类级别的@RequestMapping窄化
- public String showForm() {
- System.out.println("===============GET");
- return "customer/create";
- }
- @RequestMapping(value="/create", method = RequestMethod.POST)//③类级别的@RequestMapping窄化
- public String submit() {
- System.out.println("================POST");
- return "redirect:/success";
- }
- }
package cn.javass.chapter6.web.controller.method;
//省略import
@Controller
@RequestMapping("/customers/**")                                     //①处理器的通用映射前缀
public class RequestMethodController {
    @RequestMapping(value="/create", method = RequestMethod.GET)//②类级别的@RequestMapping窄化
    public String showForm() {
        System.out.println("===============GET");
        return "customer/create";
    }
    @RequestMapping(value="/create", method = RequestMethod.POST)//③类级别的@RequestMapping窄化
    public String submit() {
        System.out.println("================POST");
        return "redirect:/success";
    }
}
①处理器的通用映射前缀(父路径):表示该处理器只处理匹配“/customers/**”的请求;
②对类级别的@RequestMapping进行窄化,表示showForm可处理匹配“/customers/**/create”且请求方法为“GET”的请求;
③对类级别的@RequestMapping进行窄化,表示submit可处理匹配“/customers/**/create”且请求方法为“POST”的请求。
6.5.2.2、组合使用是“或”的关系
@RequestMapping(value="/methodOr", method = {RequestMethod.POST, RequestMethod.GET}):即请求方法可以是 GET 或 POST。
提示:
1、一般浏览器只支持GET、POST请求方法,如想浏览器支持PUT、DELETE等请求方法只能模拟,稍候章节介绍。
2、除了GET、POST,还有HEAD、OPTIONS、PUT、DELETE、TRACE。
3、DispatcherServlet默认开启对 GET、POST、PUT、DELETE、HEAD的支持;
4、如果需要支持OPTIONS、TRACE,请添加DispatcherServlet在web.xml的初始化参数:dispatchOptionsRequest 和 dispatchTraceRequest 为true。
请求方法的详细使用请参考RESTful架构风格一章。
以上请求方法映射限定测试类为:cn.javass.chapter6.web.controller.method.RequestMethodController。
6.5.3、请求参数数据映射限定
6.5.3.1、请求数据中有指定参数名
- package cn.javass.chapter6.web.controller.parameter;
- //省略import
- @Controller
- @RequestMapping("/parameter1") //①处理器的通用映射前缀
- public class RequestParameterController1 {
- //②进行类级别的@RequestMapping窄化
- @RequestMapping(params="create", method=RequestMethod.GET)
- public String showForm() {
- System.out.println("===============showForm");
- return "parameter/create";
- }
- //③进行类级别的@RequestMapping窄化
- @RequestMapping(params="create", method=RequestMethod.POST)
- public String submit() {
- System.out.println("================submit");
- return "redirect:/success";
- }
- }
package cn.javass.chapter6.web.controller.parameter;
//省略import
@Controller
@RequestMapping("/parameter1")                                      //①处理器的通用映射前缀
public class RequestParameterController1 {
    //②进行类级别的@RequestMapping窄化
    @RequestMapping(params="create", method=RequestMethod.GET)
    public String showForm() {
        System.out.println("===============showForm");
        return "parameter/create";
    }
    //③进行类级别的@RequestMapping窄化
    @RequestMapping(params="create", method=RequestMethod.POST)
    public String submit() {
        System.out.println("================submit");
        return "redirect:/success";
    }
}
②@RequestMapping(params="create", method=RequestMethod.GET) :表示请求中有“create”的参数名且请求方法为“GET”即可匹配,如可匹配的请求URL“http://×××/parameter1?create”;
③@RequestMapping(params="create", method=RequestMethod.POST):表示请求中有“create”的参数名且请求方法为“POST”即可匹配;
此处的create请求参数名表示你请求的动作,即你想要的功能的一个标识,常见的CRUD(增删改查)我们可以使用如下请求参数名来表达:
◇(create请求参数名 且 GET请求方法) 新增页面展示、(create请求参数名 且 POST请求方法)新增提交;
◇(update请求参数名 且 GET请求方法) 新增页面展示、(update请求参数名 且 POST请求方法)新增提交;
◇(delete请求参数名 且 GET请求方法) 新增页面展示、(delete请求参数名 且 POST请求方法)新增提交;
◇(query请求参数名 且 GET请求方法) 新增页面展示、(query请求参数名 且 POST请求方法) 新增提交;
◇(list请求参数名 且 GET请求方法) 列表页面展示;
◇(view请求参数名 且 GET请求方法) 查看单条记录页面展示。
6.5.3.2、请求数据中没有指定参数名
- //请求参数不包含 create参数名
- @RequestMapping(params="!create", method=RequestMethod.GET)//进行类级别的@RequestMapping窄化
//请求参数不包含 create参数名
@RequestMapping(params="!create", method=RequestMethod.GET)//进行类级别的@RequestMapping窄化
@RequestMapping(params="!create", method=RequestMethod.GET):表示请求中没有“create”参数名且请求方法为“GET”即可匹配,如可匹配的请求URL“http://×××/parameter1?abc”。
6.5.3.3、请求数据中指定参数名=值
- package cn.javass.chapter6.web.controller.parameter;
- //省略import
- @Controller
- @RequestMapping("/parameter2") //①处理器的通用映射前缀
- public class RequestParameterController2 {
- //②进行类级别的@RequestMapping窄化
- @RequestMapping(params="submitFlag=create", method=RequestMethod.GET)
- public String showForm() {
- System.out.println("===============showForm");
- return "parameter/create";
- }
- //③进行类级别的@RequestMapping窄化
- @RequestMapping(params="submitFlag=create", method=RequestMethod.POST)
- public String submit() {
- System.out.println("===============submit");
- return "redirect:/success";
- }
- }
package cn.javass.chapter6.web.controller.parameter;
//省略import
@Controller
@RequestMapping("/parameter2")                      //①处理器的通用映射前缀
public class RequestParameterController2 {
    //②进行类级别的@RequestMapping窄化
    @RequestMapping(params="submitFlag=create", method=RequestMethod.GET)
    public String showForm() {
        System.out.println("===============showForm");
        return "parameter/create";
    }
    //③进行类级别的@RequestMapping窄化
    @RequestMapping(params="submitFlag=create", method=RequestMethod.POST)
    public String submit() {
        System.out.println("===============submit");
        return "redirect:/success";
    }
}
②@RequestMapping(params="submitFlag=create", method=RequestMethod.GET):表示请求中有“submitFlag=create”请求参数且请求方法为“GET”即可匹配,如请求URL为http://×××/parameter2?submitFlag=create;
③@RequestMapping(params="submitFlag=create", method=RequestMethod.POST):表示请求中有“submitFlag=create”请求参数且请求方法为“POST”即可匹配;
此处的submitFlag=create请求参数表示你请求的动作,即你想要的功能的一个标识,常见的CRUD(增删改查)我们可以使用如下请求参数名来表达:
◇(submitFlag=create请求参数名 且 GET请求方法) 新增页面展示、(submitFlag=create请求参数名 且 POST请求方法) 新增提交;
◇(submitFlag=update请求参数名 且 GET请求方法) 新增页面展示、(submitFlag=update请求参数名 且 POST请求方法) 新增提交;
◇(submitFlag=delete请求参数名 且 GET请求方法) 新增页面展示、(submitFlag=delete请求参数名 且 POST请求方法) 新增提交;
◇(submitFlag=query请求参数名 且 GET请求方法) 新增页面展示、(submitFlag=query请求参数名 且 POST请求方法) 新增提交;
◇(submitFlag=list请求参数名 且 GET请求方法) 列表页面展示;
◇(submitFlag=view请求参数名 且 GET请求方法) 查看单条记录页面展示。
6.5.3.4、请求数据中指定参数名!=值
- //请求参数submitFlag 不等于 create
- @RequestMapping(params="submitFlag!=create", method=RequestMethod.GET)
//请求参数submitFlag 不等于 create
@RequestMapping(params="submitFlag!=create", method=RequestMethod.GET)
@RequestMapping(params="submitFlag!=create", method=RequestMethod.GET):表示请求中的参数“submitFlag!=create”且请求方法为“GET”即可匹配,如可匹配的请求URL“http://×××/parameter1?submitFlag=abc”。
6.5.3.5、组合使用是“且”的关系
- @RequestMapping(params={"test1", "test2=create"}) //②进行类级别的@RequestMapping窄化
@RequestMapping(params={"test1", "test2=create"}) //②进行类级别的@RequestMapping窄化
@RequestMapping(params={"test1", "test2=create"}):表示请求中的有“test1”参数名 且 有“test2=create”参数即可匹配,如可匹配的请求URL“http://×××/parameter3?test1&test2=create。
以上请求参数数据映射限定测试类为:cn.javass.chapter6.web.controller.method包下的RequestParameterController1、RequestParameterController2、RequestParameterController3。
6.5.4、请求头数据映射限定
6.5.4.1、准备环境
浏览器:建议chrome最新版本;
插件:ModHeader
安装地址:https://chrome.google.com/webstore/detail/idgpnmonknjnojddfkpgkljpfnnfcklj
插件安装步骤:
1、打开https://chrome.google.com/webstore/detail/idgpnmonknjnojddfkpgkljpfnnfcklj,如图6-2
图6-2
2、点击“添加至chrome”后弹出“确认安装”对话框,点击“安装”按钮即可,如图6-3:
图6-3
3、安装成功后,在浏览器右上角出现如图6-4的图标表示安装成功:
图6-4
4、鼠标右击右上角的“Modify Header”图标,选择选项,打开如图6-5:
图6-5
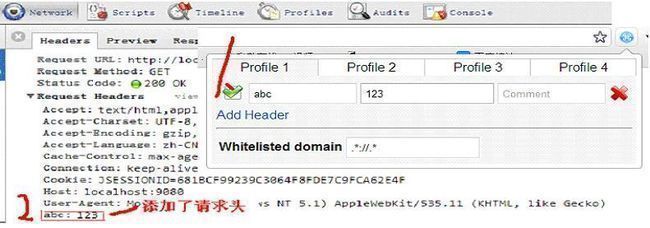
7、修改完成后,输入URL请求,你可以在chrome的“开发人员工具的”网络选项卡下,看到如图6-7的信息表示添加请求头成功了:
图6-7
到此我们的工具安装完毕,接下来看看如何使用请求头数据进行映射限定。
6.5.4.2、请求头数据中有指定参数名
@RequestMapping(value="/header/test1", headers = "Accept"):表示请求的URL必须为“/header/test1”
且 请求头中必须有Accept参数才能匹配。
@RequestMapping(value="/header/test1", headers = "abc"):表示请求的URL必须为“/header/test1”
且 请求头中必须有abc参数才能匹配,如图6-8时可匹配。
图6-8
6.5.4.3、请求头数据中没有指定参数名
@RequestMapping(value="/header/test2", headers = "!abc"):表示请求的URL必须为“/header/test2”
且 请求头中必须没有abc参数才能匹配。(将Modify Header的abc参数值删除即可)。
6.5.4.4、请求头数据中指定参数名=值
@RequestMapping(value="/header/test3", headers = "Content-Type=application/json"):表示请求的URL必须为“/header/test3” 且 请求头中必须有“Content-Type=application/json”参数即可匹配。(将Modify Header的Content-Type参数值改为“application/json”即可);
当你请求的URL为“/header/test3” 但 如果请求头中没有或不是“Content-Type=application/json”参数(如“text/html”其他参数),将返回“HTTP Status 415”状态码【表示不支持的媒体类型(Media Type),也就是MIME类型】,即我们的功能处理方法只能处理application/json的媒体类型。
@RequestMapping(value="/header/test4", headers = "Accept=application/json"):表示请求的URL必须为“/header/test4” 且 请求头中必须有“Accept =application/json”参数即可匹配。(将Modify Header的Accept参数值改为“application/json”即可);
当你请求的URL为“/header/test4” 但 如果请求头中没有“Accept=application/json”参数(如“text/html”其他参数),将返回“HTTP Status 406”状态码【不可接受,服务器无法根据Accept头的媒体类型为客户端生成响应】,即客户只接受“application/json”媒体类型的数据,即我们的功能处理方法的响应只能返回“application/json”媒体类型的数据。
@RequestMapping(value="/header/test5", headers = "Accept=text/*") :表示请求的URL必须为“/header/test5” 且 请求头中必须有如“Accept=text/plain”参数即可匹配。(将Modify Header的Accept参数值改为“text/plain”即可);
Accept=text/*:表示主类型为text,子类型任意,如“text/plain”、“text/html”等都可以匹配。
@RequestMapping(value="/header/test6", headers = "Accept=*/*") :表示请求的URL必须为“/header/test6” 且 请求头中必须有任意Accept参数即可匹配。(将Modify Header的Accept参数值改为“text/html”或“application/xml”等都可以)。
Accept=*/*:表示主类型任意,子类型任意,如“text/plain”、“application/xml”等都可以匹配。
6.5.4.5、请求头数据中指定参数名!=值
@RequestMapping(value="/header/test7", headers = "Accept!=text/vnd.wap.wml"):表示请求的URL必须为“/header/test7” 且 请求头中必须有“Accept”参数但值不等于“text/vnd.wap.wml”即可匹配。
6.5.4.6、组合使用是“且”的关系
@RequestMapping(value="/header/test8", headers = {"Accept!=text/vnd.wap.wml","abc=123"}):表示请求的URL必须为“/header/test8” 且 请求头中必须有“Accept”参数但值不等于“text/vnd.wap.wml”且 请求中必须有参数“abc=123”即可匹配。
注:Accept:text/html,application/xhtml+xml,application/xml;q=0.9,*/*;q=0.8
如果您的请求中含有Accept:“*/*”,则可以匹配功能处理方法上的如“text/html”、“text/*”,“application/xml”等。


