如何使用Cairngorm3的导航库(Spring AS)
一、概述
二、LIB库包配置
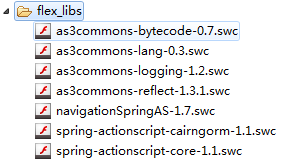
- 下载需要的LIB库
- 设置编译属性
打开工程属性选择 Flex 编译器选项卡,在“附加的编译器参数”添加“ -include-libraries flex_libs/as3commons-reflect-1.3.1.swc flex_libs/as3commons-lang-0.3.swc flex_libs/as3commons-logging-1.2.swc ”。将依赖包添加到编译器里面编译,这样在启动时才能使用Spring AS。
三、定义导航点 ContentDestination
package cn.com.enboga.scdemo.core.application
{
	public class ContentDestination
	{
		public static const LOGIN:String = "content.login";

		public static const MAIN:String = "content.main";
		public static const MAIN_TRUE:String = "content.main.true";
		public static const MAIN_FALSE:String = "content.main.false";
	}
}
四、设置导航器,并设置导航点
在导航器里面需要定义元数据
[Waypoint]设置为导航器,然后设置每个导航点的
automationName为上面定义的导航点名称。这样导航点时候可以根据这个名字导航到这个导航点上。
<?xml version="1.0" encoding="utf-8"?>
<mx:ViewStack xmlns:fx="http://ns.adobe.com/mxml/2009"
			  xmlns:s="library://ns.adobe.com/flex/spark"
			  xmlns:mx="library://ns.adobe.com/flex/mx" width="100%" height="100%"
			  xmlns:main="cn.com.enboga.scdemo.core.presentation.main.*"
			  xmlns:login="cn.com.enboga.scdemo.core.presentation.login.*">
	<fx:Metadata>
		[Waypoint]
	</fx:Metadata>

	<fx:Script>
		<![CDATA[
			import cn.com.enboga.scdemo.core.application.ContentDestination;
		]]>
	</fx:Script>

	<s:NavigatorContent width="100%"
						height="100%"
						automationName="{ ContentDestination.LOGIN }">
		<login:UILoginGroup  />
	</s:NavigatorContent>

	<s:NavigatorContent width="100%"
						height="100%"
						automationName="{ ContentDestination.MAIN }">
		<main:UIMainGroup  />
	</s:NavigatorContent>
</mx:ViewStack>
五、接下来为导航器定义一个PM
navigateTo 方法传入导航点名称,就可以导航定位到该导航点
package cn.com.enboga.scdemo.core.presentation
{
	import com.adobe.cairngorm.LogUtil;
	import com.adobe.cairngorm.navigation.NavigationEvent;
	import com.adobe.cairngorm.navigation.state.ISelectedIndex;

	import mx.logging.ILogger;

	import org.springextensions.actionscript.core.event.EventBus;

	[Landmark(name="content")]
	public class ContentPM implements ISelectedIndex
	{
		private static const LOG:ILogger = LogUtil.getLogger(ContentPM);


		[Bindable]
		/** 导航索引 */
		public var selectedIndex:int;

		[Enter(time="first")]
		public function firstEnter():void
		{
			LOG.info("content:FirstEnter");
		}

		[Enter(time="next")]
		public function enter():void
		{
			LOG.info("content:Enter");
		}

		[Exit]
		public function exit():void
		{
			LOG.info("content:Exit");
		}

		/** 导航到destination */
		public function navigateTo(destination:String):void
		{
			EventBus.dispatchEvent(NavigationEvent.createNavigateToEvent(destination));
		}

		/** 导航到destination */
		public function navigateAway(destination:String):void
		{
			EventBus.dispatchEvent(NavigationEvent.createNavigateAwayEvent(destination));
		}
	}
}
六、将导航器组件加入到Spring AS 配置文件
- 定义配置文件
<?xml version="1.0" encoding="utf-8"?>
<Objects xmlns:mx="http://www.adobe.com/2006/mxml"
		 xmlns="http://www.springactionscript.org/mxml/config"
		 xmlns:application="cn.com.enboga.scdemo.core.application.*"
		 xmlns:presentation="cn.com.enboga.scdemo.core.presentation.*"
		 xmlns:stage="org.springextensions.actionscript.stage.*"
		 xmlns:config="org.springextensions.actionscript.ioc.factory.config.*"
		 xmlns:cairngorm="http://ns.adobe.com/cairngorm"
		 xmlns:main="cn.com.enboga.scdemo.core.presentation.main.*"
		 xmlns:login="cn.com.enboga.scdemo.core.presentation.login.*">

	<!-- Presentation -->
	<presentation:ContentPM />

	<!-- Application -->

	<!-- Infrastructure -->

	<!--Spring AS specific initializations-->
	<stage:DefaultAutowiringStageProcessor/>
	<config:EventHandlerMetadataProcessor/>


	<cairngorm:NavigationAdaptor/>
	<cairngorm:FirstEnterProcessor/>
	<cairngorm:EveryEnterProcessor/>
	<cairngorm:NextEnterProcessor/>
	<cairngorm:ExitProcessor/>
	<cairngorm:LandmarkProcessor/>
	<cairngorm:WaypointProcessor/>

	<cairngorm:WaypointHistory id="contentHistory">
		<mx:String>content</mx:String>
	</cairngorm:WaypointHistory>

	<cairngorm:GlobalHistory id="globalHistory"/>
</Objects>
- 加载配置文件,这里是使用的是MXML的加载模式,也可以使用配置文件的加载模式。
同时把导航器放入主容器里面。<?xml version="1.0" encoding="utf-8"?> <s:Application xmlns:fx="http://ns.adobe.com/mxml/2009" xmlns:s="library://ns.adobe.com/flex/spark" xmlns:mx="library://ns.adobe.com/flex/mx" xmlns:cairngorm="com.adobe.cairngorm.*" minWidth="955" minHeight="600" creationComplete="creationCompleteHandler()" xmlns:presentation="cn.com.enboga.scdemo.core.presentation.*"> <fx:Script> <![CDATA[ import cn.com.enboga.scdemo.ContentContext; import cn.com.enboga.scdemo.core.presentation.UIContentViewStack; import mx.controls.Alert; import mx.events.FlexEvent; import mx.logging.LogEventLevel; import org.springextensions.actionscript.context.support.FlexXMLApplicationContext; import org.springextensions.actionscript.context.support.MXMLApplicationContext; /** Spring 上下文 */ private var _appContext:FlexXMLApplicationContext = new FlexXMLApplicationContext(); private var appContext:MXMLApplicationContext; /** 初始化 */ protected function creationCompleteHandler():void { // _appContext = new FlexXMLApplicationContext(); // _appContext.addConfigLocation("config/application-context.xml"); // _appContext.addEventListener(Event.COMPLETE, applicationContext_completeHandler); // _appContext.addEventListener(IOErrorEvent.IO_ERROR, applicationContext_ioErrorHandler); // _appContext.load(); appContext = new MXMLApplicationContext(ContentContext); appContext.load(); } /** Spring 配置文件初始化完成后执行 */ private function applicationContext_completeHandler(event:Event):void { this.addElement(new UIContentViewStack()); } /** Spring 配置文件初始化错误 */ private function applicationContext_ioErrorHandler(event:IOErrorEvent):void { Alert.show("读取StringAS配置文件出错!", "错误"); } ]]> </fx:Script> <fx:Declarations> <!-- 定义日志 --> <mx:TraceTarget level="{ LogEventLevel.ALL }" includeCategory="true"> <mx:filters> <fx:Array> <fx:String>com.adobe.cairngorm.*</fx:String> <fx:String>cn.com.enboga.scdemo.*</fx:String> </fx:Array> </mx:filters> </mx:TraceTarget> </fx:Declarations> <presentation:UIContentViewStack /> </s:Application>
七、在导航点里面导航到其他导航点
- UILoginGroup.mxml
<?xml version="1.0" encoding="utf-8"?>
<s:VGroup xmlns:fx="http://ns.adobe.com/mxml/2009"
		 xmlns:s="library://ns.adobe.com/flex/spark"
		 xmlns:mx="library://ns.adobe.com/flex/mx" width="400" height="300">

	<fx:Script>
		<![CDATA[
			import cn.com.enboga.scdemo.core.application.ContentDestination;
			import cn.com.enboga.scdemo.core.presentation.ContentPM;

			[Bindable]
			[Autowired]
			public var contentPM:ContentPM;
		]]>
	</fx:Script>

	<s:Button label="首页" click="contentPM.navigateTo(ContentDestination.MAIN)" />
	<s:Button label="true" click="contentPM.navigateTo(ContentDestination.MAIN_TRUE)" />
	<s:Button label="false" click="contentPM.navigateTo(ContentDestination.MAIN_FALSE)" />
</s:VGroup>
- UIMainGroup.mxml
<?xml version="1.0" encoding="utf-8"?>
<s:VGroup xmlns:fx="http://ns.adobe.com/mxml/2009"
		 xmlns:s="library://ns.adobe.com/flex/spark"
		 xmlns:mx="library://ns.adobe.com/flex/mx" width="400" height="300"
		 xmlns:main="cn.com.enboga.scdemo.core.presentation.main.*">
	<fx:Script>
		<![CDATA[
			import cn.com.enboga.scdemo.core.application.ContentDestination;
			import cn.com.enboga.scdemo.core.presentation.ContentPM;

			[Bindable]
			[Autowired]
			public var contentPM:ContentPM;
		]]>
	</fx:Script>

	<s:Button label="返回登录" click="contentPM.navigateTo(ContentDestination.LOGIN)" />
	<s:Button label="true" click="contentPM.navigateTo(ContentDestination.MAIN_TRUE)" />
	<s:Button label="false" click="contentPM.navigateTo(ContentDestination.MAIN_FALSE)" />

	<main:UIMainViewStack />
</s:VGroup>
- UIMainViewStack.mxml
<?xml version="1.0" encoding="utf-8"?>
<mx:ViewStack xmlns:fx="http://ns.adobe.com/mxml/2009"
			  xmlns:s="library://ns.adobe.com/flex/spark"
			  xmlns:mx="library://ns.adobe.com/flex/mx" width="400" height="300">
	<fx:Metadata>
		[Waypoint]
	</fx:Metadata>

	<fx:Script>
		<![CDATA[
			import cn.com.enboga.scdemo.core.application.ContentDestination;
		]]>
	</fx:Script>

	<s:NavigatorContent width="100%"
						height="100%"
						automationName="{ ContentDestination.MAIN_TRUE }">
		<s:Label text="MAIN_TRUE" />
	</s:NavigatorContent>

	<s:NavigatorContent width="100%"
						height="100%"
						automationName="{ ContentDestination.MAIN_FALSE }">
		<s:Label text="MAIN_FALSE" />
	</s:NavigatorContent>
</mx:ViewStack>
