Confluence3.4.5的安装&破解&汉化
1 下载 & 解压
1.1 下载
下载地址:
还是比较推荐使用 hotfile下载,一来免费,二来速度快,切记不要使用迅雷下载, hotfile 文件不支持迅雷的多线程下载。
1.2 解压
参考:
解压hotfile 下载下来大文件方法( for Atlassian )
解压后会得到
confluence-3.4-std.tar.gz和 iNViSiBLE 两个文件夹
我在安装的时候,官方已经出道了3.4.5 版本,所以我从官方网站重新下载了一个 confluence-3.4.5-std.tar.gz 版本的 confluence ,只要其中的 atlassian-extras- x.x. jar 的版本相同即可 (为破解做准备 )
$tarbag= /usr/local/src/tarbag
$software= /usr/local/src/ software
(纯属个人习惯,可根据个人需要给予修改)
# cd $tarbag /atlassian/confluence
将下载好的confluence-3.4.5-std.tar.gz 上传到以上目录
# tar zxvf confluence-3.4.5-std.tar.gz -C /usr/local/src/software/
# cd /usr/local/src/software/
# mkdir /www/atlassian/confluence/
# cp -rp confluence-3.4.5-std/ /www/atlassian/confluence/3.4.5
2修改配置文件
2.1 修改server.xml
$Install_Confluence= /www/atlassian/confluence/3.4.5
这里主要是修改端口号,confluence 默认端口号也是 8080 与 jira的默认端口冲突, 所以要将端口号修改为其它,这里我们将它修改为8090 ( server.xml 的目录 $CONFLUENCE/conf )
# vi $Install_Confluence/ conf/server.xml
<Connector className="org.apache.coyote.tomcat4.CoyoteConnector" port=" 8090 " minProcessors="5"
2 . 2 修改 confluence-init.properties
这里主要是添加一个存放配置数据的目录,在 $Install_Confluence 中建立confluence _home
# mkdir $Install_Confluence /confluence _home
# vi confluence/WEB-INF/classes/confluence-init.properties
将 confluence-init.properties 文件中的参数赋值如下:
confluence.home= /www/atlassian /confluence/ 3. 4.5 / confluence_home/
3安装 confluence & 配置mysql 连接
3.1安装 confluence
# $Install_Confluence /bin/startup.sh
启动后在 web浏览器中输入 http://IP:8090
1.然后点击在线生成一个评估 license
输入生成的license ,然后点击自定安装
2. 选择mysql 连接
3.直接 JDBC 连接
3 . 2 数据库连接准备工作
3.2.1 将mysql 驱动程序放到相应目录
将mysql 数据库于 java 连接的驱动 mysql-connector-java-5. 1 . 13 -bin.jar 拷贝到 $Install_Confluence /lib目录
# cd $ software/mysql-connector-java-5.1.13/
# cp mysql-connector-java-5. 1 . 13 -bin.jar $Install_Confluence /lib
3.2.2 建立confluence 的数据库
Mysql> create database confluence character set UTF8 ;
Mysql> grant all on confluence.* to confluence@ " % " identified by " confluence ";
Mysql> grant all on confluence.* to confluence@ "localhost" identified by " confluence ";
3.2.3 配置 JDBC 与mysql 的连接
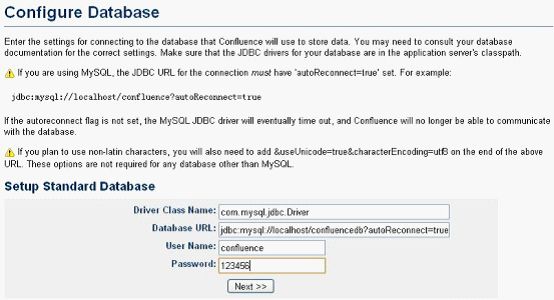
启动之后输入license key; 就可以配置 confluence 使用的数据库了,启动之后访问 http:// IP :8090
选择Custom installation à 选择Mysql à 点击 External Database à 选择Direct JDBC Connection 进入下面页面填写一下内容:
D river Class Name: com.musql.jdbc.Driver
Database U RL:jdbc:mysql://localhost/confluence?autoReconnect=true&useUnicode=true&characterEncoding=UTF-8
User Name: confluence
Password: c onfluence
confluence连接 mysql 的就配置完了;点击 next 进入下一个界面,继续配置;
文档参考: http://starsliao.blog.163.com/blog/static/8904820105162852372/
3.2.4配置 JNDI 连接 mysql
由于使用jdbc 在新版本中一直无法连接, confluence 一直报错
Configuring the database failed. Couldn't create the database schema.
没有办法,只好改用JNDI 连接,由于此前一直没有接触过 datasource ,所以也是抱着尝试的态度来研究研究。
http://confluence.fangwai.net/display/DOC/Configuring+a+MySQL+Datasource+in+Apache+Tomcat
http://confluence.atlassian.com/display/DOC/External+Database
在这还是要借鉴下fangwai 的文档来配置
主要参考以下内容修改:
1 If you are using the Standalone distribution. edit the conf/server.xml file in your Tomcat installation. Users running their own Tomcat instance must edit the xml file where they declared the Confluence Context descriptor.
2 If editing conf/server.xml, find the following lines:
<Context path="" docBase="../confluence" debug="0" reloadable="true">
<!-- Logger is deprecated in Tomcat 5.5. Logging configuration for Confluence is specified in confluence/WEB-INF/classes/log4j.properties -->
3 Within the Context tags, directly after the opening <Context.../> line, insert the DataSource Resource tag:
<Resource name="jdbc/confluence" auth="Container" type="javax.sql.DataSource"
username="yourusername"
password="yourpassword"
driverClassName="com.mysql.jdbc.Driver"
url="jdbc:mysql://localhost:3306/confluence?autoReconnect=true&useUnicode=true&characterEncoding=utf8"
maxActive="15"
maxIdle="7"
validationQuery="Select 1" />
· Replace the username and password parameters with the correct values for your database
· In the url parameter, replace the word 'confluence' with the name of the database your confluence data will be stored in.
· If you plan to use non-latin characters, you will also need to add "&useUnicode=true&characterEncoding=utf8" on the end of the above URL. These options are not required for any database other than MySQL.
简单讲一下我的做法,首先打开 $Install_Confluence /conf/server.xml
# $Install_Confluence /conf/server.xml
在<Context path="" docBase="../confluence" debug="0" reloadable=" true " useHttpOnly="true">下添加(上面的 reloadable 要将 false 改为 true 才行)
<Resource name="jdbc/confluence" auth="Container" type="javax.sql.DataSource"
username="confluence"
password="123456"
driverClassName="com.mysql.jdbc.Driver"
url="jdbc:mysql://localhost:3306/confluence?autoReconnect=true&useUnicode=true&characterEncoding=UTF-8"
maxActive="15"
maxIdle="7"
validationQuery="Select 1" />
修改完以后启动confluence ,按照破解流程往下做,在选择数据库连接方式时选择 JNDI
然后在输入框中填入
java:comp/env/jdbc/confluence
即可成功
4、 confluence破解
下载地址
http://down.51cto.com/data/155973
把下载的atlassian-extras-2. 4 .jar文件替换掉以下文件即可破解。
# cd $ tarbag/atlassian/confluence/
# cp atlassian-extras-2.4.jar $Install_Confluence /confluence/WEB-INF/lib/atlassian-extras-2.4.jar
具体的破解方法可参见 :
用admin账号进入Confluence Admin,点击左侧菜单的License Details可以看到类似如下视图:
5、 confluence 汉化
先下载汉化包
# cd /usr/local/src/tarbag/atlassian/confluence
下载地址:
将jar 包拷贝到 $install_confluence/confluence/WEB-INF/lib/ 下
然后重启confluence 即可
6、 confluence 自启动脚本
(详情请见 : Confluence自启动脚本 )
本文出自 “滕赖赖的技术小窝 ” 博客,转载请与作者联系!


