在WTP项目中无损加入Maven依赖管理
现在Eclipse的最新版本是3.6,现在的WTP功能也越来越大,相比MyEclipse那个庞然大物丝毫不逊色。之前在开发过程中都是手工维 护库的依赖,由于在项目中使用到Spring、OpenJPA、Freemarker等等,尤其是其中使用到的commons包,弄得不好就是版本不对或 者找不到class,一直想用Maven进行依赖的管理。但是m2eclipse插件很难与WTP结合,使用 eclipse:eclipse建立出来的WTP项目又与WTP默认的不一致,并且在tomcat调试的时候又非常的麻烦。由于我只是想简单的使用 Maven的包依赖管理,如果有可能在把war的生成加入就最好了。考虑到这两个功能相对简单,所以尝试了在现有WTP项目中无损的加入Maven的管理 功能。下面是过程的记录,在Ubuntu10.04 Eclipse3.6中测试成功。
1、安装m2eclipse
虽然问题多多,但是毕竟可以在eclipse里面使用
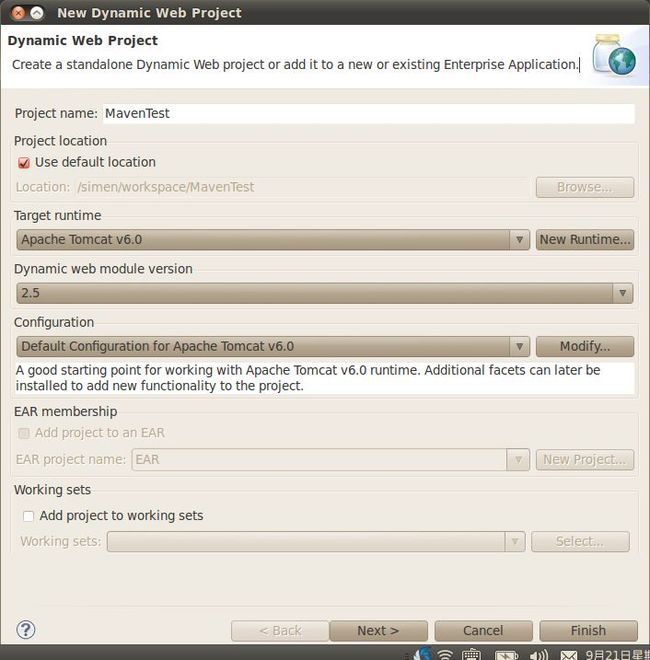
2、新建WTP项目
废话不多说,上张图而已
3、新建pom.xml文件
里面加入了我常用的一些包,大家不用可以删除。重点标注部分
<project xmlns="http://maven.apache.org/POM/4.0.0" xmlns:xsi="http://www.w3.org/2001/XMLSchema-instance" xsi:schemaLocation="http://maven.apache.org/POM/4.0.0 http://maven.apache.org/xsd/maven-4.0.0.xsd">
  <modelVersion>4.0.0</modelVersion>
  <groupId>com.strong</groupId>
  <artifactId>MavenTest</artifactId>
  <version>0.0.1-SNAPSHOT</version>
  <packaging>war</packaging>
  <dependencies>
    <dependency>
      <groupId>org.springframework</groupId>
      <artifactId>spring-aop</artifactId>
      <version>3.0.4.RELEASE</version>
      <type>jar</type>
      <scope>compile</scope>
    </dependency>
    <dependency>
      <groupId>mysql</groupId>
      <artifactId>mysql-connector-java</artifactId>
      <version>5.1.13</version>
      <type>jar</type>
      <scope>compile</scope>
    </dependency>
    <dependency>
      <groupId>org.springframework</groupId>
      <artifactId>spring-web</artifactId>
      <version>3.0.4.RELEASE</version>
      <type>jar</type>
      <scope>compile</scope>
    </dependency>
    <dependency>
      <groupId>org.springframework</groupId>
      <artifactId>spring-webmvc</artifactId>
      <version>3.0.4.RELEASE</version>
      <type>jar</type>
      <scope>compile</scope>
    </dependency>
    <dependency>
      <groupId>org.springframework.security</groupId>
      <artifactId>spring-security-core</artifactId>
      <version>3.0.3.RELEASE</version>
      <type>jar</type>
      <scope>compile</scope>
    </dependency>
    <dependency>
      <groupId>org.springframework.security</groupId>
      <artifactId>spring-security-web</artifactId>
      <version>3.0.3.RELEASE</version>
      <type>jar</type>
      <scope>compile</scope>
    </dependency>
    <dependency>
      <groupId>org.apache.openjpa</groupId>
      <artifactId>openjpa</artifactId>
      <version>2.0.1</version>
      <scope>compile</scope>
    </dependency>
    <dependency>
      <groupId>log4j</groupId>
      <artifactId>log4j</artifactId>
      <version>1.2.15</version>
      <scope>compile</scope>
    </dependency>
    <dependency>
      <groupId>commons-io</groupId>
      <artifactId>commons-io</artifactId>
      <version>1.4</version>
      <type>jar</type>
      <scope>compile</scope>
    </dependency>
    <dependency>
      <groupId>org.springframework</groupId>
      <artifactId>spring-orm</artifactId>
      <version>3.0.4.RELEASE</version>
      <type>jar</type>
      <scope>compile</scope>
    </dependency>
    <dependency>
      <groupId>org.freemarker</groupId>
      <artifactId>freemarker</artifactId>
      <version>2.3.16</version>
      <type>jar</type>
      <scope>compile</scope>
    </dependency>
  </dependencies>
<!-- =============================================== -->
  <build>
    <finalName>MavenTest</finalName>
    <directory>build</directory>
    <plugins>
      <plugin>
        <groupId>org.apache.maven.plugins</groupId>
        <artifactId>maven-war-plugin</artifactId>
        <configuration>
          <webappDirectory>WebContent</webappDirectory>
          <warSourceDirectory>WebContent</warSourceDirectory>
          <webXml>WebContent/WEB-INF/web.xml</webXml>
        </configuration>
        <version>2.1</version>
      </plugin>
    </plugins>
  </build>
<!-- =============================================== -->
</project>
4、修改项目根目录下的.project和.classpath文件
因为要把maven管理的包加入的路径中,所以手工修改内容如下:
.project 增加了标注部分
<?xml version="1.0" encoding="UTF-8"?>
<projectDescription>
  <name>MavenTest</name>
  <comment></comment>
  <projects>
  </projects>
  <buildSpec>
    <buildCommand>
      <name>org.eclipse.wst.jsdt.core.javascriptValidator</name>
      <arguments>
      </arguments>
    </buildCommand>
    <buildCommand>
      <name>org.eclipse.jdt.core.javabuilder</name>
      <arguments>
      </arguments>
    </buildCommand>
    <buildCommand>
      <name>org.eclipse.wst.common.project.facet.core.builder</name>
      <arguments>
      </arguments>
    </buildCommand>
    <buildCommand>
      <name>org.eclipse.wst.validation.validationbuilder</name>
      <arguments>
      </arguments>
    </buildCommand>
<!-- ========================================= -->
    <buildCommand>
      <name>org.maven.ide.eclipse.maven2Builder</name>
      <arguments>
      </arguments>
    </buildCommand>
<!-- ========================================= -->
  </buildSpec>
  <natures>
    <nature>org.eclipse.jem.workbench.JavaEMFNature</nature>
    <nature>org.eclipse.wst.common.modulecore.ModuleCoreNature</nature>
    <nature>org.eclipse.wst.common.project.facet.core.nature</nature>
    <nature>org.eclipse.jdt.core.javanature</nature>
    <nature>org.eclipse.wst.jsdt.core.jsNature</nature>
<!-- ========================================= -->
    <nature>org.maven.ide.eclipse.maven2Nature</nature>
<!-- ========================================= -->
  </natures>
</projectDescription>
.classpath 增加了标注部分
<?xml version="1.0" encoding="UTF-8"?>
<classpath>
  <classpathentry kind="src" path="src" />
  <classpathentry kind="con" path="org.eclipse.jdt.launching.JRE_CONTAINER/org.eclipse.jdt.internal.debug.ui.launcher.StandardVMType/jdk">
    <attributes>
      <attribute name="owner.project.facets" value="java" />
    </attributes>
  </classpathentry>
  <classpathentry kind="con" path="org.eclipse.jst.server.core.container/org.eclipse.jst.server.tomcat.runtimeTarget/Apache Tomcat v6.0">
    <attributes>
      <attribute name="owner.project.facets" value="jst.web" />
    </attributes>
  </classpathentry>
  <classpathentry kind="con" path="org.eclipse.jst.j2ee.internal.web.container" />
  <classpathentry kind="con" path="org.eclipse.jst.j2ee.internal.module.container" />
<!-- ========================================= -->
  <classpathentry kind="con" path="org.maven.ide.eclipse.MAVEN2_CLASSPATH_CONTAINER" />
<!-- ========================================= -->
  <classpathentry kind="output" path="build/classes" />
</classpath>
5、完成上述步骤后,保存修改的文件然后刷新会看到库路径变化如下
7、收工了,检查一下路径和war文件


