http://www.softwaretestinghelp.com/selenium-webdriver-tutorial-10/
In the previous two tutorials, we made you acquainted with the basic architecture and features of WebDriver and the infrastructure required to get started with Selenium WebDriver. Assuming that you all might have set up the system with all the necessary utilities and packages,we will move further with the implementation of our first WebDriver test script.
Therefore, motioning ahead with the consequent Selenium WebDriver tutorial, we would be creating WebDriver script. We would also scatter the light on the basic and commonly usedWebDriver commands. We would also learn about the locating strategies of UI elements and their inclusion in the test scripts. We would also study Get Commands in the detail.
Script Creation
For script creation, we would be using “Learning_Selenium” project created in the previous tutorial and “gmail.com” as the application under test (AUT).
Scenario:
- Launch the browser and open “Gmail.com”.
- Verify the title of the page and print the verification result.
- Enter the username and Password.
- Click on the Sign in button.
- Close the web browser.
Step 1: Create a new java class named as “Gmail_Login” under the “Learning_Selenium” project.
Step 2: Copy and paste the below code in the “Gmail_Login.java” class.
1 |
import org.openqa.selenium.By; |
2 |
import org.openqa.selenium.WebDriver; |
3 |
import org.openqa.selenium.WebElement; |
4 |
import org.openqa.selenium.firefox.FirefoxDriver; |
5 |
6 |
public class Gmail_Login { |
7 |
/** |
8 |
* @param args |
9 |
*/ |
10 |
public static void main(String[] args) { |
11 |
|
12 |
// objects and variables instantiation |
13 |
WebDriver driver = new FirefoxDriver(); |
14 |
String appUrl ="https://accounts.google.com"; |
15 |
|
16 |
// launch the firefox browser and open the application url |
17 |
driver.get(appUrl); |
18 |
|
19 |
// maximize the browser window |
20 |
driver.manage().window().maximize(); |
21 |
|
22 |
// declare and initialize the variable to store the expected title of the webpage. |
23 |
String expectedTitle = " Sign in - Google Accounts "; |
24 |
|
25 |
// fetch the title of the web page and save it into a string variable |
26 |
String actualTitle = driver.getTitle(); |
27 |
|
28 |
// compare the expected title of the page with the actual title of the page and print the result |
29 |
if (expectedTitle.equals(actualTitle)) |
30 |
{ |
31 |
System.out.println("Verification Successful - The correct title is displayed on the web page."); |
32 |
} |
33 |
else |
34 |
{ |
35 |
System.out.println("Verification Failed - An incorrect title is displayed on the web page."); |
36 |
} |
37 |
38 |
// enter a valid username in the email textbox |
39 |
WebElement username = driver.findElement(By.id("Email")); |
40 |
username.clear(); |
41 |
username.sendKeys("TestSelenium"); |
42 |
|
43 |
// enter a valid password in the password textbox |
44 |
WebElement password = driver.findElement(By.id("Passwd")); |
45 |
password.clear(); |
46 |
password.sendKeys("password123"); |
47 |
|
48 |
// click on the Sign in button |
49 |
WebElement SignInButton = driver.findElement(By.id("signIn")); |
50 |
SignInButton.click(); |
51 |
|
52 |
// close the web browser |
53 |
driver.close(); |
54 |
System.out.println("Test script executed successfully."); |
55 |
|
56 |
// terminate the program |
57 |
System.exit(0); |
58 |
} |
59 |
} |
The above code is equivalent to the textual scenario presented earlier.
Code Walkthrough
Import Statements:
1 |
import org.openqa.selenium.WebDriver; |
2 |
import org.openqa.selenium.firefox.FirefoxDriver; |
3 |
import org.openqa.selenium.WebElement; |
4 |
import org.openqa.selenium.By; |
Prior to the actual scripting, we need to import the above packages:
import org.openqa.selenium.WebDriver – References the WebDriver interface which is required to instantiate a new web browser.
import org.openqa.selenium.firefox.FirefoxDriver – References the FirefoxDriver class that is required instantiate a Firefox specific driver on the browser instance instantiated using WebDriver interface.
import org.openqa.selenium.WebElement – References to the WebElement class which is required to instantiate a new web element.
import org.openqa.selenium.By – References to the By class on which a locator type is called.
As and when our project would grow, it is evident and logical that we might have to introduce several other packages for more complex and distinct functionalities like excel manipulations, database connectivity, logging, assertions etc.
Object Instantiation
WebDriver driver = new FirefoxDriver();
We create a reference variable for WebDriver interface and instantiate it using FirefoxDriver class. A default Firefox profile will be launched which means that no extensions and plugins would be loaded with the Firefox instance and that it runs in the safe mode.
Launching the Web browser
driver.get(appUrl);
A get() method is called on the WebDriver instance to launch a fresh web browser instance. The string character sequence passed as a parameter into the get() method redirects the launched web browser instance to the application URL.
Maximize Browser Window
driver.manage().window().maximize();
The maximize() method is used to maximize the browser window soon after it is re-directed to the application URL.
Fetch the page Title
driver.getTitle();
The getTitle() method is used to fetch the title of the current web page. Thus, the fetched title can be loaded to a string variable.
Comparison between Expected and Actual Values:
1 |
if (expectedTitle.equals(actualTitle)) |
2 |
{ |
3 |
System.out.println("Verification Successful - The correct title is displayed on the web page."); |
4 |
} |
5 |
else |
6 |
{ |
7 |
System.out.println("Verification Failed - An incorrect title is displayed on the web page."); |
8 |
} |
The above code uses the conditional statement java constructs to compare the actual value and the expected value. Based on the result obtained, the print statement would be executed.
WebElement Instantiation
WebElement username = driver.findElement(By.id(“Email”));
In the above statement, we instantiate the WebElement reference with the help of “driver.findElement(By.id(“Email”))”. Thus, username can be used to reference the Email textbox on the user interface every time we want to perform some action on it.
------------
Clear Command
username.clear();
The clear() method/command is used to clear the value present in the textbox if any. It also clears the default placeholder value.
sendKeys Command
username.sendKeys(“TestSelenium “);
The sendKeys() method/command is used to enter/type the specified value (within the parentheses ) in the textbox. Notice that thesendKeys() method is called on the WebElement object which was instantiated with the help of element property corresponding to the UI element.
The above block of code enters the string “TestSelenium” inside the Email textbox on the Gmail application.
sendKeys is one of the most popularly used commands across the WebDriver scripts.
Click Command
SignInButton.click();
Like sendKeys(), click() is another excessively used command to interact with the web elements. Click() command/method is used to click on the web element present on the web page.
The above block of code clicks on the “Sign in” button present on the Gmail application.
Notes:
- Unlike sendKeys() method, click() methods can never be parameterized.
- At times, clicking on a web element may load a new page altogether. Thus to sustain such cases, click() method is coded in a way to wait until the page is loaded.
Close the Web Browser
driver.close();
The close() is used to close the current browser window.
Terminate the Java Program
System.exit(0);
The Exit() method terminates the Java program forcefully. Thus, remember to close all the browser instances prior terminating the Java Program.
Test Execution
The test script or simply the java program can be executed in the following ways:
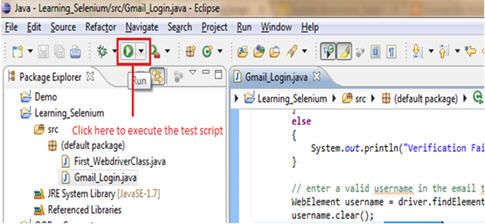
#1. Under the Eclipse’s menu bar, there is an icon to execute the test script. Refer the following figure.
Make a note that only the class which is selected would be executed.
#2. Right click anywhere inside the class within the editor, select “Run As” option and click on the “Java Application”.
#3. Another shortcut to execute the test script is – Press ctrl + F11.
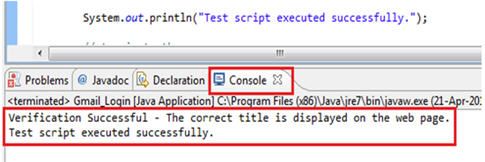
At the end of the execution cycle, the print statement “Test script executed successfully.” can be found in the console.
Locating Web Elements
Web elements in WebDriver can be located and inspected in the same way as we did in the previous tutorials of Selenium IDE. Selenium IDE and Firebug can be used to inspect the web element on the GUI. It is highly suggested to use Selenium IDE to find the web elements. Once the web element is successfully found, copy and paste the target value within the WebDriver code. The types of locators and the locating strategies are pretty much the same except for the syntax and their application.
In WebDriver, web elements are located with the help of the dynamic finders (findElement(By.locatorType(“locator value”))).
Sample Code:
driver.findElement(By.id(“Email”));
Locator Types and their Syntax
| id | driver.findElement (By.id(“ID_of_Element”)) |
Locate by value of the “id” attribute |
| className | driver.findElement (By.className (“Class_of_Element”)) |
Locate by value of the “class” attribute |
| linkText | driver.findElement (By.linkText(“Text”)) |
Locate by value of the text of the hyperlink |
| partialLinkText | driver.findElement (By.partialLinkText (“PartialText”)) |
Locate by value of the sub-text of the hyperlink |
| name | driver.findElement (By.name (“Name_of_Element”)) |
Locate by value of the “name” attribute |
| xpath | driver.findElement (By.xpath(“Xpath”)) |
Locate by value of the xpath |
| cssSelector | driver.findElement (By.cssSelector (“CSS Selector”)) |
Locate by value of the CSS selector |
| tagName | driver.findElement (By.tagName(“input”)) |
Locate by value of its tag name |
Conclusion
In this tutorial, we developed an automation script using WebDriver and Java. We also discussed the various components that constitute a WebDriver script.
Here are the cruxes of this Selenium WebDriver Tutorial:
- Prior to the actual scripting, we need to import a few packages to be able to create a WebDriver script.
- importopenqa.selenium.By;
- importopenqa.selenium.WebDriver;
- importopenqa.selenium.WebElement;
- importopenqa.selenium.firefox.FirefoxDriver;
- A get() method used to launch a fresh web browser instance. The character sequence passed as a parameter into the get() method redirects the launched web browser instance to the application URL.
- The maximize() method is used to maximize the browser window.
- The clear() method is used to clear the value present in the textbox if any.
- The sendKeys() method is used to enter the specified value in the textbox.
- Click() method is used to click on the web element present on the web page.
- In WebDriver, web elements can be located using Dynamic finders.
- The following are the available locator types:
- id
- className
- name
- xpath
- cssSelector
- linkText
- partialLinkText
- tagName
Moving ahead, in the next tutorial, we would shift our focus towards a framework that aids to Automation testing known as TestNG. We would have a detailed study on the various kinds of the annotations provided by the framework.
Next tutorial #11: Before diving deep into Frameworks we will see details about JUnit – an open source unit testing tool. Most of the programmers use JUnit as it is easy and does not take much effort to test. This tutorial will give an insight about JUnit and its usage in selenium script.
A remark for the readers: While our next tutorial of the Selenium series is in the processing mode, readers can start creating their own basic WebDriver scripts. For more advance scripts and concepts, we will have various other Selenium WebDriver tutorials coming up in this series.


