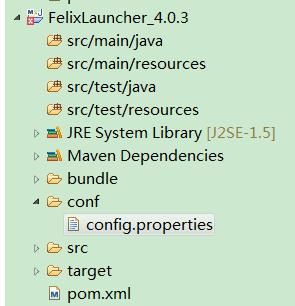
1. 新建一个 Maven project, 如下图所示.
2. 修改 pom.xml 文件如下
<project xmlns="http://maven.apache.org/POM/4.0.0" xmlns:xsi="http://www.w3.org/2001/XMLSchema-instance" xsi:schemaLocation="http://maven.apache.org/POM/4.0.0 http://maven.apache.org/xsd/maven-4.0.0.xsd">
<modelVersion>4.0.0</modelVersion>
<groupId>cn.sia</groupId>
<artifactId>FelixLauncher_4.0.3</artifactId>
<version>4.0.3</version>
<properties>
<felix.bundlerepository.version>1.6.6</felix.bundlerepository.version>
<felix.gogo.command.version>0.12.0</felix.gogo.command.version>
<felix.gogo.shell.version>0.10.0</felix.gogo.shell.version>
<felix.gogo.runtime.version>0.10.0</felix.gogo.runtime.version>
<felix.framework.version>4.0.3</felix.framework.version>
<org.osgi.compendium.version>4.2.0</org.osgi.compendium.version>
</properties>
<build>
<!--删除 bundle 文件夹 -->
<plugins>
<plugin>
<artifactId>maven-clean-plugin</artifactId>
<version>2.4.1</version>
<configuration>
<filesets>
<fileset>
<directory>bundle</directory>
</fileset>
</filesets>
</configuration>
</plugin>
<!-- 往 bundle 里添加东西 -->
<plugin>
<groupId>org.apache.maven.plugins</groupId>
<artifactId>maven-dependency-plugin</artifactId>
<version>2.6</version>
<executions>
<execution>
<id>copy</id>
<phase>generate-resources</phase>
<goals>
<goal>copy</goal>
</goals>
<configuration>
<artifactItems>
<!-- 添加 gogo.command -->
<artifactItem>
<groupId>org.apache.felix</groupId>
<artifactId>org.apache.felix.gogo.command</artifactId>
<version>${felix.gogo.command.version}</version>
</artifactItem>
<!-- 添加 gogo.runtime -->
<artifactItem>
<groupId>org.apache.felix</groupId>
<artifactId>org.apache.felix.gogo.runtime</artifactId>
<version>${felix.gogo.runtime.version}</version>
</artifactItem>
<!-- 添加 gogo.shell -->
<artifactItem>
<groupId>org.apache.felix</groupId>
<artifactId>org.apache.felix.gogo.shell</artifactId>
<version>${felix.gogo.shell.version}</version>
</artifactItem>
<!-- 添加 bundlerepository -->
<artifactItem>
<groupId>org.apache.felix</groupId>
<artifactId>org.apache.felix.bundlerepository</artifactId>
<version>${felix.bundlerepository.version}</version>
</artifactItem>
<!-- 添加 org.osgi.compendium -->
<artifactItem>
<groupId>org.osgi</groupId>
<artifactId>org.osgi.compendium</artifactId>
<version>${org.osgi.compendium.version}</version>
</artifactItem>
</artifactItems>
<outputDirectory>bundle</outputDirectory>
</configuration>
</execution>
</executions>
</plugin>
</plugins>
</build>
<dependencies>
<dependency>
<groupId>org.apache.felix</groupId>
<artifactId>org.apache.felix.main</artifactId>
<version>${felix.framework.version}</version>
</dependency>
<dependency>
<groupId>org.ops4j.pax.url</groupId>
<artifactId>pax-url-assembly</artifactId>
<version>1.3.3</version>
</dependency>
</dependencies>
</project>
3. 在项目上点右键, 选择 Run as -> Maven install
应该显示成功 (注意: 是要联网的, 因为会自动从网上下东西.)
4. 添加配置文件
(1) 项目下新建一个文件夹 conf, 在 conf 下面新建一个文件 config.properties, 如下图所示
(2) 文件里面输入如下内容
felix.auto.deploy.action=install,start
felix.log.level=1
org.osgi.framework.storage.clean=onFirstInit
5. 菜单, run, run configuration, 选择左侧的 Java application, 配置如下图所示
run configruation 的 名字设为 FelixLauncher_4.0.3, 主函数 选 org.apache.felix.main.Main (要 maven install 之后, 才可以选, install 时, 会从网上下 载 pom 里面声明的东西, 其中就包括了 felix framework, 里面有主类)
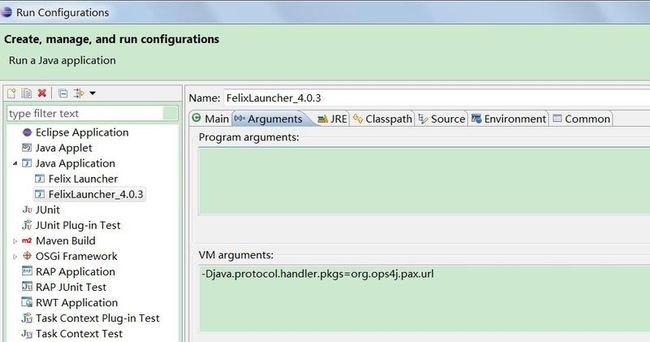
6. 上图中, 选 Arguments tab, 输入 参数 如下图所示
-Djava.protocol.handler.pkgs=org.ops4j.pax.url
6. 点击 Apply, 然后, 就可以 run 了, 结果如下图所示
===========================
7. 新建一个新的 Maven project
配置参数为
<groupId>cn.sia</groupId>
<artifactId>HelloWorld</artifactId>
<version>1.0.0</version>
<name>hello-world</name>
<description>This is a hello world program.</description>
8. 新建完后, 修改 pom.xml 如下
<project xmlns="http://maven.apache.org/POM/4.0.0" xmlns:xsi="http://www.w3.org/2001/XMLSchema-instance"
xsi:schemaLocation="http://maven.apache.org/POM/4.0.0 http://maven.apache.org/xsd/maven-4.0.0.xsd">
<modelVersion>4.0.0</modelVersion>
<groupId>cn.sia</groupId>
<artifactId>HelloWorld</artifactId>
<version>1.0.0</version>
<name>hello-world</name>
<description>This is a hello world program.</description>
<!-- 这句很重要!!! -->
<packaging>bundle</packaging>
<properties>
<felix.maven-bundle-plugin.version>2.3.7</felix.maven-bundle-plugin.version>
</properties>
<build>
<plugins>
<plugin>
<groupId>org.apache.felix</groupId>
<artifactId>maven-bundle-plugin</artifactId>
<version>2.3.7</version>
<extensions>true</extensions>
<configuration>
<instructions>
<Bundle-Category>sia</Bundle-Category>
<Bundle-SymbolicName>${project.name}</Bundle-SymbolicName>
<Bundle-Name>${project.name}</Bundle-Name>
<Bundle-Version>${project.version}</Bundle-Version>
<Bundle-Activator>cn.sia.helloworld.activator.Activator</Bundle-Activator>
<Private-Package>cn.sia.helloworld.activator</Private-Package>
</instructions>
</configuration>
</plugin>
<plugin>
<artifactId>maven-compiler-plugin</artifactId>
<version>2.3.2</version>
<inherited>true</inherited>
<configuration>
<source>1.6</source>
<target>1.6</target>
</configuration>
</plugin>
</plugins>
</build>
<dependencies>
<dependency>
<groupId>org.osgi</groupId>
<artifactId>org.osgi.core</artifactId>
<version>4.2.0</version>
</dependency>
</dependencies>
</project>
9. 新建一个 package, 名字为 cn.sia.helloworld.activator, 里面新建一个类, 名字为 Activator, 输入内容如下
package cn.sia.helloworld.activator;
import org.osgi.framework.BundleActivator;
import org.osgi.framework.BundleContext;
public class Activator implements BundleActivator {
public void start(BundleContext context) throws Exception {
System.out.println("In hello world activator start.");
}
public void stop(BundleContext context) throws Exception {
System.out.println("In hello world activator stop.");
}
}
10. 在项目上点右键, run as -> maven install, 会 build 成功, 如下图所示
11. 修改刚才 config.properties, 修改完后的内容为
felix.auto.deploy.action=install,start
felix.log.level=1
org.osgi.framework.storage.clean=onFirstInit
felix.auto.start.1 = \
assembly:/G:/study/java/OSGi-workspace/workspace-felix/HelloWorld/target/classes
12. 运行 FelixLauncher_4.0.3, 结果如下
13. 调试 HelloWorld
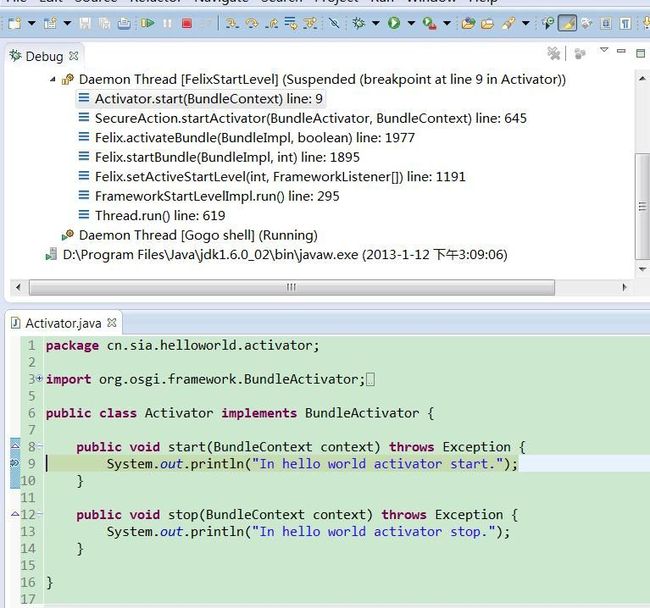
在 Activator 里添加一个断点, 如下图所示
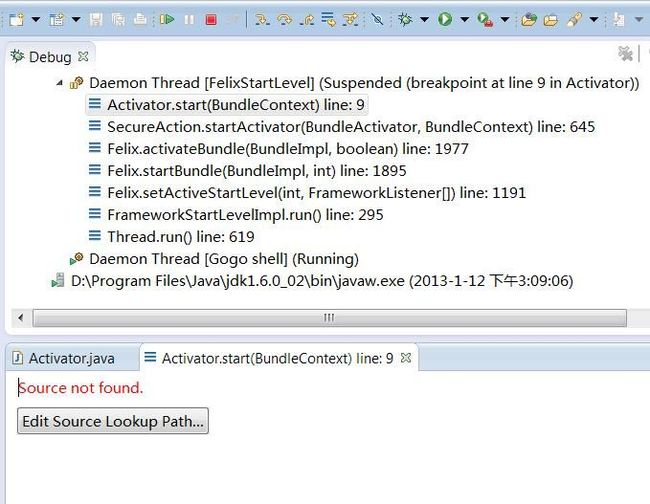
14. Debug->FelixLauncher_4.0.3,
出现
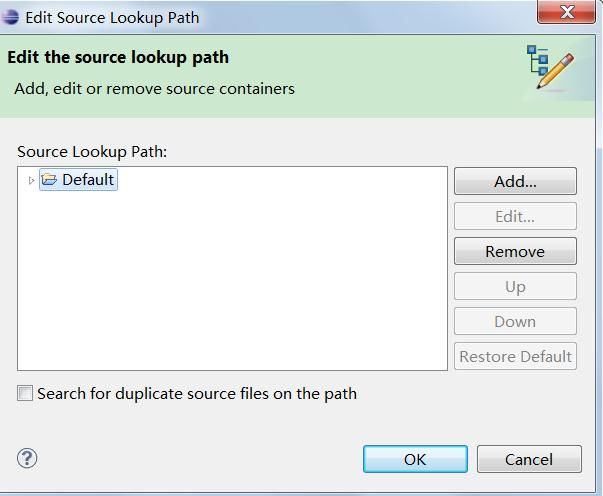
点 Edit Source Lookup Path...
点 add
选 java project,
选 HelloWorld, 点 ok,点 ok, 就找到了, 如下图
按 F6 step over, 按 F8 Resume, 再输入 stop 6, start 6, 又会进入断点
15. 生成的 HelloWorld-1.0.0.jar 文件里的 MANIFEST 文件如下
Manifest-Version: 1.0
Bnd-LastModified: 1357974254520
Build-Jdk: 1.6.0_02
Built-By: chenxing263
Bundle-Activator: cn.sia.helloworld.activator.Activator
Bundle-Category: sia
Bundle-Description: This is a hello world program.
Bundle-ManifestVersion: 2
Bundle-Name: hello-world
Bundle-SymbolicName: hello-world
Bundle-Version: 1.0.0
Created-By: Apache Maven Bundle Plugin
Export-Package: cn.sia.helloworld.activator;uses:="org.osgi.framework";v
ersion="1.0.0"
Import-Package: org.osgi.framework;version="[1.5,2)"
Tool: Bnd-1.50.0

