MySQL主从复制(Master-Slave)与读写分离(MySQL-Proxy)实践
Mysql在实际的生产环境中,由单台Mysql作为独立的数据库是完全不能满足实际需求的,无论是在安全性,高可用性以及高并发等各个方面。
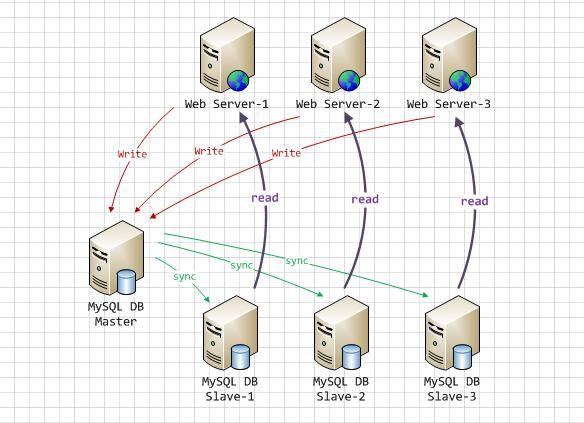
因此,一般来说都是通过 主从复制(Master-Slave)的方式来同步数据,再通过读写分离(MySQL-Proxy)来提升数据库的并发负载能力 这样的方案来进行部署与实施的。
如下图所示:
开发实践:windows xp 和虚拟机上的centos5.5系统。windows xp作为主数据库,centos5.5作为从数据库。windows xp的IP为:192.168.0.155,centos5.5的IP为:192.168.52.128
1、MySQL的安装与配置
首先windows上安装mysql很简单,直接下一步即可。配置时稍微注意一下,3306端口及root用户能够让外部访问。
centos安装mysql,用的是rpm包安装,如下:
- 1)先检查mysql的安装情况:rpm -qa | grep My
- 2)安装:rpm -ivh MySQL-server-5.0.37-0.i386.rpm
rpm -ivh MySQL-client-5.0.37-0.i386.rpm
mysqladmin -u root -p password "root"
service mysql start (或者/sbin/service mysql start) - 3)配置:如果/etc目录下没有my.cnf,可以执行
从数据库操作:cp /usr/share/mysql/my-medium.cnf /etc/my.cnf 修改server-id=2
主数据库操作:
server-id = 1 #主机标示,整数
log_bin = /var/log/mysql/mysql-bin.log #确保此文件可写
read-only =0 #主机,读写都可以
binlog-do-db =test #需要备份数据,多个写多行
binlog-ignore-db=mysql #不需要备份的数据库,多个写多行
登录mysql
mysql -u root -p
切换数据库
use mysql;
查看用户
select Host, User, Password from user;
增加mysql root的远程访问
GRANT ALL PRIVILEGES ON *.* TO 'root'@'%' IDENTIFIED BY 'root' WITH GRANT OPTION;
flush privileges; (刷新系统表)
授权给从数据库服务器192.168.0.155
mysql> GRANT REPLICATION SLAVE ON *.* to 'root'@'192.168.0.155' identified by 'password';
查询主数据库状态
Mysql> show master status;
+------------------+----------+--------------+------------------+
| File | Position | Binlog_Do_DB | Binlog_Ignore_DB |
+------------------+----------+--------------+------------------+
| mysql-bin.000002 | 106 | | |
+------------------+----------+--------------+------------------+
记录下 FILE 及 Position 的值,在后面进行从服务器操作的时候需要用到。
2.2 配置从服务器
修改从服务器的配置文件/opt/mysql/etc/my.cnf
将 server-id = 1修改为 server-id = 2,并确保这个ID没有被别的MySQL服务所使用。
启动mysql服务
/opt/mysql/init.d/mysql start
通过命令行登录管理MySQL服务器
/opt/mysql/bin/mysql -uroot -p'new-password'
执行同步SQL语句
mysql> change master to
master_host='192.168.0.155',
master_user='root',
master_password='password',
master_log_file='mysql-bin.000002',
master_log_pos=106;
正确执行后启动Slave同步进程
mysql> start slave;
主从同步检查
mysql> show slave status\G
*************************** 1. row ***************************
Slave_IO_State: Waiting for master to send event
Master_Host: 192.168.0.155
Master_User: root
Master_Port: 3306
Connect_Retry: 60
Master_Log_File: mysql-bin.000002
Read_Master_Log_Pos: 594
Relay_Log_File: localhost-relay-bin.000002
Relay_Log_Pos: 740
Relay_Master_Log_File: mysql-bin.000002
Slave_IO_Running: Yes
Slave_SQL_Running: Yes
Replicate_Do_DB:
Replicate_Ignore_DB:
Replicate_Do_Table:
Replicate_Ignore_Table:
Replicate_Wild_Do_Table:
Replicate_Wild_Ignore_Table:
Last_Errno: 0
Last_Error:
Skip_Counter: 0
Exec_Master_Log_Pos: 594
Relay_Log_Space: 900
Until_Condition: None
Until_Log_File:
Until_Log_Pos: 0
Master_SSL_Allowed: No
Master_SSL_CA_File:
Master_SSL_CA_Path:
Master_SSL_Cert:
Master_SSL_Cipher:
Master_SSL_Key:
Seconds_Behind_Master: 0
Master_SSL_Verify_Server_Cert: No
Last_IO_Errno: 0
Last_IO_Error:
Last_SQL_Errno: 0
Last_SQL_Error:
Replicate_Ignore_Server_Ids:
Master_Server_Id: 1
1 row in set (0.00 sec)
其中Slave_IO_Running 与 Slave_SQL_Running 的值都必须为YES,才表明状态正常。
如果主服务器已经存在应用数据,则在进行主从复制时,需要做以下处理:
(1)主数据库进行锁表操作,不让数据再进行写入动作
mysql> FLUSH TABLES WITH READ LOCK;
(2)查看主数据库状态
mysql> show master status;
(3)记录下 FILE 及 Position 的值。
将主服务器的数据文件(整个/opt/mysql/data目录)复制到从服务器,建议通过tar归档压缩后再传到从服务器解压。
(4)取消主数据库锁定
mysql> UNLOCK TABLES;
到此,数据库的主从已经配置完毕。
