struts2.2+hibernate3.2+spring2整合入门实例
环境:windows 7+MyEclipse 8.6
服务器: Tomcat 6.0
框架版本:struts2.2+hibernate3.2+spring 2.2
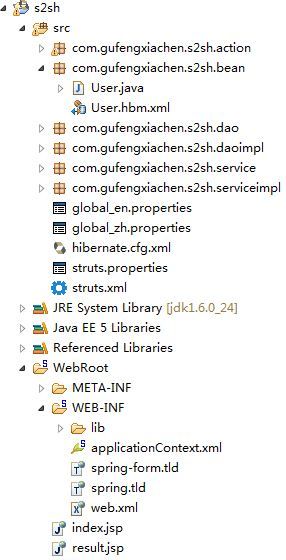
项目目录结构:
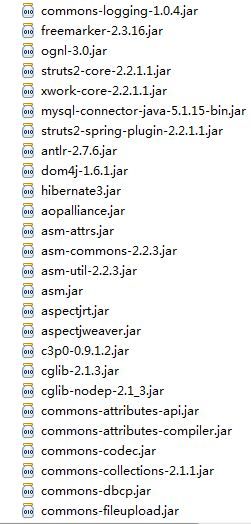
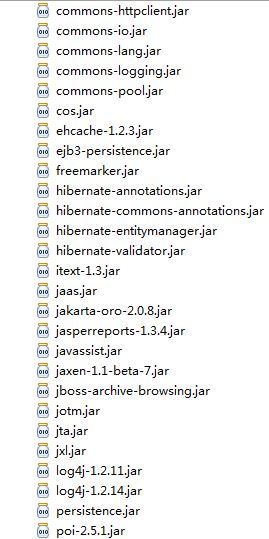
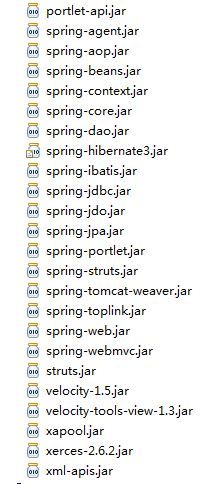
步骤一,添加框架支持的包:
步骤二:编写jsp页面:index.jsp:
<%@ page language="java" import="java.util.*" pageEncoding="UTF-8"%>
<%@ taglib prefix="s" uri="/struts-tags" %>
<%
String path = request.getContextPath();
String basePath = request.getScheme()+"://"+request.getServerName()+":"+request.getServerPort()+path+"/";
%>

<!DOCTYPE HTML PUBLIC "-//W3C//DTD HTML 4.01 Transitional//EN">
<html>
  <head>
    <base href="<%=basePath%>">

    <title>Login</title>

  </head>
  <body>
  <h2 style="color: red">Login</h2>
   <s:form action="login" namespace="/user">

   		<s:textfield name="user.username" label="%{getText('username')}"> </s:textfield>

   		<s:password name="user.password" label="%{getText('password')}"></s:password>

   		<s:submit name="submit" value="%{getText('submit')}"></s:submit>

   </s:form>
  </body>
</html>
result.jsp:
<body>
Login success!
</body>
步骤三:编写web.xml文件:
<?xml version="1.0" encoding="UTF-8"?>
<web-app version="2.5"
	xmlns="http://java.sun.com/xml/ns/javaee"
	xmlns:xsi="http://www.w3.org/2001/XMLSchema-instance"
	xsi:schemaLocation="http://java.sun.com/xml/ns/javaee
	http://java.sun.com/xml/ns/javaee/web-app_2_5.xsd">

  <welcome-file-list>
    <welcome-file>index.jsp</welcome-file>
  </welcome-file-list>

  <filter>
  	<filter-name>struts2</filter-name>
  	<filter-class>org.apache.struts2.dispatcher.ng.filter.StrutsPrepareAndExecuteFilter</filter-class>
  </filter>
  <filter-mapping>
  	<filter-name>struts2</filter-name>
  	<url-pattern>/*</url-pattern>
  </filter-mapping>

  <listener>
        <listener-class>
        org.springframework.web.context.ContextLoaderListener
        </listener-class>
   </listener>

</web-app>
步骤四:建数据库,(本例用MySQL),编写映射文件User.hbm.xml:
<?xml version="1.0" encoding="UTF-8"?>
<!DOCTYPE hibernate-mapping
PUBLIC "-//Hibernate/Hibernate Mapping DTD 3.0//EN"
"http://hibernate.sourceforge.net/hibernate-mapping-3.0.dtd">

<hibernate-mapping>
	<class name="com.gufengxiachen.s2sh.bean.User" table="user"  catalog="test">
		<id name="id" column="id" type="int">
			<generator class="increment"></generator>
		</id>

		<property name="username" column="username" type="string"></property>
		<property name="password" column="password" type="string"></property>

	</class>

</hibernate-mapping>
步骤五:编写struts.xml文件:
<?xml version="1.0" encoding="UTF-8" ?>
<!DOCTYPE struts PUBLIC
    "-//Apache Software Foundation//DTD Struts Configuration 2.0//EN"
    "http://struts.apache.org/dtds/struts-2.0.dtd">

 <struts>
 	--><package name="s2sh" extends="struts-default" namespace="/user" >
 		<action name="login" class="loginAction" >

 			<result name="success">/result.jsp</result>
 			<result name="input">/index.jsp</result>

 		</action>

 	</package>
 </struts>
步骤六:编写spring配置文件applicationContext.xml:
<?xml version="1.0" encoding="UTF-8"?>
<beans
	xmlns="http://www.springframework.org/schema/beans"
	xmlns:xsi="http://www.w3.org/2001/XMLSchema-instance"
	xmlns:p="http://www.springframework.org/schema/p"
	xsi:schemaLocation="http://www.springframework.org/schema/beans http://www.springframework.org/schema/beans/spring-beans-2.0.xsd">

<bean id="dataSource" class="org.apache.commons.dbcp.BasicDataSource">

	<property name="driverClassName" value="com.mysql.jdbc.Driver"></property>
	<property name="url" value="jdbc:mysql://localhost:3306/test"></property>
	<property name="username" value="root"></property>
	<property name="password" value=""></property>
	<property name="maxActive" value="100"></property>
	<property name="defaultAutoCommit" value="true"></property>
</bean>

<bean id="sessionFactory" class="org.springframework.orm.hibernate3.LocalSessionFactoryBean">

	<property name="dataSource" ref="dataSource"></property>
	<property name="hibernateProperties">
		<props>
			<prop key="hibernate.dialect">org.hibernate.dialect.MySQLDialect</prop>
			<prop key="hibernate.show_sql">true</prop>
		</props>
	</property>
	<property name="mappingResources">
		<list>
			<value>com/gufengxiachen/s2sh/bean/User.hbm.xml</value>
		</list>
	</property>

</bean>

<bean id="userDao" class="com.gufengxiachen.s2sh.daoimpl.UserDAOImpl" scope="singleton">
	<property name="sessionFactory">
		<ref bean="sessionFactory"/>
	</property>
</bean>

<bean id="userService" class="com.gufengxiachen.s2sh.serviceimpl.UserServiceImpl">
	<property name="userDao" ref="userDao"></property>
</bean>

<bean id="loginAction" class="com.gufengxiachen.s2sh.action.LoginAction">
	<property name="userService" ref="userService"></property>

</bean>

</beans>
步骤七:编写控制层Action,服务层(业务逻辑)Service,数据访问层,由于代码太多,详细代码见附件!


