Anjuta官方文档 Using Autotools翻译
引用自:
http://library.gnome.org/users/anjuta-build-tutorial/2.26/create-autotools.html.en
Using Autotools
Autotools 主要包括以下几个工具: aclocal , autoconf , automake 以及本文后面提到的一些工具.这些工具属于 Automake 和 Autoconf 这两个包.
- Autoconf 使用 configure.ac 来生成 configure 文件 . 然后 再通过 configure 和 Makefile.in 文件来生成 makefiles .
- Automake 使用 Makefile.am 来生成 Makefile.in 文件.
Now let's see a minimal example to start grasping the relationships between the various files.
3.1.1. 编写源码
- 新建并进入 tut_prog 目录
- 建立main.c 文件,文件内容:
#include <stdio.h>

int main()
{
	printf("Hello world!\n");
	return 0;
}
3.1.2. 运行 Autoconf
- 编写 configure.ac 文件:
AC_INIT([Tutorial Program], 1.0)
AM_INIT_AUTOMAKE
AC_PROG_CC
AC_CONFIG_FILES(Makefile)
AC_OUTPUT
将configure.ac 重命名为 configure.in . configure.ac 文件只被用在老版本 的 Autoconf 中 (2001以前版本) .
configure.ac 中的 AC_INIT, AM_INIT_AUTOMAKE, 等等都是M4 的宏定义 . M4主要提供给 Autotools使用的宏定义,详细情况暂时不用去了解。 当 Autoconf 处理 configure.in 文件时,这些宏便用来生成复杂的 configure。
用来定义工程名和版本号。
为 Automake 定义环境变量 .在所有使用 Automake 的工程中,必须包含此项 .
使用 C 进行编译.
指定需要被生成的 .in文件。(比如指定生成Makefile.in文件)
指定生成的Makefile文件列表
在不同版本的Autoconf 中,使用的部分宏可能会有所差别 :
- 包名和版本号作为 AM_INIT_AUTOMAKE 的参数,而不使用 AC_INIT.
- 使用 AC_OUTPUT 来指定生成的文件列表,而不使用 AC_CONFIG_FILES.
Autoconf 只读取其内部被定义过的宏和 aclocal.m4 中的宏 . 利用 aclocal.m4 文件可以用来扩展 Autoconf , 包括 Automake 宏 (以 AM_ 开头的宏) 和一些第三方宏. 比如,如果你需要开发一个叫 foo 的库,那么你可以在 aclocal.m4中 添加一个 名叫 AC_CHECK_FOR_FOO 的宏,别人就可以在 Autoconf 中调用来进行依赖检查 .
可以使用 aclocal 通过 configure.ac 文件来建立 aclocal.m4 文件。 aclocal 是 Automake包的一部分,并且会去检索 /usr/share/aclocal下的文件。
- 运行 aclocal . 在当前目录建立 aclocal.m4 文件
- 运行 autoconf . 在 当前目录建立 configure 文件
3.1.3. 运行 Automake
- 建立 Makefile.am 文件:
bin_PROGRAMS = tut_prog
tut_prog_SOURCES = main.c
在 Makefile.am 中的 tut_prog 会被安装到 $prefix/bin/ 。另外我们还需要一个main.c .我们不用特别指定如何去编译main.c: Automake 会自动匹配好. Automake 使用 Makefile.am 文件生成 Makefile.in。然后 configure 替换其中的一些变量,最终 生成 Makefile。
- 运行 automake --add-missing --foreign,生成Makefile.in文件。其中--add-missing 参数用来自动生成一些编译工程必须的文件:depcomp , install.sh 和 missing。而 --foreign 参数用来告诉 Automake 你不想依照GNU的标准来编译工程,那么你就不用强制生成:INSTALL , NEWS , README , AUTHORS , ChangeLog 和 COPYING 文件了。这里为了演示所以增加这些参数。好的建议是,你应该建立这些文件,即使是空的也不要紧。
3.1.4. 编译工程
-
运行: ./configure . 你可以看到下面的信息,并且得到一个Makefile文件。
checking for a BSD-compatible install... /usr/bin/install -c
checking whether build environment is sane... yes
checking for a thread-safe mkdir -p... /bin/mkdir -p
checking for gawk... gawk
checking whether make sets $(MAKE)... yes
checking for gcc... gcc
checking for C compiler default output file name... a.out
checking whether the C compiler works... yes
checking whether we are cross compiling... no
checking for suffix of executables...
checking for suffix of object files... o
checking whether we are using the GNU C compiler... yes
checking whether gcc accepts -g... yes
checking for gcc option to accept ISO C89... none needed
checking for style of include used by make... GNU
checking dependency style of gcc... gcc3
configure: creating ./config.status
config.status: creating Makefile
config.status: executing depfiles commands
-
运行 make 编译程序. 会有下面的输出, 并且生成一个可执行文件 tut_prog
gcc -DPACKAGE_NAME=\"Tutorial\ Program\" -DPACKAGE_TARNAME=\"tutorial-program\" \ -DPACKAGE_VERSION=\"1.0\" -DPACKAGE_STRING=\"Tutorial\ Program\ 1.0\" \ -DPACKAGE_BUGREPORT=\"\" -DPACKAGE=\"tutorial-program\" -DVERSION=\"1.0\" \ -I. -g -O2 -MT main.o -MD -MP -MF .deps/main.Tpo -c -o main.o main.c main.c: In function ‘main’: main.c:5: warning: return type of ‘main’ is not ‘int’ mv -f .deps/main.Tpo .deps/main.Po gcc -g -O2 -o tut_prog main.o -
如果你想把他安装到 /usr/local/bin , 可以使用 root 权限运行 sudo make install .
make[1]: Entering directory `/home/seb/Projects/Tutorial'
test -z "/usr/local/bin" || /bin/mkdir -p "/usr/local/bin"
  /usr/bin/install -c 'tut_prog' '/usr/local/bin/tut_prog'
make[1]: Nothing to be done for `install-data-am'.
make[1]: Leaving directory `/home/seb/Projects/Tutorial'
3.1.5. 清除工程
-
程序被安装好后,你可以使用 make clean 命令来清除当前目录中 make 生成的文件。
test -z "tut_prog" || rm -f tut_prog
rm -f *.o
-
需要卸载程序的话可以使用 root 权限运行 make uninstall 命令
rm -f '/usr/local/bin/tut_prog'
3.1.6. 生成工程
手动运行aclocal , automake 和 autoconf 有助于了解其中都发生了什么。但是,作为一个真正的工程这会是个乏味的工作,因为你可能还需要用到autoheader , autopoint 或者 libtoolize这些工具。而且,在建立好一个工程后,我们还经常需要重新生成 configure 文件和 Makefile.in 文件(比如你添加了一个类,或者有新的库依赖)。对于这种状况,我们可以用下面两个方法:
Autoconf 提供的另外一个工具。新建工程后直接运行 autoreconf --install 会生成合适的配置文件。(前提是你得提供 Makefile.am configure.in)
只是一个shell文件,提供相同的功能。在GNOME通用开发包中它有另外一个名字 gnome-autogen.sh ,在别的工程中可能有更多不同的名字 .
=====================================================
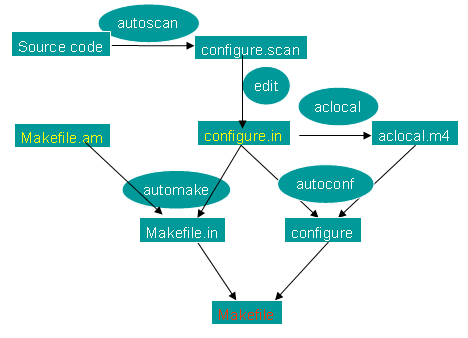
最后,为了更加形象的了解,加一个IBM文档库中生成Makefile的关系图片:
