使FastDFS支持HTTP下载配置记录
参考:http://linux.chinaunix.net/bbs/thread-1158975-1-1.html
FastDFS从V1.20开始支持通过HTTP协议下载文件,作者推荐的配置方案为:tracker使用自带的Web Server,storage server上架设其他Web Server,如nginx、apache。
按上述方案进行了配置,配置过程如下:
一、配置tracker服务器
1、切换到FastDFS 主目录:
cd FastDFS
(1)打开make.sh文件,找到 #WITH_HTTPD=1 ,去掉最前面的#,保存;
(2)依次执行以下脚本:
./make.sh clean
./make.sh
./make.sh install
注意:
1)HTTP用到了libevent,如果没有安装,编译程序前需要先安装(需要1.4.x版本),目前已有libevent-1.4.12-stable版本,libevent安装方法详见 libevent安装方法 。
2)执行./make.sh install时可能需要root权限。
2、修改tracker配置,打开tracker.conf ,找到下列片段,将值改为与红色 部分一致,蓝色 部分视实际端口占用情况自行选择是否修改:
# HTTP port on this tracker server
http.server_port= 8080
#use "#include" directive to include http other settiongs
#include http.conf
3、重启tracker服务:
命令格式:/usr/local/bin/restart.sh /usr/local/bin/fdfs_trackerd <tracker_conf_filename>
查看tracker日志文件,如有类似如下信息,说明http服务已启动成功:
INFO - HTTP supported: server_port=8080, default_content_type=application/octet-stream, anti_steal_token=0, token_ttl=0s, anti_steal_secret_key length=0, token_check_fail content_type=, token_check_fail buff length=0, check_active_interval=30, check_active_type=tcp, check_active_uri=/status.html
另外也可以通过 telnet IP 端口号 或 netstat -all 或 netstat -an | grep -w 端口号 来查看所配置的http端口是否已启用。
二、配置storage服务器(使用Apache作为Web Server,如有多台storage服务器则需一一配置,过程类似;如果用内置的 Web Server,则过程与tracker的配置类似 )
1、安装Apache:
(1) 下载安装包:httpd-2.2.15.tar.gz
(2) 解压,然后切换到主目录,进行安装,即依次执行:
tar zxvf httpd-2.2.15.tar.gz
./configure --prefix=/usr/local/apr-httpd/
make
make install
注意:
1)./configure —prefix=/usr/local/apr-httpd/ 表示安装目录为 /usr/local/apr-httpd/ 。
2)执行 make.sh install 时可能需要root权限。
(3) 打开配置文件/usr/local/apr-httpd/conf/httpd.conf ,找到下列片段,将红色 部分按蓝色 注释进行修改(需要root权限):
片段1:
#Listen 12.34.56.78:80
Listen 80
# Apache2监听端口,也就是网站的http端口,可以根据实际情况进行修改,与storage.conf 中的http.server_port= 配置是一个意思。
片段2:
<IfModule !mpm_netware_module>
<IfModule !mpm_winnt_module>
#
# If you wish httpd to run as a different user or group, you must run
# httpd as root initially and it will switch.
#
# User/Group: The name (or #number) of the user/group to run httpd as.
# It is usually good practice to create a dedicated user and group for
# running httpd, as with most system services.
#
User daemon # 改为:当前用户名
Group daemon # 改为:root
</IfModule>
</IfModule>
片段3:
<Directory />
Options FollowSymLinks
AllowOverride None
Order deny,allow
Deny from all # 改为Allow
</Directory>
片段4:
<IfModule alias_module>
#
# Redirect: Allows you to tell clients about documents that used to
# exist in your server's namespace, but do not anymore. The client
# will make a new request for the document at its new location.
# Example:
# Redirect permanent /foo http://www.example.com/bar
#
# Alias: Maps web paths into filesystem paths and is used to
# access content that does not live under the DocumentRoot.
# Example:
# Alias /webpath /full/filesystem/path
#
# If you include a trailing / on /webpath then the server will
# require it to be present in the URL. You will also likely
# need to provide a <Directory> section to allow access to
# the filesystem path.
Alias /group1/M00 "/FastDFS/data"
# 增加这一行(设置虚拟目录),/group1/M00 为 group_name 加上存储区域base_path的URL片段,如果存放的base_path只有一个,则固定为M00,后面引号中的路径即为存储区域的绝对路径(storage.conf 中 配置项 store_path0 的值再加上 /data);如果 storage.conf 中配置了多个存储区域,则这里也需一一对应配置(一行Alias对应一个存储配置)。
#
# ScriptAlias: This controls which directories contain server scripts.
# ScriptAliases are essentially the same as Aliases, except that
# documents in the target directory are treated as applications and
# run by the server when requested rather than as documents sent to the
# client. The same rules about trailing "/" apply to ScriptAlias
# directives as to Alias.
#
ScriptAlias /cgi-bin/ "/usr/local/apr-httpd//cgi-bin/"
</IfModule>
片段5:
<Directory "/usr/local/apr-httpd//cgi-bin ">
AllowOverride None
Options None
Order allow,deny
Allow from all
</Directory>
# 需改为与 片段4 Alias 引号中的值一致。表示设置该虚拟目录的访问权限。有多个Alias 配置时,需要配置多个 <Directory "...">...</Directory> 与之一一对应。
(4)启动Apache HTTP Server,执行(可能需要 root 权限):
/usr/local/apr-httpd/bin/apachectl -k start
三、下载测试
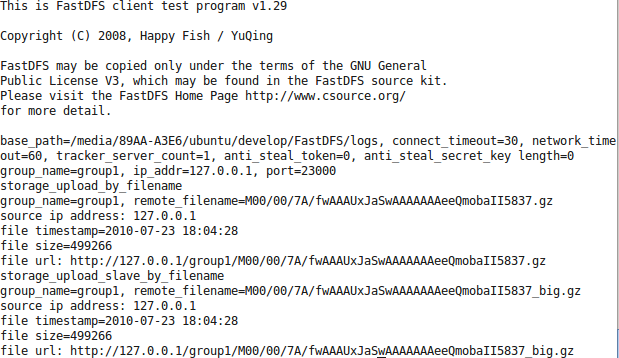
1、在 storage 服务器上通过命令行上传1个文件:/usr/local/bin/fdfs_test <storage_conf_filename> upload <file_to_upload>
2.下载文件:浏览器访问 file url 或执行 wget <file url> ,如顺利下载文件则表示配置成功。
注意:
控制台打印的 file url 缺少了http端口号,自行加上即可(使用tracker中配置的端口号,会自动跳转到storage)。
