一 安装nodejs
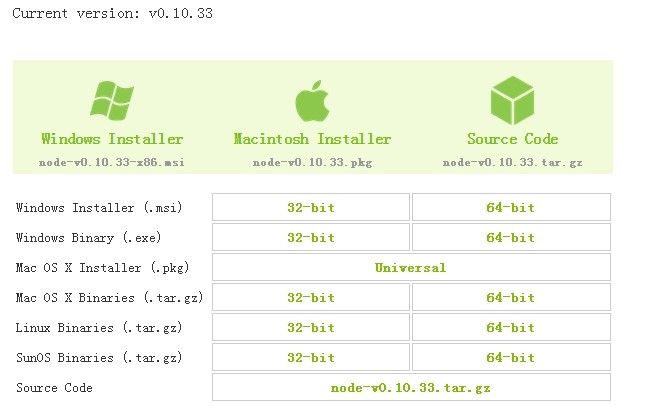
nodejs 官司网下载安装文件
官网地址:http://www.nodejs.org/download/

因为是在64位win7上开发,因此下载windows64位msi版本的nodejs.
下载完成后,进行安装,默认安装路径为C:\Program Files\nodejs\,直接下一步就可以了。
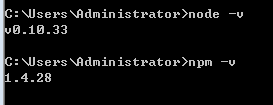
安装完成之后,在命令窗口执行,node -v (显示nodejs版本) 和npm -v (显示npm版本)可以使用这两个命令查看是否安装成功:

2.npm 简介
nodejs 安装过程中会自动安装npm,npm 是nodejs的程序包管理工具,用于从网上下载程序包并安装还可以管理工程对程序包的依赖,类似于java平台上的maven。
程序包是指实现了某些功能,并可以运行于nodejs平台,一般是开源程序,如压缩js代码程序,检查js代码正确性的程序等等。
使用npm 管理项目,一般工程目录下会有一个名为package.json 的json格式文件,该文件定义了工程的名称、作者、仓库地址、开发时依赖的模块,该工程的使用版本等等,如下bootstrap中的package.json:(详细配置说明见:http://blog.csdn.net/woxueliuyun/article/details/39294375)
{
  "name": "bootstrap",//项目名称
  "description": "The most popular front-end framework for developing responsive, mobile first projects on the web.",//项目说明
  "version": "3.3.0",//项目版本
  "keywords": [///关键字,用于别人搜索找到
    "css",
    "less",
    "mobile-first",
    "responsive",
    "front-end",
    "framework",
    "web"
  ],
  "homepage": "http://getbootstrap.com",//项目主页地址
  "author": "Twitter, Inc.",//作者
  "scripts": { //定义脚本,key为脚本名 value为可执行的nodejs命令
    "test": "grunt test"
  },
  "style": "dist/css/bootstrap.css",
  "less": "less/bootstrap.less",
  "main": "./dist/js/npm",
  "repository": {//定义了仓库类型及地址
    "type": "git",
    "url": "https://github.com/twbs/bootstrap.git"
  },
  "bugs": {//提交bug地址
    "url": "https://github.com/twbs/bootstrap/issues"
  },
  "license": {//版权声明
    "type": "MIT",
    "url": "https://github.com/twbs/bootstrap/blob/master/LICENSE"
  },
  "devDependencies": {//开发依赖哪些nodejs模块
    "btoa": "~1.1.2",
    "glob": "~4.0.6",
    "grunt": "~0.4.5",
    "grunt-autoprefixer": "~1.0.1",
    "grunt-banner": "~0.2.3",
    "grunt-contrib-clean": "~0.6.0",
    "grunt-contrib-concat": "~0.5.0",
    "grunt-contrib-connect": "~0.8.0",
    "grunt-contrib-copy": "~0.7.0",
    "grunt-contrib-csslint": "~0.3.1",
    "grunt-contrib-cssmin": "~0.10.0",
    "grunt-contrib-jade": "~0.13.0",
    "grunt-contrib-jshint": "~0.10.0",
    "grunt-contrib-less": "~0.12.0",
    "grunt-contrib-qunit": "~0.5.2",
    "grunt-contrib-uglify": "~0.6.0",
    "grunt-contrib-watch": "~0.6.1",
    "grunt-csscomb": "~3.0.0",
    "grunt-exec": "~0.4.6",
    "grunt-html-validation": "~0.1.18",
    "grunt-jekyll": "~0.4.2",
    "grunt-jscs": "~0.8.1",
    "grunt-saucelabs": "~8.3.2",
    "grunt-sed": "~0.1.1",
    "load-grunt-tasks": "~1.0.0",
    "npm-shrinkwrap": "~4.0.0",
    "remarkable": "^1.2.2",
    "time-grunt": "~1.0.0"
  },
  "engines": {//nodej引擎版本
    "node": "~0.10.1"
  }
}
如果需要对bootstrap开发,则在package.json所在目录中执行npm install 就可以下载所有的依赖包到当前目录的node_modules中,因此源码中不需要带有依赖包,只需要有一个package.json就搞定了。
npm install --save 模块名 :将模块下载到当前目录的node_modules中并将依赖写入 package.json中的dependencies中
npm install --save-dev 模块名 : 将模块下载到当前目录的node_modules中并将依赖写入 package.json中的devDependencies中
nodejs安装程序会在环境变量中添加两个变量:
系统环境变量中:path 增加C:\Program Files\nodejs\ 因为在该目下存在node.exe 和npm.cmd,加入path后可以全局调用该命令。
用户变量中设置:
path=C:\Users\Administrator\AppData\Roaming\npm
该目录下node_modules目录用来存放安装的全局的nodejs模块,并在npm目录中生成相应的命令行可执行的文件。而将该路径加入path 是为了全局调用nodejs模块。
使用npm config list 可以查看npm 配置信息:
C:\Users\Administrator>npm config list
; cli configs
registry = "https://registry.npmjs.org/" 模块注册地址
user-agent = "npm/1.4.28 node/v0.10.33 win32 x64"

; builtin config undefined
prefix = "C:\\Users\\Administrator\\AppData\\Roaming\\npm" 模块的存放目录

; node bin location = C:\Program Files\nodejs\\node.exe
; cwd = C:\Users\Administrator
; HOME = C:\Users\Administrator
; 'npm config ls -l' to show all defaults.
registry = "https://registry.npmjs.org/"
表明npm insall 模块时,到模块注册地址寻找,找到后获取模块代码的仓库地址,就可以下载了。
可以使用npm config set <key> <value> 修改默认设置,如
npm config set prefix = 'c:\node',改prefix 时要记得修改path ,以使安装后可以直接运行。
如查使用npm config配置了环境变量,则在C:\Users\Administrator中生成了一个.npmrc文件,记录了配置信息,修改该文件也相当于执行了npm config 命令。
3 安装git
git是分布式版本控制系统,现在的开源项目一般都放到公网上的git仓库上,如github(https://github.com/),项目中的使用的依赖包(开源项目)需要使用git从公网仓库中下载到本地。
windows 平台git 下载地址:http://msysgit.github.io/,安装时下一步就可以 了。 默认安装地址C:\Program Files (x86)\Git,安装完成后,在环境变量path中增加:C:\Program Files (x86)\Git\bin,目的是在cmd窗口中可以引用git命令。
进入cmd 窗 口:执行命令git --version,显示git版本号,则安装成功
C:\Users\Administrator>git --version
git version 1.9.4.msysgit.2
$ git config --global user.name "你的名字"
$ git config --global user.email "您的email地址"
git详细说明见:http://www.liaoxuefeng.com/wiki/0013739516305929606dd18361248578c67b8067c8c017b000
4.安装bower
Bower是一个适合Web应用的包管理器,它擅长前端的包管理。
Bower安装方法:npm install -g bower, -g参数是全局安装,在哪个目录下执行这个命令都行,bower 最终被安装到C:\Users\Administrator\AppData\Roaming\npm\node_modules\(默认情况下)
C:\Users\Administrator>npm install -g bower
C:\Users\Administrator\AppData\Roaming\npm\bower -> C:\Users\Administrator\AppData\Roaming\npm\node_modules\bower\bin\bower
[email protected] C:\Users\Administrator\AppData\Roaming\npm\node_modules\bower
├── [email protected]
├── [email protected]
├── [email protected]
├── [email protected]
├── [email protected]
├── [email protected]
├── [email protected]
├── [email protected]
├── [email protected]
├── [email protected]
├── [email protected]
├── [email protected]
├── [email protected]
├── [email protected]
├── [email protected]
├── [email protected]
├── [email protected]
├── [email protected]
├── [email protected]
├── [email protected]
├── [email protected] ([email protected])
├── [email protected] ([email protected])
├── [email protected] ([email protected], [email protected], [email protected], [email protected])
├── [email protected] ([email protected])
├── [email protected] ([email protected])
├── [email protected] ([email protected], [email protected], [email protected])
├── [email protected] ([email protected])
├── [email protected] ([email protected], [email protected], [email protected], [email protected], [email protected])
├── [email protected] ([email protected], [email protected])
├── [email protected] ([email protected], [email protected], [email protected])
├── [email protected] ([email protected], [email protected], [email protected])
├── [email protected] ([email protected], [email protected])
├── [email protected] ([email protected], [email protected], [email protected], [email protected], [email protected])
├── [email protected] ([email protected])
├── [email protected]
├── [email protected] ([email protected], [email protected], [email protected], [email protected], [email protected], [email protected], [email protected], [email protected], [email protected], mime-types@
1.0.2, [email protected], [email protected], [email protected], [email protected], [email protected])
├── [email protected] ([email protected], [email protected], [email protected], [email protected], [email protected], [email protected])
├── [email protected] ([email protected], [email protected], [email protected], [email protected])
├── [email protected] ([email protected], [email protected], [email protected], [email protected], [email protected], [email protected], [email protected])
├── [email protected] ([email protected], [email protected], [email protected], [email protected], [email protected], [email protected], [email protected], [email protected])
打开C:\Users\Administrator\AppData\Roaming\npm目录,发现node_modules目录下已经安装了bower,并在npm目录中生成了可执行的命令 bower 和 bower.cmd (不知道是怎么调用的)。因此需要把 C:\Users\Administrator\AppData\Roaming\npm加入path环境变量中。

执行命令:bower --version 可以显示bower版本:
C:\Users\Administrator>bower --version
1.3.12
使用bower 可以管理工程中对js类库的依赖,如果程序中依赖jquery ,不需要再到网上下载jquery.min.js了,使用命令 bower install jquery --save,jquery 会动下载到当前目录下的bower_componets目录中了 。
bower还可以管理js类库之间间依赖,如果需要bootstrap 那么 bower install bootstrap --save,就把bootstrap下载到bower_components目录,同时由就bootstrap依赖于jquery,jquery 也被下载到bower_components目录了。
上面命令中:bower install bootstrap --save,--save参数是指工程对bootstrap的依赖关系写入bower.json。 (使用bower init 可以交互的方式建立bower.json)。
bower.json格式:
{
  "name": "my-project",//工程名
  "version": "1.0.0",//版本号
  "main": "path/to/main.css",
  "ignore": [
    ".jshintrc",
    "**/*.txt"
  ],
  "dependencies": {//工程依赖的javascript类库
    "<name>": "<version>",
    "<name>": "<folder>",
    "<name>": "<package>"
  },
  "devDependencies": {//开发环境依赖包
    "<test-framework-name>": "<version>"
  }
}
有了bower.json文件,不需要将bower_componets目录加入版本管理中了。别人使用该项目时,从版本管理系统中检出来,在bower.json 所在目录执行命令 bower install ,那么依赖的javascript类库就自动下载安装到当前目录bower_componets下了。
bower install bootstrap --save 将bootstrap依赖写入bower.json中的dependencies中
bower install bootstrap --save-dev 将bootstrap依赖写入bower.json中的devDependencies中
5.安装gulp
gulp 用于前端项目的构建,如监控程序文件变化,检查js代码正确性,压缩js,源码转换到发布目录,启动web 服务测试等等。
安装方法: npm install -g gulp
C:\>npm install -g gulp
\


> [email protected] install C:\Users\Administrator\AppData\Roaming\npm\node_modules\gulp\node_modules\v8flags
> node fetch.js

flags for v8 3.14.5.9 cached.
C:\Users\Administrator\AppData\Roaming\npm\gulp -> C:\Users\Administrator\AppData\Roaming\npm\node_modules\gulp\bin\gulp.js
[email protected] C:\Users\Administrator\AppData\Roaming\npm\node_modules\gulp
├── [email protected]
├── [email protected]
├── [email protected]
├── [email protected]
├── [email protected]
├── [email protected]
├── [email protected]
├── [email protected] ([email protected])
├── [email protected] ([email protected], [email protected], [email protected], [email protected], [email protected])
├── [email protected] ([email protected], [email protected], [email protected])
├── [email protected] ([email protected], [email protected], [email protected], [email protected])
├── [email protected] ([email protected], [email protected], [email protected], [email protected], [email protected], [email protected], [email protected])
└── [email protected] ([email protected], [email protected], [email protected], [email protected], [email protected], [email protected], [email protected], [email protected])
查看gulp版本号:
C:\Windows>gulp --version
[10:37:20] CLI version 3.8.10
gulpfile.js用于定义gulp执行的任务。
6.建立工程目录结构
工程的目录结构可以是任意的,没有固定的结构,自已觉得合理就好了。

image :图片目录
scripts:脚本目录
styles:css目录
vender :依赖的第三方javscript类库或css样式库,(最好是把第三方的类库放到一个公共的http地址或引用cdn ,而不是将第三方类库存在本地程序中)
vender/css:第三方css样式库
vender/js:第三方javascript类库
views :html模版
index.html:程序入口
6.安装依赖库 angularjs 和bootstrap
首先初始化bower.json
在工程根目录(我是里是web目录)执行命令:
D:\web>bower init
? name: webtest
? version: 0.1.0
? description: 前端测试项目
? main file: ./app/index.html
? what types of modules does this package expose?: globals
? keywords:
? authors: yanlei <[email protected]>
? license: MIT
? homepage:
? set currently installed components as dependencies?: Yes
? add commonly ignored files to ignore list?: No
? would you like to mark this package as private which prevents it from being accidentally pub

{
  name: 'webtest',
  version: '0.1.0',
  authors: [
    'yanlei <[email protected]>'
  ],
  description: '前端测试项目',
  main: './app/index.html',
  moduleType: [
    'globals'
  ],
  license: 'MIT',
  private: true
}

? Looks good?: Yes

D:\web>
初始化完成,打开bower.json:
{
  "name": "webtest",
  "version": "0.1.0",
  "authors": [
    "yanlei <[email protected]>"
  ],
  "description": "前端测试项目",
  "main": "./app/index.html",
  "moduleType": [
    "globals"
  ],
  "license": "MIT",
  "private": true
}
安装 angularjs :
D:\web>bower install --save angularjs
bower angularjs#*               cached git://github.com/angular/bower-angular.git#1.3.3
bower angularjs#*             validate 1.3.3 against git://github.com/angular/bower-angular.git
bower angularjs#*                  new version for git://github.com/angular/bower-angular.git#*
bower angularjs#*              resolve git://github.com/angular/bower-angular.git#*
bower angularjs#*             download https://github.com/angular/bower-angular/archive/v1.3.4.
bower angularjs#*              extract archive.tar.gz
bower angularjs#*             resolved git://github.com/angular/bower-angular.git#1.3.4
bower angularjs#~1.3.4         install angularjs#1.3.4

angularjs#1.3.4 bower_components\angularjs
再次打开bower.json:
{
  "name": "webtest",
  "version": "0.1.0",
  "authors": [
    "yanlei <[email protected]>"
  ],
  "description": "前端测试项目",
  "main": "./app/index.html",
  "moduleType": [
    "globals"
  ],
  "license": "MIT",
  "private": true,
  "dependencies": {
    "angularjs": "~1.3.4"
  }
}
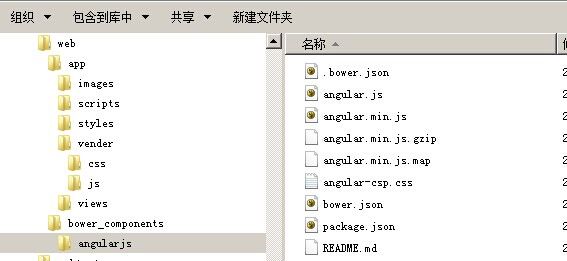
打开web目录看一下:

安装bootstrap:
D:\web>bower install --save bootstrap
bower bootstrap#*               cached git://github.com/twbs/bootstrap.git#3.3.1
bower bootstrap#*             validate 3.3.1 against git://github.com/twbs/bootstrap.git#*
bower jquery#>= 1.9.1           cached git://github.com/jquery/jquery.git#2.1.1
bower jquery#>= 1.9.1         validate 2.1.1 against git://github.com/jquery/jquery.git#>= 1.9.1
bower bootstrap#~3.3.1         install bootstrap#3.3.1
bower jquery#>= 1.9.1          install jquery#2.1.1//jquery也安装了

bootstrap#3.3.1 bower_components\bootstrap//
└── jquery#2.1.1

jquery#2.1.1 bower_components\jquery
bower.json:
{
  "name": "webtest",
  "version": "0.1.0",
  "authors": [
    "yanlei <[email protected]>"
  ],
  "description": "前端测试项目",
  "main": "./app/index.html",
  "moduleType": [
    "globals"
  ],
  "license": "MIT",
  "private": true,
  "dependencies": {
    "angularjs": "~1.3.4",
    "bootstrap": "~3.3.1"
  }
}
目录结构:

7.使用gulp
在工程根目录(web)下执行gulp命令:
D:\web>gulp
[11:26:39] Local gulp not found in D:\web
[11:26:39] Try running: npm install gulp
提示本地没有安装gulp ,需要安装,安装之间需要初始化 package.json文件:
D:\web>npm init
This utility will walk you through creating a package.json file.
It only covers the most common items, and tries to guess sane defaults.

See `npm help json` for definitive documentation on these fields
and exactly what they do.

Use `npm install <pkg> --save` afterwards to install a package and
save it as a dependency in the package.json file.

Press ^C at any time to quit.
name: (web) webtest //项目名称
version: (1.0.0)  //项目版本
description: 前端测试项目  //说明
entry point: (index.js)  //项目的程序入口
test command: //测试命令
git repository: //项目仓库地址
keywords://关键字 为了别人可以搜索到
author://作者
license: (ISC)//版权
About to write to D:\web\package.json:

{
  "name": "webtest",
  "version": "1.0.0",
  "description": "",
  "main": "index.js",
  "dependencies": {},//还没有依赖包
  "devDependencies": {},
  "scripts": {
    "test": "echo \"Error: no test specified\" && exit 1"
  },
  "author": "",
  "license": "ISC"
}
  "author": "",
  "license": "ISC"
}


Is this ok? (yes) yes
项目根目录下增加了package.json文件。
安装gulp到本地:
D:\web>npm install --save-dev gulp
npm WARN package.json [email protected] No description
npm WARN package.json [email protected] No repository field.
npm WARN package.json [email protected] No README data
|


> [email protected] install D:\web\node_modules\gulp\node_modules\v8flags
> node fetch.js

flags for v8 3.14.5.9 cached.
[email protected] node_modules\gulp
├── [email protected]
├── [email protected]
├── [email protected]
├── [email protected]
├── [email protected]
├── [email protected]
├── [email protected]
├── [email protected] ([email protected])
├── [email protected] ([email protected], [email protected], [email protected], [email protected], [email protected])
├── [email protected] ([email protected], [email protected], [email protected], [email protected])
├── [email protected] ([email protected], [email protected], [email protected])
├── [email protected] ([email protected], [email protected], [email protected], [email protected], [email protected], [email protected], [email protected], [email protected]
└── [email protected] ([email protected], [email protected], [email protected], [email protected], [email protected], [email protected], [email protected])
打开package.json 看一下:
{
  "name": "webtest",
  "version": "1.0.0",
  "description": "",
  "main": "index.js",
  "dependencies": {},
  "devDependencies": {
    "gulp": "^3.8.10"
  },
  "scripts": {
    "test": "echo \"Error: no test specified\" && exit 1"
  },
  "author": "",
  "license": "ISC"
}
执行gulp命令时,提示:
D:\web>gulp
[11:32:32] No gulpfile found
gulp执行需要gulpfile.js ,该 文件里定义了需要执行的任务。 可以手动建一个:
gulpfile.js
var gulp = require('gulp');

browserSync = require('browser-sync');

// Start the server
gulp.task('browser-sync', function() {
    browserSync({
        server: {
            baseDir: "./app"
        }
    });
});

// 将bower的库文件对应到指定位置
gulp.task('refBowerComponents',function() {
    gulp.src('./bower_components/angularjs/angular.min.js')
        .pipe(gulp.dest('./app/vender/js'));
    gulp.src('./bower_components/angularjs/angular.min.js.map')
        .pipe(gulp.dest('./app/vender/js'));
    gulp.src('./bower_components/bootstrap/dist/js/bootstrap.min.js')
        .pipe(gulp.dest('./app/vender/js'));
    gulp.src('./bower_components/jquery/dist/jquery.min.js')
        .pipe(gulp.dest('./app/vender/js'));
    gulp.src('./bower_components/jquery/dist/jquery.min.map')
        .pipe(gulp.dest('./app/vender/js'));
    //css
    gulp.src('./bower_components/bootstrap/dist/css/bootstrap.min.css')
        .pipe(gulp.dest('./app/vender/css/'));
});
// Compile SASS & auto-inject into browsers
gulp.task('sass', function () {
    return gulp.src('./app/sass/*.scss')
        .pipe(sass({includePaths: ['scss']}))
        .pipe(gulp.dest('./app/styles/style.css'))
        .pipe(browserSync.reload({stream:true}));
});

// Reload all Browsers
gulp.task('bs-reload', function () {
    browserSync.reload();
});
 var files = [
    './app/*.html',
    './app/images/**/*.*',
    './app/views/**/*.html',
    './app/scripts/**/*.js',
    './app/styles/**/*.css'
  ];
// Watch scss AND html files, doing different things with each.
gulp.task('default', ['browser-sync'], function () {
    gulp.watch("scss/*.scss", ['sass']);
    gulp.watch(files, ['bs-reload']);
});
gulp详细文档见:http://markpop.github.io/2014/09/17/Gulp%E5%85%A5%E9%97%A8%E6%95%99%E7%A8%8B/
这里使用了一个browser-sync,它能够开启一个静态web服务器,供测试,当源码发生变化时,可以自动刷新页面,不用担心缓存问题 。
安装browser-sync:(官网:http://www.browsersync.io/)
D:\web>npm install browser-sync --save-dev
npm WARN package.json [email protected] No description
npm WARN package.json [email protected] No repository field.
npm WARN package.json [email protected] No README data
|
> [email protected] install D:\web\node_modules\browser-sync\node_modules\socket.io\node_modules\engine.io\node_modules\ws
> (node-gyp rebuild 2> builderror.log) || (exit 0)

/
D:\web\node_modules\browser-sync\node_modules\socket.io\node_modules\engine.io\node_modules\ws>node "C:\Program Files\nodejs\node_modules\npm\bin\node-g
.js" rebuild
/


> [email protected] install D:\web\node_modules\browser-sync\node_modules\socket.io\node_modules\socket.io-client\node_modules\engine.io-client\node_modules\ws
> (node-gyp rebuild 2> builderror.log) || (exit 0)

-
D:\web\node_modules\browser-sync\node_modules\socket.io\node_modules\socket.io-client\node_modules\engine.io-client\node_modules\ws>node "C:\Program Fil
..\node_modules\node-gyp\bin\node-gyp.js" rebuild
[email protected] node_modules\browser-sync
├── [email protected]
├── [email protected]
├── [email protected]
├── [email protected]
├── [email protected]
├── [email protected]
├── [email protected]
├── [email protected]
├── [email protected]
├── [email protected]
├── [email protected] ([email protected])
├── [email protected] ([email protected])
├── [email protected] ([email protected])
├── [email protected] ([email protected])
├── [email protected] ([email protected], [email protected])
├── [email protected] ([email protected], [email protected], [email protected], [email protected], [email protected], [email protected])
├── [email protected] ([email protected], [email protected], [email protected], [email protected])
├── [email protected] ([email protected], [email protected], [email protected])
├── [email protected] ([email protected], [email protected], [email protected], [email protected])
├── [email protected] ([email protected])
├── [email protected] ([email protected])
└── [email protected] ([email protected], [email protected], [email protected], [email protected], [email protected], [email protected])
安装完成后,执行gulpfile.js里定义的任务:‘refBowerComponents’,将bower_components中的第三方javascript及css文件copy 到 vender目录,refBowerComponents任务定义如下:
// 将bower的库文件对应到指定位置
gulp.task('refBowerComponents',function() {
    gulp.src('./bower_components/angularjs/angular.min.js')
        .pipe(gulp.dest('./app/vender/js'));
    gulp.src('./bower_components/angularjs/angular.min.js.map')
        .pipe(gulp.dest('./app/vender/js'));
    gulp.src('./bower_components/bootstrap/dist/js/bootstrap.min.js')
        .pipe(gulp.dest('./app/vender/js'));
    gulp.src('./bower_components/jquery/dist/jquery.min.js')
        .pipe(gulp.dest('./app/vender/js'));
    gulp.src('./bower_components/jquery/dist/jquery.min.map')
        .pipe(gulp.dest('./app/vender/js'));
    //css
    gulp.src('./bower_components/bootstrap/dist/css/bootstrap.min.css')
        .pipe(gulp.dest('./app/vender/css/'));
});
执行命 令:gulp refBowerComponents
D:\web>gulp refBowerComponents
[14:44:08] Using gulpfile D:\web\gulpfile.js
[14:44:09] Starting 'refBowerComponents'...
[14:44:09] Finished 'refBowerComponents' after 13 ms
查看vender目录:

需要的js库文件已经copy 过来了。
环境就搭建好了,可以开发了。
需要测试的时候执行:gulp (default任务被调用),启用web服务器,端口为3000,以./app为webroot,当html或css或js变化时自动刷新打开的页面。
gulpfile.js 配置如下:
gulp.task('browser-sync', function() {
    browserSync({
        server: {
            baseDir: "./app"
        }
    });
});
// Reload all Browsers
gulp.task('bs-reload', function () {
    browserSync.reload();
});

 var files = [
    './app/*.html',
    './app/images/**/*.*',
    './app/views/**/*.html',
    './app/scripts/**/*.js',
    './app/styles/**/*.css'
  ];
// Watch scss AND html files, doing different things with each.
gulp.task('default', ['browser-sync'], function () {
    gulp.watch("scss/*.scss", ['sass']);
    gulp.watch(files, ['bs-reload']);
});
执行gulp命令:
D:\web>gulp
[14:53:19] Using gulpfile D:\web\gulpfile.js
[14:53:19] Starting 'browser-sync'...
[14:53:19] Finished 'browser-sync' after 43 ms
[14:53:19] Starting 'default'...
[14:53:19] Finished 'default' after 13 ms
[BS] Local URL: http://localhost:3000
[BS] Serving files from: ./app
8.使用git
打开 git bash :

在这个窗口中执行git命令。
需要配置用户名和邮箱:
$ git config --global user.name "Your Name"
$ git config --global user.email "[email protected]"
配置完成后会在 C:\Users\Administrator生成一个.gitconfig文件。
a.初始化本地仓库:
在项目根目录下执行命令:git init
$git init
Initialized empty Git repository in /D/web/.git/
会生成一个.git的目录,就是git版本库的地址,提交的文件都会保存到该目录中,也可以从目录中检出之前版本的文件。
执行命令:git status (查看文件状态)
$git status
On branch master

Initial commit

Untracked files:
  (use "git add <file>..." to include in what will be committed)

        .gitignore
        .idea/
        app/
        bower.json
        bower_components/
        gulpfile.js
        node_modules/
        package.json

nothing added to commit but untracked files present (use "git add" to track)
提示标红的文件未被git所监控,需要执行git add命令将文件提交到git索引区,再执行git commit 提交到版本库。
但目录:bower_components/,node_modules/,.idea/(使用webstromIDE开发自动生成的目录)不希望提交的版库,则在.git同级目录中创建.gitignore文件,这个文件表示忽略一些文件及目录,即不添加到版本库中。
.gitignore文件如下:
$more .gitignore
Thumbs.db
bower_components
node_modules
.idea
再次执行 git status
$git status
On branch master

Initial commit

Untracked files:
  (use "git add <file>..." to include in what will be committed)

        .gitignore
        app/
        bower.json
        gulpfile.js
        package.json

nothing added to commit but untracked files present (use "git add" to track)
配置的文件和目录被忽略掉了。
执行命令:git add -A ,(所有文件添加到git索引区)
$git add -A
再执行git status 看一下:
$git status
On branch master

Initial commit

Changes to be committed:
  (use "git rm --cached <file>..." to unstage)

        new file:   .gitignore
        new file:   app/index.html
        new file:   app/vender/css/bootstrap.min.css
        new file:   app/vender/js/angular.min.js
        new file:   app/vender/js/angular.min.js.map
        new file:   app/vender/js/bootstrap.min.js
        new file:   app/vender/js/jquery.min.js
        new file:   app/vender/js/jquery.min.map
        new file:   bower.json
        new file:   gulpfile.js
        new file:   package.json
这些文件可以使用 git commit -m '说明' 提交到版本库,这些文件就生成了一个版本,可以根据说明再取出来。
$git commit -m '模版项目'
[master (root-commit) 9d3d713] '模版项目'
 11 files changed, 378 insertions(+)
 create mode 100644 .gitignore
 create mode 100644 app/index.html
 create mode 100644 app/vender/css/bootstrap.min.css
 create mode 100644 app/vender/js/angular.min.js
 create mode 100644 app/vender/js/angular.min.js.map
 create mode 100644 app/vender/js/bootstrap.min.js
 create mode 100644 app/vender/js/jquery.min.js
 create mode 100644 app/vender/js/jquery.min.map
 create mode 100644 bower.json
 create mode 100644 gulpfile.js
 create mode 100644 package.json
提交完成后执行git status 看一下:
$ git status
On branch master
nothing to commit, working directory clean
修改index.html ,再执行 git status:
$ git status
On branch master
Changes not staged for commit:
  (use "git add <file>..." to update what will be committed)
  (use "git checkout -- <file>..." to discard changes in working direct

        modified:   app/index.html

no changes added to commit (use "git add" and/or "git commit -a")

Administrator@LNYD-03-04-YANL /d/web (master)
再次执行 git add 文件名,--> git commit -m 就可以再次提交了。
也可以执行 git checkout --文件名 ,从索引区取出覆盖修改过的工作目录的本地文件(未执行add的)。
$ git checkout -- app/index.html

Administrator@LNYD-03-04-YANL /d/web (master)
git checkout 执行完之后,发现index.html 又变回修改之间的样子了。
再次修改index.html ,并add 、commit 到版本库 。
现在测试一下,把index 回退到最版本:
使用git log 查看commit信息:
$ git log
commit 46b7d3018493a993c90038d59bc14c56414effb0
Author: yanlei <[email protected]>
Date:   Tue Nov 25 16:24:13 2014 +0800

    增加HELLO输出

commit dd6969e241b41b40390a4a59501b1a47f03c20f6
Author: yanlei <[email protected]>
Date:   Tue Nov 25 16:04:53 2014 +0800

    '空白目录补充'

commit 9d3d71370b78fed189b209cd59bbab4dfc161a5d
Author: yanlei <[email protected]>
Date:   Tue Nov 25 16:02:36 2014 +0800

    '模版项目'
所index.html回退到第一次提交时的样子:
将指定版本的index.html 存入索引区:
$ git reset dd6969e241b41b40390a4a59501b1a47f03c20f6 app/index.html
Unstaged changes after reset:
M       app/index.html
已在索引区恢复,但当前版本库和工作目录还是之间的文件。
提交到当前版本库:
$ git commit -m 'revert index.html'
[master d3a37db] revert index.html
 1 file changed, 1 insertion(+), 1 deletion(-)
恢复工作目录中的index.html:
进入app目录:
$ git checkout index.html
再打开index.html ,发现已回退到最初版本。
如果当前程序想回退到某个commit 版本,先查看一下commit log :
$ git log
commit d3a37dbc2bdb039afec546ad1fa0d638506b3226
Author: yanlei <[email protected]>
Date:   Tue Nov 25 16:39:06 2014 +0800

    revert index.html

commit 46b7d3018493a993c90038d59bc14c56414effb0
Author: yanlei <[email protected]>
Date:   Tue Nov 25 16:24:13 2014 +0800

    增加HELLO输出

commit dd6969e241b41b40390a4a59501b1a47f03c20f6
Author: yanlei <[email protected]>
Date:   Tue Nov 25 16:04:53 2014 +0800

    '空白目录补充'

commit 9d3d71370b78fed189b209cd59bbab4dfc161a5d
Author: yanlei <[email protected]>
Date:   Tue Nov 25 16:02:36 2014 +0800

    '模版项目'

Administrator@LNYD-03-04-YANL /d/web/app (master)
如果要回退到‘增加HELLO输出’这一版(工作目录中文件被该版文件覆盖,该版之后修改过的未提交的将
找不到了。)
$ git reset --hard 46b7d3018493a993c90038d59bc14c56414effb0
HEAD is now at 46b7d30 增加HELLO输出
当前工作区的程序就回退到'增加HELLO输出'这一版了。 可以继续修改提交了。
git 命令:
git add 文件名 :把文件添加到索引区
git commit :把索引区的文件提前到版本库
git status:查看文件状态
git log:查看commit 日志
git checkout 文件名,文件修改但未add的可以从索引区检出覆盖本地工作目录文件
git reset HEAD 文件名:文件修改已经add过了,需要使用’git reset HEAD 文件名‘ ,从当前版本库检出覆盖索引区,再执行 git checkout 文件名,从索引区覆盖本地工作目录文件
git reset --hard commit版本号: 当前工作目录及索引区由指定commit版本号的程序覆盖。
git reset commit版本号 文件名:单个文件回退到某一版本号,仅覆盖索引区对应的文件,需要执行 commit 提交到当前版,git checkout 文件名,从索引区检出覆盖本地工作目录中对应的文件。
发布到远程仓库:
先生成ssh key:
$ ssh-keygen -t rsa -C "[email protected]"
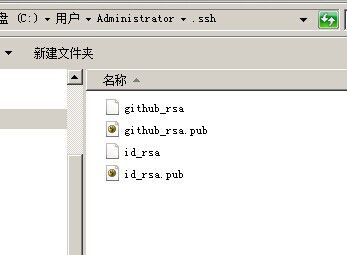
在 C:\Users\Administrator\.ssh下会生成密钥文件:

把id_rsa.pub文件的内容配置到远程仓库中,就允许连接到远程仓库了。
添加远程仓库地址到本地,并设置别名为 :origin
$ git remote add origin https://git.oschina.net/iframe/FrontWebTemplate.git
在工程根目录下,推送本地仓库内容到远程仓库:
$ git push origin master
Username for 'https://git.oschina.net': [email protected]
Password for 'https://[email protected]@git.oschina.net':
Counting objects: 29, done.
Delta compression using up to 2 threads.
Compressing objects: 100% (23/23), done.
Writing objects: 100% (29/29), 272.41 KiB | 0 bytes/s, done.
Total 29 (delta 4), reused 0 (delta 0)
To https://git.oschina.net/iframe/FrontWebTemplate.git
 * [new branch]      master -> master

Administrator@LNYD-03-04-YANL /d/web/app (master)
这样在家里电脑上,生成ssh key ,配置到远程仓库,执行命令:
$ git clone https://git.oschina.net/iframe/FrontWebTemplate.git
Cloning into 'FrontWebTemplate'...
Username for 'https://git.oschina.net': [email protected]
Password for 'https://[email protected]@git.oschina.net':
remote: Counting objects: 29, done.
remote: Compressing objects: 100% (23/23), done.
remote: Total 29 (delta 4), reused 0 (delta 0)
Unpacking objects: 100% (29/29), done.
Checking connectivity... done.

Administrator@LNYD-03-04-YANL /d/web1
$ ls
FrontWebTemplate

Administrator@LNYD-03-04-YANL /d/web1
$ cd FrontWebTemplate

Administrator@LNYD-03-04-YANL /d/web1/FrontWebTemplate (master)
$ ls
app  bower.json  gulpfile.js  package.json

Administrator@LNYD-03-04-YANL /d/web1/FrontWebTemplate (master)
进入colne 的项目目录,执行npm install 和 bower install 就可以了。
$ npm install
npm WARN package.json [email protected] No description
npm WARN package.json [email protected] No repository field.
npm WARN package.json [email protected] No README data
-


> [email protected] install d:\web1\FrontWebTemplate\node_modules\gulp\node_modules\
v8flags
> node fetch.js

flags for v8 3.14.5.9 cached.
/


> [email protected] install d:\web1\FrontWebTemplate\node_modules\browser-sync\node_modul
es\socket.io\node_modules\engine.io\node_modules\ws
> (node-gyp rebuild 2> builderror.log) || (exit 0)

-
d:\web1\FrontWebTemplate\node_modules\browser-sync\node_modules\socket.io\node_m
odules\engine.io\node_modules\ws>node "c:\Program Files\nodejs\node_modules\npm\
bin\node-gyp-bin\\..\..\node_modules\node-gyp\bin\node-gyp.js" rebuild
-


> [email protected] install d:\web1\FrontWebTemplate\node_modules\browser-sync\node_modu
les\socket.io\node_modules\socket.io-client\node_modules\engine.io-client\node_m
odules\ws
> (node-gyp rebuild 2> builderror.log) || (exit 0)

\
d:\web1\FrontWebTemplate\node_modules\browser-sync\node_modules\socket.io\node_m
odules\socket.io-client\node_modules\engine.io-client\node_modules\ws>node "c:\P
rogram Files\nodejs\node_modules\npm\bin\node-gyp-bin\\..\..\node_modules\node-g
yp\bin\node-gyp.js" rebuild
[email protected] node_modules\gulp
├── [email protected]
├── [email protected]
├── [email protected]
├── [email protected]
├── [email protected]
├── [email protected]
├── [email protected] ([email protected])
├── [email protected]
├── [email protected] ([email protected], [email protected], supports-colo
[email protected], [email protected], [email protected])
├── [email protected] ([email protected], [email protected], end-of-stream
@0.1.5)
├── [email protected] ([email protected], [email protected], [email protected], findu
[email protected])
├── [email protected] ([email protected], [email protected], [email protected], defaul
[email protected], [email protected], [email protected], [email protected], [email protected])
└── [email protected] ([email protected], [email protected], lodash@2.
4.1, [email protected], [email protected], [email protected], [email protected])

[email protected] node_modules\browser-sync
├── [email protected]
├── [email protected]
├── [email protected]
├── [email protected]
├── [email protected]
├── [email protected]
├── [email protected] ([email protected])
├── [email protected]
├── [email protected]
├── [email protected]
├── [email protected]
├── [email protected] ([email protected])
├── [email protected] ([email protected])
├── [email protected] ([email protected])
├── [email protected] ([email protected])
├── [email protected] ([email protected], [email protected], [email protected], finalhandl
[email protected])
├── [email protected] ([email protected], [email protected])
├── [email protected] ([email protected], [email protected], [email protected],
 [email protected])
├── [email protected] ([email protected])
├── [email protected] ([email protected], [email protected], [email protected], [email protected].
3, [email protected], [email protected])
├── [email protected] ([email protected], [email protected], [email protected])
└── [email protected] ([email protected], [email protected], socket.io-adapter@0.
3.1, [email protected], [email protected], [email protected])
$ bower install
bower cached        git://github.com/angular/bower-angular.git#1.3.4
bower validate      1.3.4 against git://github.com/angular/bower-angular.git#~1.
3.4
bower cached        git://github.com/twbs/bootstrap.git#3.3.1
bower validate      3.3.1 against git://github.com/twbs/bootstrap.git#~3.3.1
bower cached        git://github.com/jquery/jquery.git#2.1.1
bower validate      2.1.1 against git://github.com/jquery/jquery.git#>= 1.9.1
bower install       angularjs#1.3.4
bower install       bootstrap#3.3.1
bower install       jquery#2.1.1

angularjs#1.3.4 bower_components\angularjs

bootstrap#3.3.1 bower_components\bootstrap
└── jquery#2.1.1

jquery#2.1.1 bower_components\jquery
执行gulp命 令:
$ gulp
[17:29:50] Using gulpfile d:\web1\FrontWebTemplate\gulpfile.js
[17:29:50] Starting 'browser-sync'...
[17:29:50] Finished 'browser-sync' after 53 ms
[17:29:50] Starting 'default'...
[17:29:50] Finished 'default' after 15 ms
[BS] Local URL: http://localhost:3000
[BS] Serving files from: ./app
web 服务器启动了。 修改测试了。


