CSS圆角
在网页设计越来越精美的今天,圆角的应用已经越来越广泛这篇文章将分别讲述圆角在CSS2和CSS3里的创建方法。
从易用性来说,CSS3不需要额外的标记和图片,比CSS2要先进得多。但当应用在网站上时,采用CSS2能使页面在主流浏览器上的效果更加一致。下面将详细阐述创建圆角的各种方法和其对浏览器的兼容性。
注:本文以第一个配图的效果作为演示。
用CSS2创建圆角的方法
1.固定宽度的圆角
这个是最简单的方法最多只需要使用两个图片(顶部和底部),并且也不需要添加额外的标记。在这里,我使用以下两个图片做背景:![]()
![]()
HTML:
1 2 3 4 5 6 7 8 9 10 11 12 13 |
<div class="box"> <h2>This is a heading</h2> Lorem ipsum dolor sit amet, consectetur adipiscing elit. Sed vehicula ligula eu diam tincidunt fermentum. Curabitur facilisis enim non libero cursus eu varius enim suscipit. Ut venenatis vehicula lorem ut hendrerit. Ut adipiscing augue sed ante volutpat eget ornare erat facilisis. In hac habitasse platea dictumst. </div> |
CSS:
1 2 3 4 5 6 7 8 9 10 11 12 13 14 |
.box { width:200px; background-color:#EE2E24; background:url("img/rounded-top.jpg") no-repeat left bottom; color:#fff;} .box h2 { background:url("img/rounded-top.jpg") no-repeat left top; padding: 10px 10px 0 10px; } .box p { padding: 10px; } |
优点:
用最少的标记和图片实现了圆角效果(CSS好点的童鞋只要一个图片就可以搞定了)。
缺点:
不够灵活,每次更改框架的宽度都要更新背景图片。
2.灵活的圆角
为了能让圆角更加灵活,我们可以把容器里的每个圆角都做成一个独立的元素,通过CSS强行定位到父容器的四个角上。在这个方法里,我们只需要用到右边这个图片。![]()
HTML:
1 2 3 4 5 6 7 8 9 10 11 12 13 14 15 16 17 |
<div class="box"> <span class="crnr tl"></span> <span class="crnr tr"></span> <h2>This is a heading</h2> Lorem ipsum dolor sit amet, consectetur adipiscing elit. Sed vehicula ligula eu diam tincidunt fermentum. Curabitur facilisis enim non libero cursus eu varius enim suscipit. Ut venenatis vehicula lorem ut hendrerit. Ut adipiscing augue sed ante volutpat eget ornare erat facilisis. In hac habitasse platea dictumst. <span class="crnr bl"></span> <span class="crnr br"></span> </div> |
CSS:
1 2 3 4 5 6 7 8 9 10 11 12 13 14 15 16 17 18 19 20 21 22 23 24 25 26 27 28 29 30 31 32 33 34 35 36 |
.box { position:relative; width:200px; height:200px; } .crnr { position:absolute; background:url("img/crnr-sprite.jpg") no-repeat; width:20px; height:20px; } .tl { left:0; top:0; background-position: 0 0 ; } .tr { right:0; top:0; background-position: -25px 0 ; } .bl { left:0; bottom:0; background-position: 0 -25px ; } .br { right:0; bottom:0; background-position: -25px -25px ; } |
优点:
能自动适应父容器的大小,浏览器兼容性非常强。
缺点:
为了实现圆角,添加了一些没有意义的标记。
用CSS3创建圆角的方法
1.Border radius(边界半径)
W3C建议已经建议为boder增加几个属性选项,其中之一就是border-radius,目前这个属性已经被Firefox和Safari 3(Chrome)支持,比较遗憾的是IE不支持此属性。
HTML:
1 2 3 4 5 6 7 8 9 10 11 12 13 |
<div class="box"> <h2>This is a heading</h2> Lorem ipsum dolor sit amet, consectetur adipiscing elit. Sed vehicula ligula eu diam tincidunt fermentum. Curabitur facilisis enim non libero cursus eu varius enim suscipit. Ut venenatis vehicula lorem ut hendrerit. Ut adipiscing augue sed ante volutpat eget ornare erat facilisis. In hac habitasse platea dictumst. </div> |
CSS:
1 2 3 4 5 6 7 8 |
.box { width:200px; height:200px; background-color:#EE2E24; -moz-border-radius: 20px; -webkit-border-radius: 20px; border-radius: 20px; } |
优点:
这种方法不需要添加任何多余的标记,而且可以非常方便睇修改圆角的半径,是最易上手的方法。
缺点:
虽然符合W3C的标准,但缺乏浏览器支持。
2.多个背景图片
CSS3对background属性做出了一些重大改进,在CSS3标准里,我们可以把多个背景图片应用到同一个元素里。我们利用这个特性为容器加上圆角效果。HTML代码与上例保持一致,在CSS中需要先把四个圆角的图片分别做好
CSS:
1 2 3 4 5 6 |
.box { background: url(top-left.gif) top left no-repeat, url(top-right.jpg) top right no-repeat, url(bottom-left.gif) bottom left no-repeat, url(bottom-right.gif) bottom right repeat-y; } |
优点:
没有多余的标记,可以分别设置每个圆角的半径。
缺点:
使用了W3C未明确定义的方法,浏览器兼容性很差,目前只有Safari和Chrome对此方法支持良好。
3.Border Image(图形边界)
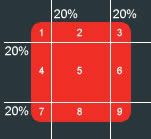
 使用图片作为border将是未来使用最广泛的CSS属性之一,这个属性是对border-style的升级。此属性允许您切片成的规则的9个不同部分的图像,然后在浏览器便会作为border的基本形状来进行渲染。如右图,这种技术称为九切片缩放,可以避免圆角出现失真。我们不需要手动切开图片,CSS能帮我们实现切片功能。
CSS:
1 2 3 4 |
.box { -webkit-border-image : url (box.jpg) 20% 20% 20% 20% round round; -moz-border-image : url (box.jpg) 20% 20% 20% 20% round round; } |
优点:
不需要添加多余的标记,使用非常简单,而且可以自由改变每个圆角的半径。
缺点:
W3C并为确定这个属性的使用方法,目前只可以用浏览器的私有属性实现,浏览器兼容性较差。目前支持这个方法的游览器有Firefox,Chrome,Safari,Opera。
后记:
网页圆角的实现方法是目前争议较大的一个话题。还有一个通过由若干个不同宽度的Div组合做出圆角的方法,该方法对浏览器的兼容性是最强的,由于篇幅所限,没有提及。虽然本文提及的方法都有明显的缺点,但在浏览器更新越来越快的今天,我们可以预见旧式浏览器将很快被淘汰,权当是对未来CSS写法的预习吧。
原文:Creating rounded corners with CSS2 & CSS3。有删改。