JList列表框
JList和JCombobox组件从本质上说是类似的,它们都是提供了一系列列表数据供用户选择,从表现形式上可以把JCombobox看做一个JList和一个JTextField组成,通过callback机制回调选择项目.JList并没有复杂的UI,当然也就没有复杂的画面了,所以对于提高JList的画面表现,一般继承ListCellRenderer加入自己的表现样式就可以了,当然依照Swing的MVC原则,需要修改数据时,实现ListModel接口就可以了,对选择样式修改,实现ListSelectionModel接口就可以了,它们的实现都相对简单,功能也相对简单,一般都不需要实现,对于复杂画面样式也不推荐JList,单列的JTable和自己实现的JTree比它好很多.
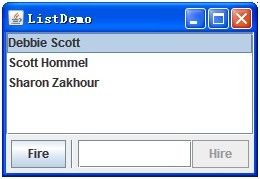
JList的基本使用很简单,先看Sun官方的使用例子:
界面如下:
<!--[if gte vml 1]> <![endif]-->
只需要新创建一个DefaultListModel,赋予需要显示的值就可以了.
DefaultListModel listModel = new DefaultListModel();
listModel.addElement("Debbie Scott");
listModel.addElement("Scott Hommel");
listModel.addElement("Sharon Zakhour");
然后创建JList:
JList list = new JList(listModel);
list.setSelectionMode(ListSelectionModel.SINGLE_SELECTION);
当然可以给它加监听:
list.addListSelectionListener(this);
也可以加鼠标的Click监听,这是所有JComponent都具有的能力.
然后实现监听就可以了:
// This method is required by ListSelectionListener.
publicvoid valueChanged(ListSelectionEvent e) {
if (e.getValueIsAdjusting() == false) {
最后把创建JList放入画面上,就完成了.
Sun官方还给了一个使用JList的例子,在同一行显示多个项目:
界面如下:

<!--[if gte vml 1]> <![endif]-->
创建JList的过程和前一个例子相同,只是需要继承JList把它的getScrollableUnitIncrement方法重写,变成我们自己的表现样式:
/**
* Returns the distance to scroll to expose the next or previous
* row (for vertical scrolling) or column (for horizontal scrolling).
*/
@Override
publicint getScrollableUnitIncrement(Rectangle visibleRect, int orientation, int direction) {
这个方法就是描绘JList前一个后一个行或者列的表现的,只需要根据容器的大小算出现在每个格子的大小:
Rectangle r = getCellBounds(row, row);
然后依次放置就可以了,布局使用FlowLayout.
Point loc = r.getLocation();
loc.y--;
int prevIndex = locationToIndex(loc);
Rectangle prevR = getCellBounds(prevIndex, prevIndex);
if (prevR == null || prevR.y >= r.y) {
return 0;
}
return prevR.height;
当然也可以重写其它的类实现其它样式,复杂样式也可以重写JList的ListUI.
其它的JList的设置颜色,字体,背景等都很简单,按照API就可以了,至于拖拽操作也和其它组件一样.
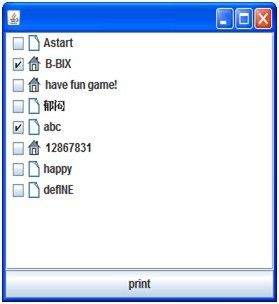
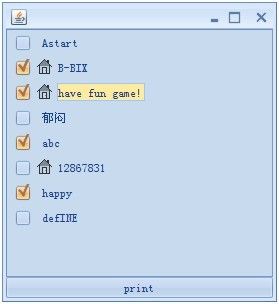
最后我们实现一个自己的JList,在它的单元格内加入图片,复选框,设置它是否可以选择,图片是否可以显示,当然你也可以加入其它的表现形式,只需要再写入新的接口.
界面如下:

<!--[if gte vml 1]> <![endif]--><!--[if gte vml 1]> <![endif]--><!--[if gte vml 1]> <![endif]-->
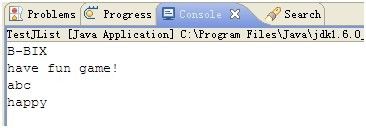
当单元格是选中状态时,点击Print按钮输入选中的项目:
<!--[if gte vml 1]> <![endif]-->
工程目录如下:
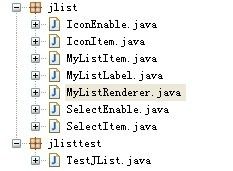
<!--[if gte vml 1]> <![endif]-->
先看几个接口,
/**
* the interface that the JComboBox can Icon enable.
*/
publicinterface IconEnable {
/**
* the interface that the list can have icon.
*/
publicinterface IconItem {
/**
* the interface that the JComboBox can select enable.
*/
publicinterface SelectEnable {
/**
* the interface that the list can have select.
*/
publicinterface SelectItem {
它们都提供
/**
* set bean.
*/
publicvoid setXXX(XXX XXX);
/**
* get bean.
*/
public XXX getXXX();
来表示JList某项自定义属性.
然后自定义一个类实现这些接口:
/**
* list item.
*/
publicclass MyListItem implements IconItem, IconEnable, SelectEnable,
SelectItem {
它的属性:
/**
* list value.
*/
private Object listItem = null;
/**
* list is select.
*/
privatebooleanisSelected = false;
/**
* list icon.
*/
private Icon icon = null;
/**
* list icon enable.
*/
privatebooleanisIconEnable = true;
/**
* list is select enable.
*/
privatebooleanisSelectEnable = true;
这样就使这个类可以保存JList的单元格的项,我们的JList的Model使用这个类的实例作为Bean来存储JList的信息.
接着是一个JList项目的显示描绘类,
/**
* the list cell's label.
*/
publicclass MyListLabel extends JLabel {
它复写JLabel的
@Override
publicvoid setBackground(Color color) {
@Override
publicvoid paint(Graphics g) {
@Override
public Dimension getPreferredSize() {
调整JList的单元格的颜色,图片样式,字体,焦点偏移和最适合大小.
g.setColor(UIManager.getColor("Tree.textBackground"));
g.drawRect(imageOffset, 0, d.width - 1 - imageOffset,
d.height - 1);
最后就是重要的画面表现类MyListRenderer了,它需要实现ListCellRenderer接口
/**
* JList cell renderer.
*/
publicclass MyListRenderer extends JPanel implements MouseListener,
ListCellRenderer {
通过继承JPanel,使JList的单元格可以实现任何的控件效果,这里是放置一个JCheckBox和我们自定义的MyListLabel:
/**
* JList cell renderer.
*/
public MyListRenderer(JList list) {
this.list = list;
setLayout(null);
add(checkBox = new JCheckBox());
add(label = new MyListLabel());
checkBox.setBackground(UIManager.getColor("Tree.textBackground"));
label.setForeground(UIManager.getColor("Tree.textForeground"));
commonIcon = UIManager.getIcon("Tree.leafIcon");
}
实现接口的getListCellRendererComponent方法,返回我们需要的呈现:
/**
* Return a component that has been configured to display the specified
* value.
*/
@Override
public Component getListCellRendererComponent(JList list, Object value, int index, boolean isSelected, boolean cellHasFocus) {
其中value就是我们的自定义单元格MyListItem,可以设置属性:
设置可用: setEnabled(((SelectEnable) value).isSelectEnabled());
设置选择: checkBox.setSelected(((SelectItem) value).getSelect());
设置Label的选择: label.setSelected(isSelected);
设置字体和图片:
label.setFont(list.getFont());
label.setText(value.toString());
label.setFocus(cellHasFocus);
if (((IconEnable) value).isIconEnabled()) {
Icon icon = ((IconItem) value).getIcon();
if (icon == null) {
icon = commonIcon;
}
label.setIcon(icon);
}
同样也通过重写getPreferredSize、setBackground和doLayout设置合适大小、颜色和布局:
Dimension d_check = checkBox.getPreferredSize();
Dimension d_label = label.getPreferredSize();
returnnew Dimension(d_check.width + d_label.width,
(d_check.height < d_label.height ? d_label.height
: d_check.height));
通过两个组件的合适大小可以得出两个组件的位置:
y_check = (d_label.height - d_check.height) / 2;
然后通过设定位置,做出Layout:
label.setLocation(d_check.width, y_label);
label.setBounds(d_check.width, y_label, d_label.width, d_label.height);
最后处理的是JList的鼠标选择JCheckBox事件,
@Override
publicvoid mouseClicked(MouseEvent e) {
通过选择定位选择的Item,然后对应设置选中状态,刷新:
int index = list.locationToIndex(e.getPoint());
MyListItem item = (MyListItem) list.getModel().getElementAt(index);
if (((SelectEnable) item).isSelectEnabled()) {
item.setSelect(!((SelectItem) item).getSelect());
Rectangle rect = list.getCellBounds(index, index);
ist.repaint(rect);
}
这个我们的JList就设置完了,它的使用和普通的一样,只不过Model使用的是MyListItem数组:
MyListItem[] items = { new MyListItem("Astart"),
new MyListItem("B-BIX", true, icon),
new MyListItem("have fun game!", false, null, false, false),
new MyListItem("郁闷", false),
new MyListItem("abc", true),
new MyListItem("12867831", false, icon),
new MyListItem("happy", false, null, false, true),
new MyListItem("defINE", false, null) };
JList jList = new JList(items);
设置Renderer:
jList.setCellRenderer(new MyListRenderer(jList));
然后得到的JList就和普通JComponent一样使用了.