集群监视项目Ganglia
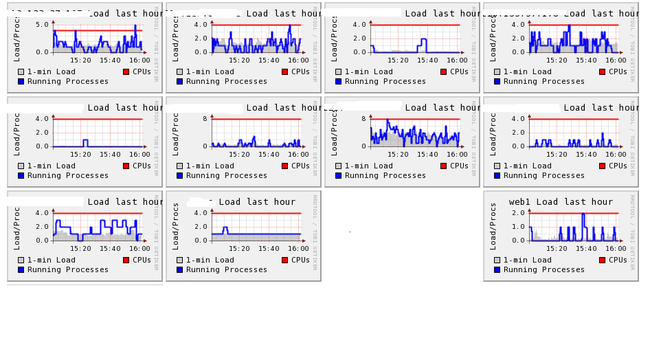
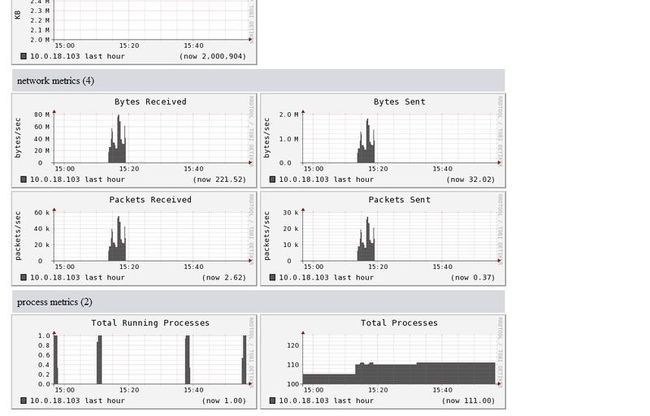
===============ab测试异常效果截图
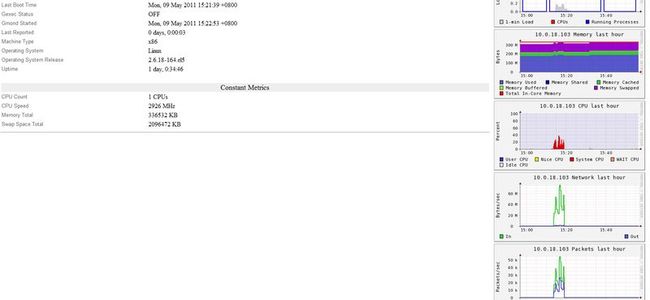
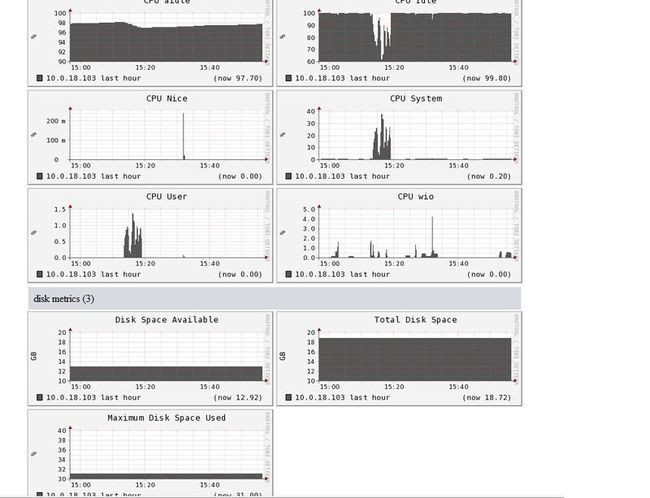
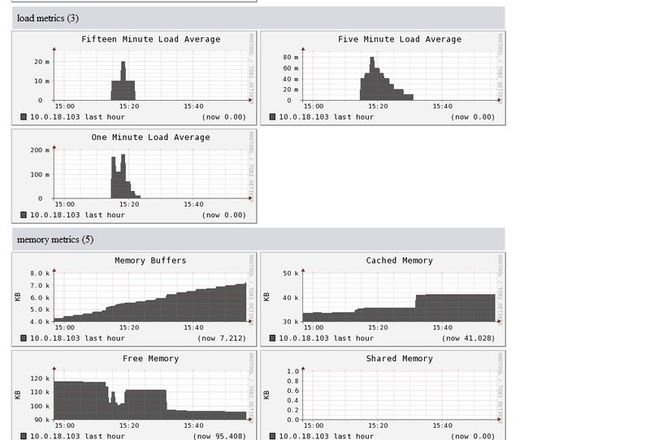
Ganglia是UC Berkeley发起的一个开源集群监视项目,设计用于测量数以千计的节点。Ganglia的核心包含gmond、gmetad以及一个Web前端。主要是用来监控系统性能,如:cpu 、mem、硬盘利用率, I/O负载、网络流量情况等,通过曲线很容易见到每个节点的工作状态,对合理调整、分配系统资源,提高系统整体性能起到重要作用。
每台计算机都运行一个收集和发送度量数据的名为 gmond 的守护进程。接收所有度量数据的主机可以显示这些数据并且可以将这些数据的精简表单传递到层次结构中。正因为有这种层次结构模式,才使得 Ganglia 可以实现良好的扩展。gmond 带来的系统负载非常少,这使得它成为在集群中各台计算机上运行的一段代码,而不会影响用户性能。所有这些数据多次收集会影响节点性能。网络中的 “抖动”发生在大量小消息同时出现时,可以通过将节点时钟保持一致,来避免这个问题。 gmetad可以部署在集群内任一台节点或者通过网络连接到集群的独立主机,它通过单播路由的方式与gmond通信,收集区域内节点的状态信息,并以XML数据的形式,保存在数据库中。 由RRDTool工具处理数据,并生成相应的的图形显示,以Web方式直观的提供给客户端。
=================服务器端安装 129
yum -y install apr-devel apr-util check-devel cairo-devel pango-devel libxml2-devel rpmbuild
yum -y install glib2-devel dbus-devel freetype-devel fontconfig-devel gcc-c++
yum -y install expat-devel python-devel libXrender-devel
2.由于rpmbuild用不了,用自己的包来安装,安装rpmbuild的过程
#head -n 1 /etc/issue
CentOS release 5.4 (Final)
http://mirror.centos.org/
http://mirrors.163.com/
http://mirrors.163.com/centos/5/os/i386/CentOS/
[root@localhost SPECS]# rpm -ivh http://mirrors.163.com/centos/5/os/i386/CentOS/elfutils-devel-0.137-3.el5.i386.rpm
error: Failed dependencies:
elfutils-devel-static = 0.125-3.el5 is needed by elfutils-devel-0.125-3.el5.i386
elfutils-libelf-devel = 0.125-3.el5 is needed by elfutils-devel-0.125-3.el5.i386
elfutils-libs = 0.125-3.el5 is needed by elfutils-devel-0.125-3.el5.i386
libdw.so.1 is needed by elfutils-devel-0.125-3.el5.i386
--1
[root@localhost SPECS]# rpm -ivh http://mirrors.163.com/centos/5/os/i386/CentOS/elfutils-libs-0.137-3.el5.i386.rpm
Preparing... ########################################### [100%]
1:elfutils-libs ########################################### [100%]
--2
[root@localhost SPECS]# rpm -ivh http://mirrors.163.com/centos/5/os/i386/CentOS/elfutils-libelf-0.137-3.el5.i386.rpm
Preparing... ########################################### [100%]
package elfutils-libelf-0.125-3.el5 is already installed
--3
[root@localhost SPECS]# rpm -ivh http://mirrors.163.com/centos/5/os/i386/CentOS/elfutils-devel-static-0.137-3.el5.i386.rpm
error: Failed dependencies:
elfutils-devel = 0.125-3.el5 is needed by elfutils-devel-static-0.125-3.el5.i386
elfutils-libelf-devel-static = 0.125-3.el5 is needed by elfutils-devel-static-0.125-3.el5.i386
--4
[root@localhost SPECS]# rpm -ivh http://mirrors.163.com/centos/5/os/i386/CentOS/elfutils-libelf-devel-static-0.137-3.el5.i386.rpm
error: Failed dependencies:
elfutils-libelf-devel = 0.125-3.el5 is needed by elfutils-libelf-devel-static-0.125-3.el5.i386
--5,我觉得这个是重要的了!
[root@localhost SPECS]# rpm -ivh http://mirrors.163.com/centos/5/os/i386/CentOS/elfutils-0.137-3.el5.i386.rpm
Preparing... ########################################### [100%]
1:elfutils ########################################### [100%]
--6
[root@localhost SPECS]# rpm -ivh http://mirrors.163.com/centos/5/os/i386/CentOS/elfutils-libelf-devel-0.137-3.el5.i386.rpm
error: Failed dependencies:
elfutils-libelf-devel-static = 0.125-3.el5 is needed by elfutils-libelf-devel-0.125-3.el5.i386
--安装成功3个……
--再安装rpm-build
[root@localhost SPECS]# rpm -ivh http://mirrors.163.com/centos/5/os/i386/CentOS/rpm-build-4.4.2.3-18.el5.i386.rpm
Preparing... ########################################### [100%]
1:rpm-build ########################################### [100%]
--居然就这样成功了……
wget http://download.fedora.redhat.com/pub/epel/5/i386/libconfuse-2.5-4.el5.i386.rpm
rpm -ivh libconfuse-2.5-4.el5.i386.rpm
wget http://download.fedora.redhat.com/pub/epel/5/i386/libconfuse-devel-2.5-4.el5.i386.rpm
rpm -ivh libconfuse-devel-2.5-4.el5.i386.rpm
--------- 不需要
rpmbuild --rebuild libconfuse-2.6-1.fc9.src.rpm
cd /usr/src/redhat/RPMS/x86_64/
rpm -ivh libconfuse-devel-2.6-1.x86_64.rpm libconfuse-2.6-1.x86_64.rpm
记住,镜像经常变化。如果此镜像不工作,则使用搜索引擎查找 libconfuse-2.6.-1.fc9 source RPM。
-----------
RRDTool
RRDTool 表示:轮循数据库工具(Round Robin Database Tool)。它是由 Tobias Oetiker 创建的,并且为许
多高性能监视工具提供了引擎。Ganglia 是其中之一,但是 Cacti 和 Zenoss 是另外两个。
要安装 Ganglia,首先需要让 RRDTool 运行在监视服务器上。RRDTool 将提供其他程序使用的两个非常优秀的
功能:
它将在轮循数据库中存储数据。随着捕捉的数据变得越来越旧,解析的精确性将变得越来越低。这将占用很少的
内存并且在大多数情况下仍然有用。
它可以通过使用命令行实参根据捕捉的数据生成图形。
要安装 RRDTool,请运行以下代码(对 1.3.4 版和 1.3.6 版进行了测试):
cd /tmp/
wget http://oss.oetiker.ch/rrdtool/pub/rrdtool.tar.gz
tar zxvf rrdtool*
cd rrdtool-*
./configure --prefix=/usr
make -j8
make install
which rrdtool
ldconfig
------主要 Ganglia 安装
http://ganglia.sourceforge.net
wget http://sourceforge.net/projects/ganglia/files/ganglia%20monitoring%20core/3.1.7/ganglia-3.1.7.tar.gz/download
现在已满足所有先决条件,您可以安装 Ganglia。首先需要获得它。在本文中,
我们使用的是 Ganglia 3.1.1。下载 ganglia-3.1.2.tar.gz 文件并将其放在监视服务器的 /tmp 目录中。
然后执行以下代:
cd /tmp/
tar zxvf ganglia*gz
cd ganglia-3.1.2/
./configure --with-gmetad --sysconfdir=/etc/ganglia
make -j8
make install
您应当会退出,而不会遇到任何错误。如果看到错误,则可能需要检查缺少哪些库。
配置 Ganglia
现在基本安装已完成,需要设置几个配置项才能运行。执行以下步骤:
处理命令行文件。
修改 /etc/ganglia/gmond.conf。
注意多宿主(multi-homed)计算机。
在管理服务器中启动它。
步骤 1:处理命令行文件
如下所示:
cd /tmp/ganglia-3.1.2/ # you should already be in this directory
mkdir -p /data0/htdocs/ganglia/ # make sure you have apache installed
cp -a web/* /data0/htdocs/ganglia/ # this is the web interface
cp gmetad/gmetad.init /etc/rc.d/init.d/gmetad # startup script
cp gmond/gmond.init /etc/rc.d/init.d/gmond
#####mkdir /etc/ganglia # where config files go
gmond -t | tee /etc/ganglia/gmond.conf # generate initial gmond config
cp gmetad/gmetad.conf /etc/ganglia/ # initial gmetad configuration
mkdir -p /var/lib/ganglia/rrds # place where RRDTool graphs will be stored
chown nobody:nobody /var/lib/ganglia/rrds # make sure RRDTool can write here.
chkconfig --add gmetad # make sure gmetad starts up at boot time
chkconfig --add gmond # make sure gmond starts up at boot time
#vim /etc/ganglia/gmetad.conf
data_source 增加客户端的ip和端口
#监控客户端192.168.93.131
data_source "my cluster" 192.168.93.131:8649
tcp_accept_channel {
port = 8649
acl {
default = "deny"
access {
ip = 192.168.93.129
mask = 32
action = "allow"
}
}
}
步骤 2:修改 /etc/ganglia/gmond.conf
现在可以修改 /etc/ganglia/gmond.conf 以命名集群。假定集群名称为 “matlock”;
则可以将 name = "unspecified" 更改为 name = "matlock"。
步骤 4:在管理服务器中启动它
现在您可以在监视服务器中完全启动它:
service gmond start
service gmetad start
=====================================客户端安装 131
yum -y install apr-devel apr-util check-devel cairo-devel pango-devel libxml2-devel rpmbuild
yum -y install glib2-devel dbus-devel freetype-devel fontconfig-devel gcc-c++
yum -y install expat-devel python-devel libXrender-devel
wget http://web.mit.edu/~thefred/MacData/afs/dev/system/rhlinux/fedora-7-updates/RPMS/ganglia-gmond-3.0.5-1.fc7.i386.rpm
rpm -ivh ganglia-gmond-3.0.5-1.fc7.i386.rpm
------------------------------------- vim /etc/gmond.conf
cluster {
name = "matlock"
owner = "unspecified"
latlong = "unspecified"
url = "unspecified"
}
找到tcp_accept_channel 在里面加入服务器的ip地址
tcp_accept_channel {
port = 8649
acl {
default = "deny"
access {
ip = 192.168.93.129
mask = 32
action = "allow"
}
}
}
---------
3、重启客户端服务
chkconfig --add gmond
service gmond retart
==================apache认证
#vim /usr/local/webserver/apache2/conf/httpd.conf
<Directory "/data0/htdocs/slanglia">
Options None
AllowOverride None
Order allow,deny
Allow from all
AuthName "Ganglia Access"
AuthType Basic
AuthUserFile /tmp/ganglia.passwd
Require valid-user
</Directory>
首先用htpasswd创建一个密码文件:比如文件名叫做ganglia.passwd
/usr/local/webserver/apache2/bin/htpasswd -c -b /tmp/ganglia.passwd slanglia 111111
如果增加帐号:d
/usr/local/webserver/apache2/bin/htpasswd -b /tmp/ganglia.passwd slanglia 111111
==================更换端口
gmond start 8652 ==>86522
gmetad start 8649 ==>86499
=========服务器 8652 8649
#vim /etc/ganglia/gmond.conf
port = 86499
#vim /etc/ganglia/gmetad.conf
interactive_port 86522
把8649改为86499
vim /data0/htdocs/slanglia/conf.php
8652改为86522
=========客户端
vim /etc/gmond.conf
把8649改为86499
======= 重启
---客户端
lsof -i:8652
kill -9 **
service gmond start
---服务器
lsof -i:8649
lsof -i:8652
kill -9 **
service gmond start
service gmetad start
================其它资料
http://apps.hi.baidu.com/share/detail/6081605
http://linux.chinaunix.net/techdoc/install/2006/05/29/933276.shtml
http://www.linuxdiyf.com/viewarticle.php?id=150014
http://linux.chinaunix.net/techdoc/system/2009/08/23/1131690.shtml
http://www.360doc.com/content/10/1022/13/737570_63003007.shtml
http://blog.chinaunix.net/u3/93926/showart_1873057.html
yum -y install apr-devel apr-util check-devel cairo-devel pango-devel libxml2-devel rpmbuild glib2-devel dbus-devel freetype-devel fontconfig-devel gcc-c++ expat-devel python-devel libXrender-devel
wget http://download.fedora.redhat.com/pub/epel/5/i386/libconfuse-2.5-4.el5.i386.rpm
rpm -ivh libconfuse-2.5-4.el5.i386.rpm
wget http://download.fedora.redhat.com/pub/epel/5/i386/libconfuse-devel-2.5-4.el5.i386.rpm
rpm -ivh libconfuse-devel-2.5-4.el5.i386.rpm
wget http://download.fedora.redhat.com/pub/epel/5/i386/libconfuse-2.5-4.el5.i386.rpm
rpm -ivh libconfuse-2.5-4.el5.i386.rpm
wget http://download.fedora.redhat.com/pub/epel/5/i386/libconfuse-devel-2.5-4.el5.i386.rpm
rpm -ivh libconfuse-devel-2.5-4.el5.i386.rpm
安装expat-2.0.1.tar.gz
http://sourceforge.net/projects/expat/
wget http://sourceforge.net/projects/expat/files/expat/2.0.1/expat-2.0.1.tar.gz
tar zxvf expat-2.0.1.tar.gz
cd expat-2.0.1
./configure --prefix=/usr/local/expat-2.0.1
make
make install
---------------------------------已安装过 /usr/local/apr /usr/local/apr-util
2)安装apr-1.3.2.tar.bz2
tar xvjf apr-1.3.2.tar.bz2
cd apr-1.3.2;./configure --prefix=/usr/local/apr-1.3.2;make;make install
3)安装apr-util-1.3.2.tar.bz2
tar xvjf apr-util-1.3.2.tar.bz2
cd apr-util-1.3.2;./configure --with-apr=/usr/local/apr --with-expat=/usr/local/expat(./configure --with-apr=/usr/local/apr-1.3.3 --with-expat=/usr/local/expat-2.0.1)
make;make install
cp /usr/local/apr/include/apr-1/* /usr/local/apr/include/目录,因为ganglia安装时默认会去/usr/local/apr/include下寻找apr的库文件。
cp /usr/local/apr-1.3.3/include/apr-1/* /usr/local/apr-1.3.3/include/
cp /usr/local/apr/include/apr-1/* /usr/local/apr/include/
--------------------
wget http://down1.chinaunix.net/distfiles/confuse-2.5.tar.gz
tar zxvf confuse-2.5.tar.gz
cd confuse-2.5
./configure --prefix=/usr/local/confuse-2.5
make
make install
http://www.mrtg.org/rrdtool/download.en.html
wget http://oss.oetiker.ch/rrdtool/pub/rrdtool-1.4.4.tar.gz
tar zxvf rrdtool*
cd rrdtool-*
./configure --prefix=/usr/local/rrdtool
make
make install
http://ganglia.info
http://ganglia.sourceforge.net/
wget http://sourceforge.net/projects/ganglia/files/ganglia%20monitoring%20core/3.1.7/ganglia-3.1.7.tar.gz
安装之前用以下命令检查有没有rrd.h和librrd.a文件:
引用
ll /usr/include/rrd.h
ll /usr/lib/librrd.a
如果存在以上两个文件,则继续安装否则使用find命令查找这两个文件,并创建指向这两个文件的软链接
引用
find / -name rrd.h
find / -name librrd.a
比如说你找到的文件在/usr/local/下,则:
引用
ln -s /usr/local/rrd.h /usr/include/rrd.h
ln -s /usr/local/librrd.a /usr/lib/librrd.a
如果安装过程中出现读取相关lib文件读取错误,请在/usr/lib(32os)或/usr/lib64下查找是否存在该lib文件,如果不存在,查找该文件并在/usr/lib(32os)或/usr/lib64创建指向该lib文件的软链接。
tar xvzf ganglia-*
cd ganglia-*
./configure --prefix=/usr/local/ganglia --with-librrd=/usr/local/rrdtool --with-libapr=/usr/local/apr --with-libexpat=/usr/local/expat-2.0.1 --with-libconfuse=/usr/local/confuse-2.5 --with-gmetad --enable-gexec --enable-status
make
make install
-----------------???????????
./configure
checking whether disabling type punning in gcc is possible... yes
Extra checks for 3.1 series...
sysconfdir appears to be the default value
Prior to release 3.1.3, Ganglia ignored the value of sysconfdir
passed to configure and would always use /etc/ganglia
This is considered a bug because the help text from configure
informs the user that the default location is PREFIX/etc
If you wish to continue using /etc/ganglia for gmond.conf and
other configuration files, you must now explicitly specify
--sysconfdir=/etc/ganglia
If you want to use configure's default value, PREFIX/etc, you
must use the environment variable GANGLIA_ACK_SYSCONFDIR=1:
GANGLIA_ACK_SYSCONFDIR=1 ./configure ...
otherwise you will see this error message.
When Ganglia 3.2 is released:
- sysconfdir will use configure's default value, unless specified
- GANGLIA_ACK_SYSCONFDIR will not be required
- this error will no longer be displayed
*** configure has failed ***
- please invoke configure again using one of
the methods described for determining sysconfdir
[root@localhost ganglia-3.1.7]# make
make: *** No targets specified and no makefile found. Stop.
--------------------------
改为:(增加 --sysconfdir=/etc/ganglia)
./configure --prefix=/usr/local/ganglia --with-librrd=/usr/local/rrdtool --with-libapr=/usr/local/apr --with-libexpat=/usr/local/expat-2.0.1 --with-libconfuse=/usr/local/confuse-2.5 --with-gmetad --enable-gexec --enable-status --sysconfdir=/etc/ganglia
--------------------??????????????
scoreboard.c:170: error: 鈍sb_scoreboard?undeclared (first use in this function)
make[2]: *** [scoreboard.lo] Error 1
make[2]: Leaving directory `/data0/software/ganglia-3.1.7/lib'
make[1]: *** [all-recursive] Error 1
make[1]: Leaving directory `/data0/software/ganglia-3.1.7'
make: *** [all] Error 2
-----------------------------------