听着《Traveling Light 》继续我们的学习。这次我们用命令行执行,打开cmd,改变目录到RuBymineProjects下
1.新建rails工程
rails new Demo6 -d=mysql
这句命令意思是新建一个名称为Demo6的rails工程,并且使用mysql数据库。然后你会看到好多create语句和using语句。。。
2.配置devise
修改Gemfile文件(Gemfile文件在Demo6的目录下),添加一句:
gem 'devise' #devise是一个gem包
3.配置数据库文件
在mysql中新建数据库demo6_development(也可以使用命令 rake db:create 创建数据库),配置config/database.yml文件,添加自己的密码(当然这里也可以不用自动生成的数据库名,重新定义数据库名称也是可以的)。
development:
  adapter: mysql2
  encoding: utf8
  database: Demo6_development
  pool: 5
  username: root
  password: root
  host: localhost
4,执行命令bundle install
bundle install
这个命令是安装Gemfile文件中需要的插件(刚加了一个devise插件)。devise是一个开源的工程,主要用于用户的注册、登录、找回密码、session等等。所谓“不要重复制造轮子”,既然有好的工程,我们就拿来用,直接在Gemfile中作为gem包引入,方便之极。
5.配置devise,建立devise档案
rails g devise:install
结果是创建了两个文件。
D:\Tools\Ruby\RubymineProjects\Demo6>rails g devise:install
      create  config/initializers/devise.rb
      create  config/locales/devise.en.yml
在这里如果报找不到mysql2.so的错误是因为你的mysqllib.dll的引入路径不对,记得一定要把mysqllib.dll拷贝到ruby的bin路径下。
6.使用devise创建user model:
rails g devise User
发生了什么?
a.在app/models文件夹下产生了一个user.rb,也就是创建了一个user model
b.在db/migrate文件夹下产生了一个migrate文件
c.在config/routes.rb文件中添加了一行 devise_for :users
7.编辑app/models/user.rb文件
class User < ActiveRecord::Base
  # Include default devise modules. Others available are:
  # :confirmable, :lockable, :timeoutable and :omniauthable
  devise :database_authenticatable, :registerable,
         :recoverable, :rememberable, :trackable, :validatable,     #末尾添加,号
         :confirmable, :lockable                 #添加这一行
end
8.编辑db/migrate/20131211xxxxxx_devise_create_users.rb文件
class DeviseCreateUsers < ActiveRecord::Migration
  def change
    create_table(:users) do |t|
      ## Database authenticatable
      t.string :email,              :null => false, :default => ""
      t.string :encrypted_password, :null => false, :default => ""

      ## Recoverable
      t.string   :reset_password_token
      t.datetime :reset_password_sent_at

      ## Rememberable
      t.datetime :remember_created_at

      ## Trackable
      t.integer  :sign_in_count, :default => 0, :null => false
      t.datetime :current_sign_in_at
      t.datetime :last_sign_in_at
      t.string   :current_sign_in_ip
      t.string   :last_sign_in_ip

      #打开下面的注释
      ## Confirmable
       t.string   :confirmation_token
       t.datetime :confirmed_at
       t.datetime :confirmation_sent_at
       t.string   :unconfirmed_email # Only if using reconfirmable

      #打开下面的注释
      ## Lockable
       t.integer  :failed_attempts, :default => 0, :null => false # Only if lock strategy is :failed_attempts
       t.string   :unlock_token # Only if unlock strategy is :email or :both
       t.datetime :locked_at


      t.timestamps
    end

    add_index :users, :email,                :unique => true
    add_index :users, :reset_password_token, :unique => true

    #打开以下注释
    add_index :users, :confirmation_token,   :unique => true
    add_index :users, :unlock_token,         :unique => true
  end
end
其实第7,8步没什么必要,不做也可以,这两个步骤就是在数据库生成表示多生成几个字段,用来记录信息用的。
9.生成数据表:
在rubyMine中找到db/migrate/20131211xxxxxx_devise_create_users.rb,右键选在create "db:migrate",点击OK,点击运行(这里上篇文章说过了),这是控制台输出
D:\Tools\Ruby\RailsInstaller\Ruby2.0.0\bin\ruby.exe -e $stdout.sync=true;$stderr.sync=true;load($0=ARGV.shift) D:\Tools\Ruby\RubymineProjects\Demo6\bin\rake db:migrate
==  DeviseCreateUsers: migrating ==============================================
-- create_table(:users)
   -> 0.1700s
-- add_index(:users, :email, {:unique=>true})
   -> 0.1530s
-- add_index(:users, :reset_password_token, {:unique=>true})
   -> 0.1290s
-- add_index(:users, :confirmation_token, {:unique=>true})
   -> 0.1410s
-- add_index(:users, :unlock_token, {:unique=>true})
   -> 0.0970s
==  DeviseCreateUsers: migrated (0.6900s) =====================================


Process finished with exit code 0
这一步也可以直接使用命令 rake db:migrate 完成数据库迁移工作。
10.配置邮件服务器,编辑config/initializers/devise.rb
 # ==> Mailer Configuration
  # Configure the e-mail address which will be shown in Devise::Mailer,
  # note that it will be overwritten if you use your own mailer class
  # with default "from" parameter.
  config.mailer_sender = "[email protected]"   #换成你的邮箱,最好不要是gmail
这步就是设置你的转发邮件的地址,其实所有用户的注册的验证信息都是通过这个邮箱发出去的。记得这个邮箱是和下面的一步相关联的。
11.编辑config/environments/development.rb
# Don't care if the mailer can't send
 config.action_mailer.raise_delivery_errors = true #此处改为true
 #添加以下内容
 config.action_mailer.default_url_options = { :host => "localhost:3000" } #刚才devise的提示中提到这一句
 config.action_mailer.delivery_method = :smtp
 config.action_mailer.smtp_settings = {
 :address => "smtp.126.com",
 :port => 25,
 :domain => "126.com",
 :authentication => :login,
 :user_name => "[email protected]", #你的邮箱
 :password => "xxxxxxxxxxx" #你的密码
 }
这里要说一下,现在用的是126的邮箱,所以如果你想用其他的邮箱进行邮件的发送,那么就需要重新配置这些信息了。
12.其它配置
a.新建一个home controller
rails g controller home index
生成信息
D:\Tools\Ruby\RubymineProjects\Demo6>rails g controller home index
      create  app/controllers/home_controller.rb
       route  get "home/index"
      invoke  erb
      create    app/views/home
      create    app/views/home/index.html.erb
      invoke  test_unit
      create    test/controllers/home_controller_test.rb
      invoke  helper
      create    app/helpers/home_helper.rb
      invoke    test_unit
      create      test/helpers/home_helper_test.rb
      invoke  assets
      invoke    coffee
      create      app/assets/javascripts/home.js.coffee
      invoke    scss
      create      app/assets/stylesheets/home.css.scss
生成home的controller和view就是要你访问home的,我们在访问home的controller前面加了一个过滤器,必须先登录才能访问home,简单的说,现在就是建你的项目了,前面都是为了登录验证的。
b.删除public目录下的index.html文件,修改config/routes.rb文件,添加一句
root :to => "home#index"
c.编辑app/controllers/home_controller.rb文件
class HomeController < ApplicationController

  before_filter :authenticate_user!  #添加这一句

  def index
  end
end
这是防止非法用户的访问,首先要验证用户的合法性。
d.编辑app/views/layouts/application.html.erb文件,提示flash信息
<!DOCTYPE html>
<html>
<head>
  <title>Demo6</title>
  <%= stylesheet_link_tag    "application", media: "all", "data-turbolinks-track" => true %>
  <%= javascript_include_tag "application", "data-turbolinks-track" => true %>
  <%= csrf_meta_tags %>
</head>
<body>

#添加以下两句
<p class="notice"><%= notice %></p>
<p class="alert"><%= alert %></p>

<%= yield %>

</body>
</html>
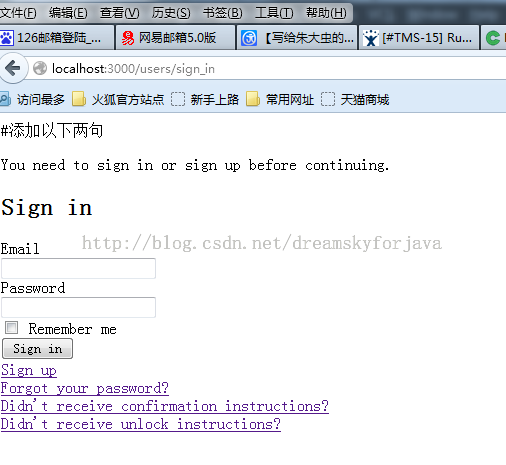
13.启动程序,访问http://localhost:3000

填写email、密码,点击“sign up ”,不出意外的话去注册邮箱收取确认邮件吧!
可是。可是,他就是出意外了,去我的126邮箱看看,把我的邮件当成垃圾邮件了,不给转发
没法,注册时不行了,那咱就试试修改密码,看会不会发邮件,点击Forgot your password?
填上自己的邮箱,就会发现收到邮件了。
恩,好了,虽说有点遗憾,不过没关系,谁让他把咱当成破坏分子了呢,就到这哈,下个目标:
探索devise的单点登录以及第三方登录功能
使用cancan进行权限的控制,将权限存储在数据库中
点击这里下载源码: Demo6源码


