flexbuilder 和eclipse 整合 BlazeDs
参考:
http://livedocs.adobe.com/blazeds/1/blazeds_devguide/
flexbuilder 整合 BlazeDs
1.下载BlazeDS,下载地址http://opensource.adobe.com/wiki/display/blazeds/BlazeDS/.
2.把blazeds.war放到D:\Tomcat 6.0\webapps\下并解压。
3.使用flexbuilder新建flex工程

工程名:Flex_java选择为Server_type为J2EE,并使用BlazeDS.
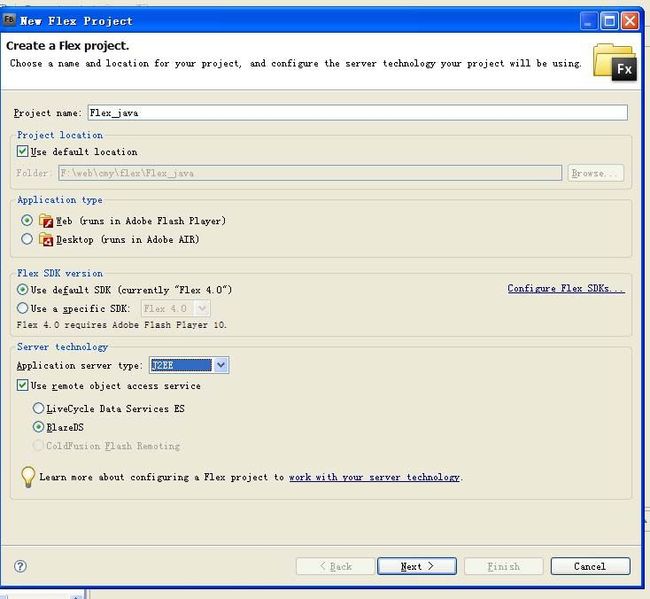
配置Flex目录
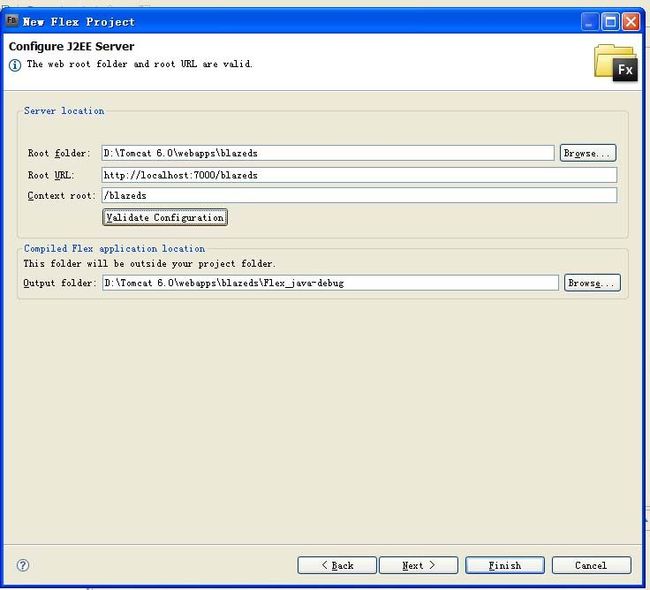
点击Finish.
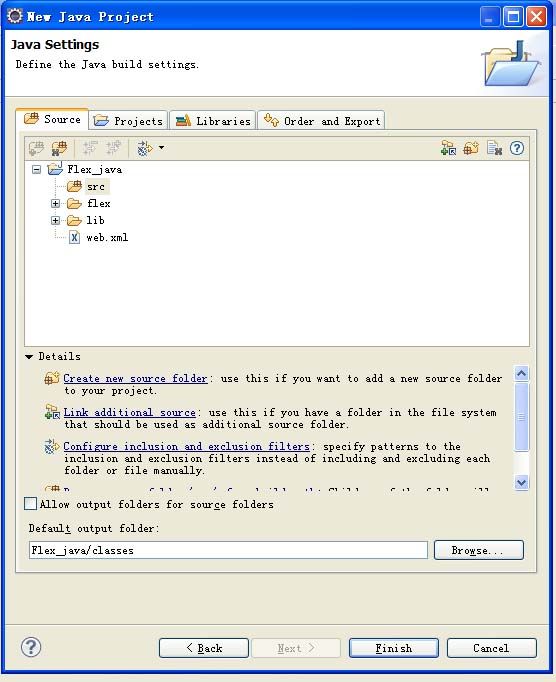
4.使用eclipse新建Java工程
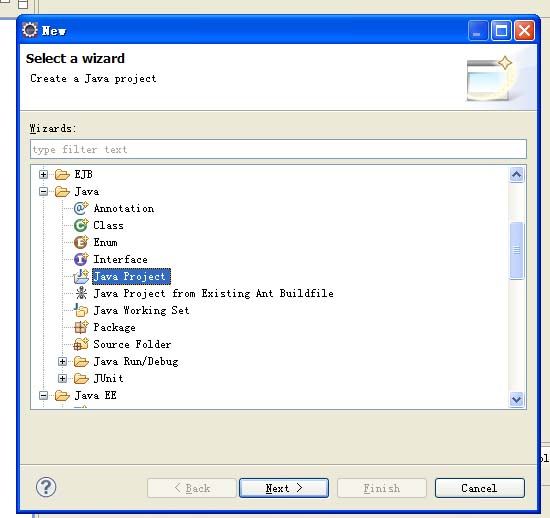
设置工程目录:
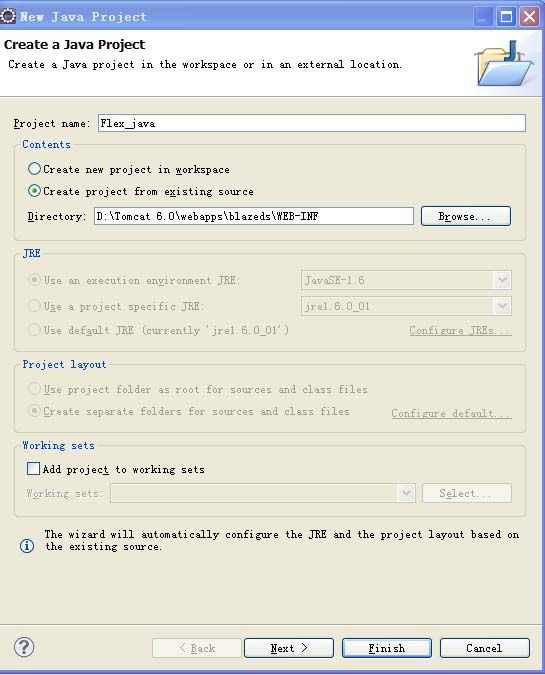
设置java原文件目录和class目录:
4.在java中新建类:EchoService
package remoting;
public class EchoService
{
public String echo(String text) {
return "Server says: I received '" + text + "' from you";
}
}
5.在WEB-INF/flex/remoting-config.xml中增加
<destination id="echoServiceDestination" channels="my-amf">
<properties>
<source>remoting.EchoService</source>
</properties>
</destination>
增加后为:
<?xml version="1.0" encoding="UTF-8"?>
<service id="remoting-service"
class="flex.messaging.services.RemotingService">
<adapters>
<adapter-definition id="java-object" class="flex.messaging.services.remoting.adapters.JavaAdapter" default="true"/>
</adapters>
<default-channels>
<channel ref="my-amf"/>
</default-channels>
<destination id="echoServiceDestination" channels="my-amf">
<properties>
<source>remoting.EchoService</source>
</properties>
</destination>
</service>
6.在FlexBuilder中编辑Flex_java.mxml为:
<?xml version="1.0" encoding="utf-8"?>
<s:Application xmlns:fx="http://ns.adobe.com/mxml/2009"
xmlns:s="library://ns.adobe.com/flex/spark"
xmlns:mx="library://ns.adobe.com/flex/halo" minWidth="1024" minHeight="768">
<fx:Declarations>
<!-- Place non-visual elements (e.g., services, value objects) here -->
<mx:RemoteObject id="remoteObject" destination="echoServiceDestination"
result="remoteObject_resultHandler(event)"
fault="remoteObject_faultHandler(event)"/>
</fx:Declarations>
<fx:Script>
<![CDATA[
import mx.rpc.events.FaultEvent;
import mx.rpc.events.ResultEvent;
private function echo():void{
var text:String=ti.text;
remoteObject.echo(text);
}
protected function remoteObject_resultHandler(event:ResultEvent):void
{
// TODO Auto-generated method stub
ta.text+="Server respinded:"+event.result+"\n";
}
protected function remoteObject_faultHandler(event:FaultEvent):void
{
// TODO Auto-generated method stub
ta.text+="Received fault:"+event.fault+"\n";
}
]]>
</fx:Script>
<s:layout>
<s:HorizontalLayout/>
</s:layout>
<mx:Label text="Enter a text for the server t echo"/>
<s:TextInput id="ti" text="Hello World"/>
<s:Button label="Send" click="echo()"/>
<s:TextArea id="ta" width="100%" height="100%"/>
</s:Application>
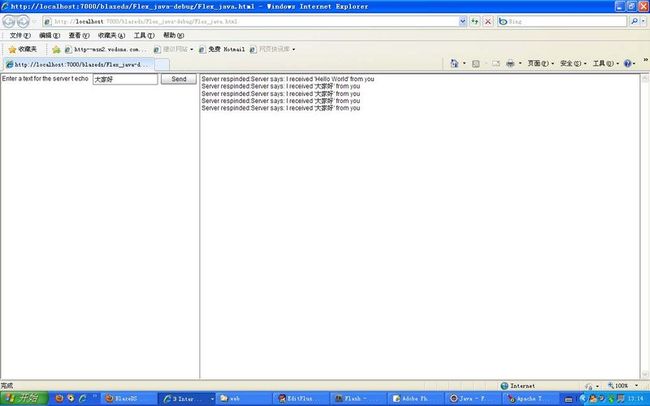
7.在flexbuilder中执行Flex_java.html
如图所示,点击send就可以通过java来传递消息。
http://livedocs.adobe.com/blazeds/1/blazeds_devguide/
flexbuilder 整合 BlazeDs
1.下载BlazeDS,下载地址http://opensource.adobe.com/wiki/display/blazeds/BlazeDS/.
2.把blazeds.war放到D:\Tomcat 6.0\webapps\下并解压。
3.使用flexbuilder新建flex工程

工程名:Flex_java选择为Server_type为J2EE,并使用BlazeDS.

配置Flex目录

点击Finish.
4.使用eclipse新建Java工程

设置工程目录:

设置java原文件目录和class目录:

4.在java中新建类:EchoService
package remoting;
public class EchoService
{
public String echo(String text) {
return "Server says: I received '" + text + "' from you";
}
}
5.在WEB-INF/flex/remoting-config.xml中增加
<destination id="echoServiceDestination" channels="my-amf">
<properties>
<source>remoting.EchoService</source>
</properties>
</destination>
增加后为:
<?xml version="1.0" encoding="UTF-8"?>
<service id="remoting-service"
class="flex.messaging.services.RemotingService">
<adapters>
<adapter-definition id="java-object" class="flex.messaging.services.remoting.adapters.JavaAdapter" default="true"/>
</adapters>
<default-channels>
<channel ref="my-amf"/>
</default-channels>
<destination id="echoServiceDestination" channels="my-amf">
<properties>
<source>remoting.EchoService</source>
</properties>
</destination>
</service>
6.在FlexBuilder中编辑Flex_java.mxml为:
<?xml version="1.0" encoding="utf-8"?>
<s:Application xmlns:fx="http://ns.adobe.com/mxml/2009"
xmlns:s="library://ns.adobe.com/flex/spark"
xmlns:mx="library://ns.adobe.com/flex/halo" minWidth="1024" minHeight="768">
<fx:Declarations>
<!-- Place non-visual elements (e.g., services, value objects) here -->
<mx:RemoteObject id="remoteObject" destination="echoServiceDestination"
result="remoteObject_resultHandler(event)"
fault="remoteObject_faultHandler(event)"/>
</fx:Declarations>
<fx:Script>
<![CDATA[
import mx.rpc.events.FaultEvent;
import mx.rpc.events.ResultEvent;
private function echo():void{
var text:String=ti.text;
remoteObject.echo(text);
}
protected function remoteObject_resultHandler(event:ResultEvent):void
{
// TODO Auto-generated method stub
ta.text+="Server respinded:"+event.result+"\n";
}
protected function remoteObject_faultHandler(event:FaultEvent):void
{
// TODO Auto-generated method stub
ta.text+="Received fault:"+event.fault+"\n";
}
]]>
</fx:Script>
<s:layout>
<s:HorizontalLayout/>
</s:layout>
<mx:Label text="Enter a text for the server t echo"/>
<s:TextInput id="ti" text="Hello World"/>
<s:Button label="Send" click="echo()"/>
<s:TextArea id="ta" width="100%" height="100%"/>
</s:Application>
7.在flexbuilder中执行Flex_java.html
如图所示,点击send就可以通过java来传递消息。
