DHTMLX系列组件的使用(3)——dhtmlx日历应用
1. 初始化
首先将 dhtmlxSuit 中的 dhtmlxCalendar 文件夹下的 codebase 文件夹整个复制到你的项目目录下,然后创建HTML文件。
1.1 引入JS文件和CSS文件
<link rel="stylesheet" type="text/css" href="codebase/dhtmlxcalendar.css" />
<script  src="codebase/dhtmlxcommon.js"></script>
<script  src="codebase/dhtmlxcalendar.js"></script>
1.2 定义用于显示日历的容器
<input type="text" id="calendar" />
1.3 定义生成日历的 JS 函数
<script type="text/javascript">
window.dhx_globalImgPath = "codebase/imgs/";
window.onload = function() {
    var cal1 = new dhtmlxCalendarObject('calendar');
}
</script>
1.4 效果预览
2. 皮肤设置
2.1 引入样式文件
在上面的基础上,引入 codebase 文件夹下所有的样式文件。
<link rel="stylesheet" type="text/css" href="codebase/dhtmlxcalendar.css" />
<link rel="stylesheet" type="text/css" href="codebase/skins/dhtmlxcalendar_classic.css" />
<link rel="stylesheet" type="text/css" href="codebase/skins/dhtmlxcalendar_dhx_black.css" />
<link rel="stylesheet" type="text/css" href="codebase/skins/dhtmlxcalendar_dhx_blue.css" />
<link rel="stylesheet" type="text/css" href="codebase/skins/dhtmlxcalendar_dhx_skyblue.css" />
<link rel="stylesheet" type="text/css" href="codebase/skins/dhtmlxcalendar_simpleblue.css" />
<link rel="stylesheet" type="text/css" href="codebase/skins/dhtmlxcalendar_simplecolordark.css" />
<link rel="stylesheet" type="text/css" href="codebase/skins/dhtmlxcalendar_simplecolorsand.css" />
<link rel="stylesheet" type="text/css" href="codebase/skins/dhtmlxcalendar_simplegrey.css" />
<link rel="stylesheet" type="text/css" href="codebase/skins/dhtmlxcalendar_vista.css" />
<link rel="stylesheet" type="text/css" href="codebase/skins/dhtmlxcalendar_yahoolike.css" />
2.2 定义下拉列表框
<select name="cssName" id="skinSelect" onChange="cal1.setSkin(this.value);">
    <option value="" selected >= default =</option>
    <option value="yahoolike">Yahoo like</option>
    <option value="simplegrey">Simple gray</option>
    <option value="simpleblue">Simple blue</option>
    <option value="vista">Windows Vista</option>
    <option value="simplecolordark">Simple color dark</option>
    <option value="simplecolorsand">Simple color sand</option>
    <option value="classic">Classic</option>
    <option value="dhx_blue">Dhx Blue</option>
    <option value="dhx_black">Dhx Black</option>
<option value="dhx_skyblue">Dhx Skyblue</option>
</select>
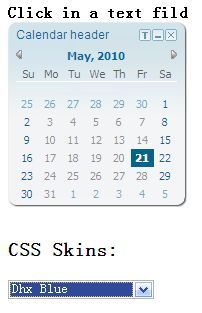
2.3 效果预览
说明:运行后,选择下拉列表框即可改变日历的皮肤。事实上,这里调用了 setSkin 函数,并指定参数即可。
3. 基本设置
<script type="text/javascript">
window.dhx_globalImgPath = "codebase/imgs/";
window.onload = function() {
var cal1 = new dhtmlxCalendarObject('calendar', true, {isYearEditable: true, isWinHeader: true, isWinDrag: true});
cal1.setYearsRange(1900, 2010);
cal1.loadUserLanguage("en-us");
}
</script>
年度设置:首先设置 isYearEditable 为 true,然后调用 setYearsRange 设置年度范围,如果不设置的话,默认的年度范围是 1900 年至 2100 年。
语言设置:调用 loadUserLanguage 函数进行设置即可,不过目前好像只支持美国英语,俄罗斯语和德语三种语言。
4. 周开始日设置
<script type="text/javascript">
window.dhx_globalImgPath = "codebase/imgs/";
window.onload = function() {
var cal1 = new dhtmlxCalendarObject('calendar', true, {isYearEditable: true, isWinHeader: true, isWinDrag: true});
cal1.options.weekstart = 2;
cal1.draw();
}
</script>
说明:通常情况下,我们习惯于将周日作为一周最开始的一天。在这里,可以通过设置 options.weekstart 属性来设置一周最开始的一天。其中,0 表示周日,1 表示周一,其余类推。当然,设置后,还需要调用 draw 函数重绘日历才能得到设置后的效果。
5. 将日历依附于多个文本框
首先定义多个文本框。
<input type="text" id="calInput1" style="width: 200px; font-size:12px;" readonly="readonly">
<input type="text" id="calInput2" style="width: 200px; font-size:12px;" readonly="readonly">
<input type="text" id="calInput3" style="width: 200px; font-size:12px;" readonly="readonly">
然后定义 JS 函数,
<script type="text/javascript">
window.dhx_globalImgPath = "codebase/imgs/";
window.onload = function() {
var cal1 = new dhtmlxCalendarObject(['calInput1', 'calInput2', 'calInput3']);
}
</script>
6. 节日设置
<script type="text/javascript">
window.dhx_globalImgPath = "codebase/imgs/";
window.onload = function() {
mCal = new dhtmlxCalendarObject('dhtmlxCalendar', true);
cal1.setHolidays("01.01,2009.08.24,09.01");
}
</script>
说明:调用 setHolidays 函数即可进行设置。设置后的日历,对应的日历将以深红色,粗体字显示(默认样式)。
7. 日期格式化
// mCal is an object of dhtmlxCalendarObject
mCal.setDateFormat(dateformatString);
var date = mCal. getFormatedDate();
说明:首先调用 setDateFormat 函数设置格式,然后调用 getFormatedDate 函数即可设置格式化后的日期值。其中,格式化字符串可以是以下字符的组合。
// Date Format Info:
%e [g-] Day of the month without leading zeros (01..31)
%d [gs] Day of the month, 2 digits with leading zeros (01..31)
%j [g-] Day of the year, 3 digits with leading zeros (001..366)
%a [g-] A textual representation of a day, three letters
%W [g-] A full textual representation of the day of the week
%c [g-] Numeric representation of a month, without leading zeros (1..12)
%m [gs] Numeric representation of a month, with leading zeros (01..12)
%b [gs] A short textual representation of a month, three letters (Jan..Dec)
%M [gs] A full textual representation of a month, such as January or March (January..December)
%y [g-] A two digit representation of a year (93..03)
%Y [gs] A full numeric representation of a year, 4 digits (1993..2003)
%% [gs] Char "%"
例如:如果格式化字符串为“%Y年%m月%d日”,则日期值为:2010年05月23日
8. 隐藏/显示日历
// mCal is an object of dhtmlxCalendarObject
mCal. hide();
mCal.show();
mCal.isVisible();
说明:isVisible 函数返回一个 bool 值来表示日历的显示状态。
9. onChangeMonth 事件
<script type="text/javascript">
var mCal;
window.onload = function() {
    mCal = new dhtmlxCalendarObject('dhtmlxCalendar', false, { isYearEditable: true});
    mCal.attachEvent("onChangeMonth", mSelectMonth);
    mCal.draw();
}
function mSelectMonth(curMonth, prevMonth) {
    // do something you like
    return true;
}
</script>
10. onClick 事件
<script type="text/javascript">
var mCal;
window.onload = function() {
    mCal = new dhtmlxCalendarObject('dhtmlxCalendar', false, { isYearEditable: true});
    mCal.attachEvent("onClick", mSelectDate);
    mCal.draw();
}
function mSelectDate(date) {
    // do something you like
    return true;
}
</script>
-----------------------------------------------------
Stay Hungry, Stay Foolish!
Afa
May 24th, 2010
-----------------------------------------------------


