首先描述一下示例的开发环境:
Ruby on Rails:2.0.2
Ruby:1.8.6
数据库:MySQL
Ruby IDE:NetBeans Ruby IDE 6.1
Rails 插件:GeoKit、Cartographer
创建Rails 工程gmaps,并指定其数据库为MySQL
下面需要创建名称为gmaps_development 的数据库,在命令行中,使用mysqladmin 工具来创建数据库,命令如下:
mysqladmin -u root create gmaps_development |
数据库创建后,在config/database.yml 文件中写入正确的配置信息,然后进入应用的目录,在命令行中输入rake 命令rake db:migrate 来检查数据库的配置是否正确。
创建模型
一切正常后,我们首先在数据库中添加包含地址信息(address)、纬度(lat)及经度(lng)等属性信息的模型location,命令如下:
ruby script/generate model location |
下面,我们在生成的数据迁移任务db/migrate/001_create_locations.rb 中加入如下的数据库迁移脚本代码
class CreateLocations < ActiveRecord::Migration
def self.up
create_table :locations do |t|
t.column :address, :string, :limit => 100
t.column :lat, :decimal, :precision => 15, :scale => 10
t.column :lng, :decimal, :precision => 15, :scale => 10
end
end
def self.down
drop_table :locations
end
end |
我们为locations 表添加了3 个列,分别是address(string 型)、lat(decimal 型)和lng(decimal型),并定义了它们各自的长度和精度。
然后在命令行中通过rake 命令执行数据迁移任务,向数据库中添加新的数据表和字段:
转自:http://hi.baidu.com/marshluca/blog/item/6bbe19dcb31b2ca6cd1166c3.html
== 1 CreateLocations: migrating =============
-- create_table(:locations)
-> 0.1720s
== 1 CreateLocations: migrated (0.1720s) ======= |
安装测试Rails 插件
现在,我们为Rails 应用程序安装位于rubyforge.org 存储库上的GeoKit 插件,在命令行中输入:
ruby script/plugin install svn://rubyforge.org/var/svn/geokit/trunk |
在之前的代码中,我们已经建立了location 模型,现在我们为location 模型指定地址信息的自动译码,所要做的只是在模型app/models/location.rb 中加入如下的语句
class Location < ActiveRecord::Base
acts_as_mappable :auto_geocode => true
end |
进入Rails 的控制台,先来查看一下数据库中目前是否有数据存在
>> Location.find :all
=> [] |
由于还没有向Locations 表中添加记录,所以现在得到的返回集合为空。 为location 模型添加一条新的记录
>> Location.create(:address => "100 Spear St,
San Francisco, CA ")
=> #<Location id: 1, address: "100 Spear St, San
Francisco, CA ", lat:
#<BigDecimal:3063968,'0.37792528E2',12(12)>,lng:#
<BigDecimal:306374c,'-0.1223
93981E3',12(16)>> |
在命令执行之后,让我们来看一下是否已经通过location 模型向数据表中增了新的记录。
我们将location 模型中的第一条搜索结果赋值给home
>> home = Location.find :first
=> #<Location id: 1, address: "100 Spear St, San
Francisco, CA ",
lat: #<BigDecimal:30594a4,'0.37792528E2',12(16)>,
lng:#<BigDecimal:3059300,
'-0.122393981E3',12(20)>> |
可以看到,home 的内容即为刚才提交的地址信息,同时,在数据表中读出的信息里还包含了经度值和纬度值,也就是说,地址信息在提交到数据表之前已经自动进行了地址译码,将经纬度写入了数据表的字段之中。接下来我们再添加一条记录到数据表中
>> Location.create(:address => "10 Market St, San Francisco, CA ")
=> #<Location id: 2, address: "10 Market St, San Francisco, CA ",
lat: #<BigDecimal:2fff184,'0.37794391E2',12(12)>,
lng: #<BigDecimal:2ffef04,
'-0.122394831E3',12(16)>> |
已经插入到数据库表Locations 中的记录,可以使用find:all 将其全部列出
=> [#<Location id: 1, address: "100 Spear St,
San Francisco, CA ",
lat: #<BigDecimal:2f8f1b8,'0.37792528E2',12(16)>,
lng: #<BigDecimal:2f8f168,
'-0.122393981E3',12(20)>>, #<Location id: 2,
address: "10 Market St,
San Francisco, CA ", lat: #<BigDecimal:2f8f014,'
0.37794391E2',12(16)>,
lng: #<BigDecimal:2f8efc4,'-0.122394831E3',12(20)>>] |
根据控制台反馈的结果,我们得到了刚才向Locations 表中添加的两条地址记录的信息,在接下来的过程中,我们会把这些点的位置以标记的形式放置在Google Maps 地图上面.
创建location 控制器
下面我们为gmaps 应用添加名为location 的控制器,在工作目录的命令提示符下,输入如代码
gmaps>ruby script/generate controller location
exists app/controllers/
exists app/helpers/
create app/views/location
exists test/functional/
create app/controllers/location_controller.rb
create test/functional/location_controller_test.rb
create app/helpers/location_helper.rb |
增加新的字段
因为在需求描述中,用户点击地图上出现的标记时,需要在标记上弹出包含用户描述内容的提示窗口,所以我们需要为Locations 表增加新的字段description,将其指定为string 类型,并限定长度。在gmaps 工作目录的命令提示符下,输入如代码
gmaps>ruby script/generate migration add_description
exists db/migrate
create db/migrate/002_add_description.rb |
然后在迁移脚本002_add_description.rb 中添加如下的语句,完成字段description 的添加
class AddDescription < ActiveRecord::Migration
def self.up
add_column :locations, :description, :string, :limit => 200
end
def self.down
remove_column :locations, :description
end
end |
在命令提示符下输入rake 命令,再次进行数据迁移
gmaps>rake db:migrate
== 2 AddDescription: migrating ===========================================
-- add_column(:locations, :description, :string, {:limit=>200})
-> 0.4540s
== 2 AddDescription: migrated (0.4540s) ================================== |
配置Cartographer 插件
为了更方便地将Ruby 代码转换为Google Maps API 的调用代码,可以借助于Cartographer插件提供的功能,帮助我们生成嵌入在Google Maps 页面中的JavaScript 代码,以及带有气泡提示窗口的位置标注。
在下载Cartographer 插件(http://cartographer.rubyforge.org/)之后,将其解压到应用的插件目录vendor/plugins 之下,并将cartographer-config.yml 文件移动到gmaps 应用的config 目录之中。然后在cartographer-config.yml 中加入Google API 的钥匙代码串,在本机测试时配置文件的内容如下所示:
127.0.0.1:3000:ABQIAAAAj5cpJ2swzFT77RVZXuP
73BTX2XchcwgyHzp4Xo0DHRAzt2aLjhSg2ymVlJvVj
Ba7kWNgtqU8xxwIAQ |
注意:本章内容附带Rails 应用的完整代码,由于插件Cartographer 的官方文档更新滞后,为保证Cartographer 的函数调用与书中描述的代码一致,请使用本节示例代码中附带的Cartographer 插件版本。
在location 控制器中,需要包含两个方法,分别是index 和create。index 方法用于显示地图应用和相应的用户标记;create 方法帮助用户在数据库中添加新的位置标记,并在添加之后重新定向到index 页面,在地图上显示新添加的标记。
在index 方法中,需要完成三件工作。首先需要从数据表中得到已经添加的所有位置信息,之后通过Google Maps API 调用地图数据,接下来将位置信息以标记的形式添加在地图上,最后为标记的提示窗口增加用户提交的位置描述信息。Index 方法中的代码
def index
@locations = Location.find(:all)
@map = Cartographer::Gmap.new("gmaps")
@map.controls = [ :large, :scale ]
@map.debug = true
@map.center = [37.79, -122.4]
@locations.each do |location|
@map.markers << Cartographer::Gmarker.new(:name => "location_" +
location.id.to_s, :position => [location.lat, location.lng],
:info_window => location.description, :map => @map )
end
end |
在index 方法中,首先通过Location.find(:all)从模型中返回所有的记录。接下来使用Cartographer 插件提供的Gmap 方法生成新的Google Maps 地图,地图id 为gmaps。这个id 要与index 对应视图中添加包含地图的div 的名称一致,这样地图就会显示到div 标签所定义的位置中。
我们使用Cartographer 中所定义的方法为地图添加了控制栏和比例尺显示,并使用@map.center 设置加载地图的中心位置。语句@map.debug 将代码模式设置为调试,这样我们可以得到最终生成JavaScript 代码中的提示帮助信息,在最终应用发布时,则可以将@map.debug设置为false。
接下来的循环中,将模型中读出的记录信息赋值给@map.markers 生成的地图标注,并设定消息提示窗口显示的内容是description 字段中包含的文本。
控制器的index 方法完成之后,开始着手完成index 视图,让我们先看一下上述工作所得到的结果。在为index 视图添加代码之前,先打开模型location 的layout 文件,在head 标签之间添加Cartographer 的标记,这样,经过Cartographer 解释后的Ruby 代码,会自动解释成为Google Maps API 的JavaScript 代码。在页面中加载Google Maps 地图, layout 文件views/layouts/location.rhtml 中的head 标记部分如代码
<html>
<head>
<title>Map demo</title>
<%= Cartographer::Header.header_for(request) %>
</head>
<body id="map">
<div id="main">
<%= yield :layout %>
</div>
</body>
</html> |
然后我们为视图index 页面views/location/index.rhtml 添加代码,内容如代码
<h1>Add New Location</h1>
<hr />
<% @map.zoom = 14 %>
<%= @map.to_html(true) %>
<div id="gmaps" style="width: 600px; height: 400px;"></div> |
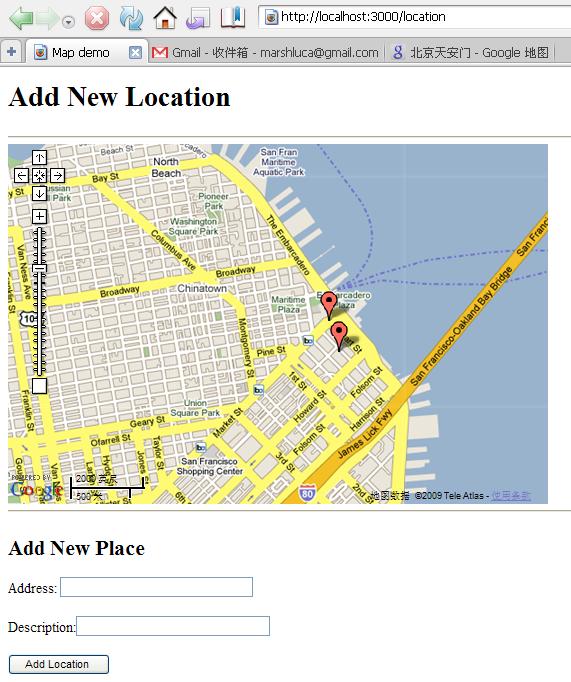
在index 视图中,添加了id 为gmaps 的标签,设定地图的缩放级别为14 级,并定义600×400 像素大小的区域来显示嵌入的Google Maps 地图。好了,到目前为止,第一部分的工作已经完成。还记得么?刚才我们在测试GeoKit 时,已经使用Location.create 方法为数据库的locations 表加入两条记录,下面 启动服务器,在浏览器里看一下已有的成果吧

