Windows中多指针输入技术的实现与应用(6 Single Display Groupware Toolkit的应用)
Windows中多指针输入技术的实现与应用(6 Single Display Groupware Toolkit的应用)
湖南大学 谢祁衡
4.Single Display Groupware Toolkit的应用
在新设计软件中要加入多指针设备的输入,通过分析对比,目前最成熟的方案是利用SDG Toolkit实现,SDG Toolkit包含了其他方案的很多优点,而且使用的方便程度及官方的文档支持,甚至强过微软目前的MultiPoint SDK,而且效率上实现的非常好,加入SDG Toolkit的事件后,甚至看不出与原有软件的效率区别。还有就是因为SDG Toolkit是开源软件,自己可以进一步改进效率,比如去除不需要的部分重新编译以得到更精简的代码。最大的缺点就是此项目从2004年开始已停止更新,很难加入对未来Windows版本的直接支持,并且因为技术原因不能运行在Windows 9X上,导致目前SDG Toolkit可以预知的使用环境仅仅是Windows XP/NT系统。考虑到微软将来在Windows Vista中的直接支持及MultiPoint SDK将来的技术升级,利用MultiPoint SDK实现是将来有前途的实现。而假如不愿意受制于微软的Visual Studio.Net编程环境,或者希望在Windows 9X中也能运行,可以接受的方案就是自己利用RawInput技术实现或则利用CPNmouse库。对于一般情况,SDG Toolkit将是目前最好的选择。以下简要讲解了SDG Toolkit的使用方法,仍旧主要通过鼠标指针的绘制及输入数据的识别两方面讲述,并以Visual Studio .NET 2005 下使用C#语言编程控制3个鼠标为例,其中一个为PS/2,两个为USB接口。
4.1 Single Display Groupware Toolkit的安装
因为SDG Toolkit向微软的.NET技术兼容,要使用SDG Toolkit就要先安装VS(Visual Studio) .NET。这里我以目前使用的最多的VS .NET 2005为例介绍。
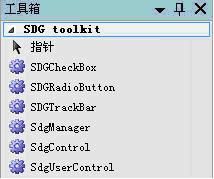
SDG Toolkit因为没有自己的安装程序,所以需要使用者自己在VS .NET中设置,首先要把从官方网站上下来的文件解压到磁盘的某个地方,因为<chsdate w:st="on" year="1899" month="12" day="30" islunardate="False" isrocdate="False"><span lang="EN-US" style="FONT-SIZE: 12pt; LINE-HEIGHT: 150%; mso-font-kerning: 0pt; mso-bidi-font-weight: bold">2.0.0</span></chsdate>.9还未加入相关的控件,目前最新且可用的版本为2.0.0.8。共两个文件,分别为Sdgt 2.0.0.8.dll和SDGWidgets.dll,然后在VS 的工具箱中通过 选择项->.NET Framwork组件->浏览,找到这两个文件并添加进工具箱,SDG就算安装完了。效果如图4.1。
<shapetype id="_x0000_t75" stroked="f" filled="f" path="m@4@5l@4@11@9@11@9@5xe" o:preferrelative="t" o:spt="75" coordsize="21600,21600"><stroke joinstyle="miter"></stroke><formulas><f eqn="if lineDrawn pixelLineWidth 0"></f><f eqn="sum @0 1 0"></f><f eqn="sum 0 0 @1"></f><f eqn="prod @2 1 2"></f><f eqn="prod @3 21600 pixelWidth"></f><f eqn="prod @3 21600 pixelHeight"></f><f eqn="sum @0 0 1"></f><f eqn="prod @6 1 2"></f><f eqn="prod @7 21600 pixelWidth"></f><f eqn="sum @8 21600 0"></f><f eqn="prod @7 21600 pixelHeight"></f><f eqn="sum @10 21600 0"></f></formulas><path o:connecttype="rect" gradientshapeok="t" o:extrusionok="f"></path><lock aspectratio="t" v:ext="edit"></lock></shapetype><shape id="_x0000_i1025" style="WIDTH: 159.75pt; HEIGHT: 133.5pt" type="#_x0000_t75"><imagedata o:title="SDGtoolkit1" src="file:///C:/DOCUME~1/ADMINI~1/LOCALS~1/Temp/msohtml1/01/clip_image001.jpg"></imagedata></shape>
图4.1 SDG Toolkit提供给开发者的控件
4.2 Single Display Groupware Toolkit指针的绘制
在多鼠标输入时最难以解决的就是两个问题,即不同鼠标输入数据的识别和鼠标指针的绘制。能识别不同鼠标数据的输入开发者才能让软件对不同的输入进行不同的响应,绘制独立的鼠标指针才能让软件的用户可以进行操作。下面首先介绍使用SDG Toolkit时各鼠标独立指针的绘制。
要在程序中使用SDG Toolkit,首先需要把图4.1所示的SdgManager控件加入新建立的程序。SdgManager是SDG Toolkit的主要控件,管理着SDG Toolkit包括所有输入事件的响应,鼠标指针的绘制等主要功能。
在程序中添加了SdgManager后,不改动任何数据,也即所有的参数都使用默认值,此时程序可以被正常的编译运行,且SDG Toolkit已完成了不同鼠标指针的绘制。但是此时程序无法响应任何鼠标输入的事件,甚至连系统原有的事件都无法响应。因为我们此时没有指明到底系统应该响应哪个鼠标的,首先应该将SdgManager的RelativeTo属性更改为Form1,表示这个SdgManager的鼠标响应与Form1相关,然后代码中InitializeComponet后添加进如下两条语句:
sdgManager1.EmulateSystemMouseMode = Sdgt.EmulateSystemMouseModes.FollowMouse;
sdgManager1.MouseToFollow = 0;
第一个语句表示系统鼠标的模式为跟随某个鼠标,第二个语句表示系统鼠标跟随第1个鼠标。在这里0表示迭代的索引号,0表示第一个,1表示第二个,依此类推,如C++中数组的规则。
添加这两条语句之后,此程序就可以响应第一个鼠标引发的系统事件,即把第一个鼠标当作系统鼠标来操作。这里要提醒的是,系统所辨识的第一个鼠标为Windows中GetRawInputDeviceList函数所标识的Device 0,并且依此类推,而不是指用户接入的第一个鼠标。这是因为上面所提及的,SDG Toolkit是利用带ID的RawInput技术所实现。另外需要非常注意的是,假如需要让程序在只有一个鼠标的情况下能够运行,那么此值就必须设为0,即第一个鼠标,因为只有一个鼠标的时候设为0以外的数值属于数组越界的情况,会导致程序的崩溃。
此时会发现3个鼠标的指针完全相同,这样会导致用户不知道自己控制的是哪一个。这也是多鼠标输入需要解决的问题之一,SDG Toolkit提供了很多种方法以解决此问题。在SDG Toolkit中,可以利用鼠标指针样式的不同,鼠标指针的透明度不同,鼠标指针的文字标识以使用户很容易的识别自己所操作的鼠标指针。已经说过,在SDG Toolkit中把每一个鼠标的指针属性,数据信息和相关操作都放在一个为名为Mouse的类里面,多加一个鼠标,就在sdgManager下的Mice动态数组中多添加一个mouse类成员。因此对以上几种方法的实现都是通过更改sdgManager的Mice数组成员不同的属性来完成的。比如更改sdgManager.Mice[i].Cursor为改变鼠标指针的类型,只要符合Windows的标准,也可以是自定义指针;改变sdgManager.Mice[i].Opacity改变鼠标指针的透明度;sdgManager.Mice[i].Text为定义鼠标指针的文字标识,系统默认在鼠标指针的右下角显示。还可以通过改变sdgManager.Mice[i]的TextBrush来改变文字标识的颜色,TextFont来改变文字标识的字体,TextLocation来改变文字标识的位置。另外,上面介绍过,SDG Toolkit为考虑在多人使用触摸屏时站在屏幕不同的角度,所以加入了指针的方向特性。只需要改变sdgManager.Mice[i]的DegreeRotation属性就可以实现。改变鼠标指针的方向不仅仅是为了识别,此时鼠标的移动也是以所在屏幕的方向为基准,这点真的是很符合特定情况的需要。在上文中,[i]表示的是第i个成员,i为鼠标的ID号,其分配也是以GetRawInputDeviceList为准。详细示例代码如下所示。
SDG鼠标指针绘制及改变测试程序具体代码(以下代码在VS .NET 2005 上编译通过)
using System;
using System.Collections.Generic;
using System.ComponentModel;
using System.Data;
using System.Drawing;
using System.Text;
using System.Windows.Forms;
namespace SDG_TEST
{
public partial class Form1 : Form
{
public Form1()
{
InitializeComponent();
//设置鼠标指针样式
Cursor[] sdgCursors = { Cursors.IBeam, Cursors.Hand, Cursors.Default };
//设置鼠标文字标识内容
String[] sdgText = { "Mouse 1", "Mouse 2", "Mouse 3" };
//设置鼠标文字标识颜色
Color[] sdgColor = { Color.Blue, Color.Red, Color.Black };
//设置鼠标指针透明度
double[] sdgOpacity = { 0.4, 0.6, 1 };
//设置鼠标指针方向
int[] sdgDegreeRotations = {90, 45, 0};
//迭代遍历所有鼠标,这里以3个鼠标为例
for (int i=0; i < sdgManager1.Mice.Count && i < 3; ++i)
{
sdgManager1.Mice[i].Cursor = sdgCursors[i];
sdgManager1.Mice[i].Text = sdgText[i];
sdgManager1.Mice[i].Opacity = sdgOpacity[i];
sdgManager1.Mice[i].TextBrush = new SolidBrush(sdgColor[i]);
sdgManager1.Mice[i].DegreeRotation = sdgDegreeRotations[i];
}
//改变系统鼠标模式为跟随模式
sdgManager1.EmulateSystemMouseMode = Sdgt.EmulateSystemMouseModes.FollowMouse;
//制定第1个鼠标为系统鼠标
sdgManager1.MouseToFollow = 0;
}
}
}
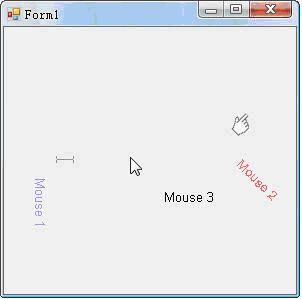
程序运行效果如图
<shape id="_x0000_i1026" style="WIDTH: 202.5pt; HEIGHT: 201.75pt" type="#_x0000_t75"><imagedata o:title="SDG test" src="file:///C:/DOCUME~1/ADMINI~1/LOCALS~1/Temp/msohtml1/01/clip_image002.jpg"></imagedata></shape>
图4.2 SDG Toolkit鼠标指针的绘制及识别
4.3 Single Display Groupware Toolkit不同鼠标输入数据的识别
已经讲过,在SDG Toolkit中不同鼠标输入数据的识别是通过Windows的事件系统来完成的。SDG Toolkit一共能响应鼠标的5个事件,分别与对应的Windows标准事件类似,只是参数不同,多了ID属性用来识别不同的鼠标。事件的响应程序设置也与标准的Windows程序事件响应设置类似。要加以说明的是Button属性识别按键是通过与System.Windows.Forms的MouseButtons下各鼠标按键值做比较,Delta识别鼠标中键滚轮时因为Windows设计的原因,数据的输入都是按120的倍数,其中向下滚动为负,向上滚动为正。详细示例代码如下所示:
SDG不同鼠标输入数据的识别及与Windows标准控件的交互(以下代码在VS .NET 2005 上编译通过)
using System;
using System.Collections.Generic;
using System.ComponentModel;
using System.Data;
using System.Drawing;
using System.Text;
using System.Windows.Forms;
namespace SDG_TEST
{
public partial class Form1 : Form
{
public Form1()
{
InitializeComponent();
//设置鼠标文字标识内容, 此例仅以文字标识区别不同鼠标
String[] sdgText = { "Mouse 1", "Mouse 2", "Mouse 3" };
//迭代遍历所有鼠标,这里以3个鼠标为例
for (int i=0; i < sdgManager1.Mice.Count && i < 3; ++i)
{
sdgManager1.Mice[i].Text = sdgText[i];
}
//改变系统鼠标模式为跟随模式
sdgManager1.EmulateSystemMouseMode = Sdgt.EmulateSystemMouseModes.FollowMouse;
//制定第1个鼠标为系统鼠标
sdgManager1.MouseToFollow = 1;
}
//鼠标移动的事件响应
private void sdgManager1_MouseMove(object sender, Sdgt.SdgMouseEventArgs e)
{
//通过识别不同的鼠标ID来改变不同的textBox属性
switch (e.ID)
{
case 0:
this.tB_mouse1.Text = "X " + e.X + " Y " + e.Y;
break;
case 1:
this.tB_mouse2.Text = "X " + e.X + " Y " + e.Y;
break;
case 2:
this.tB_mouse3.Text = "X " + e.X + " Y " + e.Y;
break;
default:
break;
}
}
//有鼠标键按下时的事件响应
private void sdgManager1_MouseDown(object sender, Sdgt.SdgMouseEventArgs e)
{
//首先识别鼠标ID
switch (e.ID)
{
case 0:
//识别不同按键来改变不同的checkBox值为选中
if (e.Button == MouseButtons.Left)
this.cb_mouse<chmetcnv w:st="on" tcsc="0" numbertype="1" negative="False" hasspace="False" sourcevalue="1" unitname="l">1L</chmetcnv>.Checked = true;
if (e.Button == MouseButtons.Middle)
this.cb_mouse<chmetcnv w:st="on" tcsc="0" numbertype="1" negative="False" hasspace="False" sourcevalue="1" unitname="m">1M</chmetcnv>.Checked = true;
if (e.Button == MouseButtons.Right)
this.cb_mouse1R.Checked = true;
break;
case 1:
//识别不同按键来改变不同的checkBox值为选中
if (e.Button == MouseButtons.Left)
this.cb_mouse<chmetcnv w:st="on" tcsc="0" numbertype="1" negative="False" hasspace="False" sourcevalue="2" unitname="l">2L</chmetcnv>.Checked = true;
if (e.Button == MouseButtons.Middle)
this.cb_mouse<chmetcnv w:st="on" tcsc="0" numbertype="1" negative="False" hasspace="False" sourcevalue="2" unitname="m">2M</chmetcnv>.Checked = true;
if (e.Button == MouseButtons.Right)
this.cb_mouse2R.Checked = true;
break;
case 2:
//识别不同按键来改变不同的checkBox值为选中
if (e.Button == MouseButtons.Left)
this.cb_mouse<chmetcnv w:st="on" tcsc="0" numbertype="1" negative="False" hasspace="False" sourcevalue="3" unitname="l">3L</chmetcnv>.Checked = true;
if (e.Button == MouseButtons.Middle)
this.cb_mouse<chmetcnv w:st="on" tcsc="0" numbertype="1" negative="False" hasspace="False" sourcevalue="3" unitname="m">3M</chmetcnv>.Checked = true;
if (e.Button == MouseButtons.Right)
this.cb_mouse3R.Checked = true;
break;
default:
break;
}
}
//有鼠标键松开时的事件响应
private void sdgManager1_MouseUp(object sender, Sdgt.SdgMouseEventArgs e)
{
//首先识别鼠标ID
switch (e.ID)
{
case 0:
//识别不同按键来改变不同的checkBox值为取消选中
if (e.Button == MouseButtons.Left)
this.cb_mouse<chmetcnv w:st="on" tcsc="0" numbertype="1" negative="False" hasspace="False" sourcevalue="1" unitname="l">1L</chmetcnv>.Checked = false;
if (e.Button == MouseButtons.Middle)
this.cb_mouse<chmetcnv w:st="on" tcsc="0" numbertype="1" negative="False" hasspace="False" sourcevalue="1" unitname="m">1M</chmetcnv>.Checked = false;
if (e.Button == MouseButtons.Right)
this.cb_mouse1R.Checked = false;
break;
case 1:
//识别不同按键来改变不同的checkBox值为取消选中
if (e.Button == MouseButtons.Left)
this.cb_mouse<chmetcnv w:st="on" tcsc="0" numbertype="1" negative="False" hasspace="False" sourcevalue="2" unitname="l">2L</chmetcnv>.Checked = false;
if (e.Button == MouseButtons.Middle)
this.cb_mouse<chmetcnv w:st="on" tcsc="0" numbertype="1" negative="False" hasspace="False" sourcevalue="2" unitname="m">2M</chmetcnv>.Checked = false;
if (e.Button == MouseButtons.Right)
this.cb_mouse2R.Checked = false;
break;
case 2:
//识别不同按键来改变不同的checkBox值为取消选中
if (e.Button == MouseButtons.Left)
this.cb_mouse<chmetcnv w:st="on" tcsc="0" numbertype="1" negative="False" hasspace="False" sourcevalue="3" unitname="l">3L</chmetcnv>.Checked = false;
if (e.Button == MouseButtons.Middle)
this.cb_mouse<chmetcnv w:st="on" tcsc="0" numbertype="1" negative="False" hasspace="False" sourcevalue="3" unitname="m">3M</chmetcnv>.Checked = false;
if (e.Button == MouseButtons.Right)
this.cb_mouse3R.Checked = false;
break;
default:
break;
}
}
private void sdgManager1_MouseWheel(object sender, Sdgt.SdgMouseEventArgs e)
{
//首先识别鼠标ID
switch (e.ID)
{
case 0:
//当progressBar控件没有超出范围时,进行操作
if (this.pb_mouse1.Value == this.pb_mouse1.Minimum
&& e.Delta < 0) break;
if (this.pb_mouse1.Value == this.pb_mouse1.Maximum
&& e.Delta > 0) break;
this.pb_mouse1.Value += e.Delta / 120;
break;
case 1:
//当progressBar控件没有超出范围时,进行操作
if (this.pb_mouse2.Value == this.pb_mouse2.Minimum
&& e.Delta < 0) break;
if (this.pb_mouse2.Value == this.pb_mouse2.Maximum
&& e.Delta > 0) break;
this.pb_mouse2.Value += e.Delta / 120;
break;
case 2:
//当progressBar控件没有超出范围时,进行操作
if (this.pb_mouse3.Value == this.pb_mouse3.Minimum
&& e.Delta < 0) break;
if (this.pb_mouse3.Value == this.pb_mouse3.Maximum
&& e.Delta > 0) break;
this.pb_mouse3.Value += e.Delta / 120;
break;
default:
break;
}
}
}
}
以下为各控件在Form1.Designer.cs中的声明:
private Sdgt.SdgManager sdgManager1;
private System.Windows.Forms.Label label2;
private System.Windows.Forms.Label label1;
private System.Windows.Forms.TextBox tB_mouse3;
private System.Windows.Forms.TextBox tB_mouse2;
private System.Windows.Forms.TextBox tB_mouse1;
private System.Windows.Forms.Label label3;
private System.Windows.Forms.CheckBox cb_mouse1R;
private System.Windows.Forms.CheckBox cb_mouse<chmetcnv w:st="on" tcsc="0" numbertype="1" negative="False" hasspace="False" sourcevalue="1" unitname="m">1M</chmetcnv>;
private System.Windows.Forms.CheckBox cb_mouse<chmetcnv w:st="on" tcsc="0" numbertype="1" negative="False" hasspace="False" sourcevalue="1" unitname="l">1L</chmetcnv>;
private System.Windows.Forms.CheckBox cb_mouse3R;
private System.Windows.Forms.CheckBox cb_mouse2R;
private System.Windows.Forms.CheckBox cb_mouse<chmetcnv w:st="on" tcsc="0" numbertype="1" negative="False" hasspace="False" sourcevalue="3" unitname="m">3M</chmetcnv>;
private System.Windows.Forms.CheckBox cb_mouse<chmetcnv w:st="on" tcsc="0" numbertype="1" negative="False" hasspace="False" sourcevalue="2" unitname="m">2M</chmetcnv>;
private System.Windows.Forms.CheckBox cb_mouse<chmetcnv w:st="on" tcsc="0" numbertype="1" negative="False" hasspace="False" sourcevalue="3" unitname="l">3L</chmetcnv>;
private System.Windows.Forms.CheckBox cb_mouse<chmetcnv w:st="on" tcsc="0" numbertype="1" negative="False" hasspace="False" sourcevalue="2" unitname="l">2L</chmetcnv>;
private System.Windows.Forms.ProgressBar pb_mouse1;
private System.Windows.Forms.ProgressBar pb_mouse3;
private System.Windows.Forms.ProgressBar pb_mouse2;
<shape id="_x0000_i1027" style="WIDTH: 361.5pt; HEIGHT: 178.5pt" type="#_x0000_t75"><imagedata o:title="SDGtoolkitData" src="file:///C:/DOCUME~1/ADMINI~1/LOCALS~1/Temp/msohtml1/01/clip_image004.jpg"></imagedata></shape>
图4.3 SDG Toolkit中数据的识别及与Windows标准控件的交互
4.4 Single Display Groupware Toolkit控件的使用
为了不受制于Windows标准控件的局限性,SDG Toolkit为了多鼠标的使用特意开发了一组相关控件,并在示例文件Simple Widget Application中详细演示了相关控件的使用,这里仅以此例来说明具体使用方法。
SDG Toolkit控件一共包含sdgRadioButton, sdgCheckBox, sdgTrackBar 3个,与名字相近的Windows标准控件用途一致,实现多鼠标控制的方式是为每个控件建立一个动态数组,以鼠标ID为索引,并且在显示上采用了同一控件分区域识别,使用户能知道自己相关控件的状态设置,在设计器层面使用方法与标准Windows控件完全相同。sdgRadioButton, sdgCheckBox控件数据主要利用CheckChanged事件来传递,事件的第二参数即为鼠标ID标识。sdgTrackBar主要利用Scroll事件来传递,鼠标的第二参数为sdgManager事件Sdgt.SdgMouseEventArgs形式,参数含义与4.3节介绍的一致。程序具体代码可在SDG Toolkit官方网站的example中找到,在此不详细列出,运行效果如图4.4所示。有一点要说明的是,到本文结稿之日为止,SDG Toolkit程序最终版本已经出到<chsdate w:st="on" year="1899" month="12" day="30" islunardate="False" isrocdate="False"><span lang="EN-US" style="FONT-SIZE: 12pt; LINE-HEIGHT: 150%; mso-font-kerning: 0pt; mso-no-proof: yes">2.0.1</span></chsdate>.0,而控件程序的版本仍然只有2.0.0.8,所以,假如要使用其控件,就不得不使用2.0.0.8版的SDG Toolkit程序。
<shape id="_x0000_i1028" style="WIDTH: 306pt; HEIGHT: 209.25pt" type="#_x0000_t75"><imagedata o:title="sdgwig" src="file:///C:/DOCUME~1/ADMINI~1/LOCALS~1/Temp/msohtml1/01/clip_image005.jpg"></imagedata></shape>
图4.4 SDG Toolkit控件使用演示
最后说明,由于本人对C#理解不深,可能写出来的程序有些问题,请指正。
此程序也演示了 SDG Toolkit 是怎么样通过输入的数据与 Windows 标准控件进行交互的。程序运行效果,如图 4.3 。 4.2 。


