目录
认证是由AuthenticationManager来管理的,但是真正进行认证的是AuthenticationManager中定义的AuthenticationProvider。AuthenticationManager中可以定义有多个AuthenticationProvider。当我们使用authentication-provider元素来定义一个AuthenticationProvider时,如果没有指定对应关联的AuthenticationProvider对象,Spring Security默认会使用DaoAuthenticationProvider。DaoAuthenticationProvider在进行认证的时候需要一个UserDetailsService来获取用户的信息UserDetails,其中包括用户名、密码和所拥有的权限等。所以如果我们需要改变认证的方式,我们可以实现自己的AuthenticationProvider;如果需要改变认证的用户信息来源,我们可以实现UserDetailsService。
实现了自己的AuthenticationProvider之后,我们可以在配置文件中这样配置来使用我们自己的AuthenticationProvider。其中myAuthenticationProvider就是我们自己的AuthenticationProvider实现类对应的bean。
<security:authentication-manager>
<security:authentication-provider ref="myAuthenticationProvider"/>
</security:authentication-manager>
实现了自己的UserDetailsService之后,我们可以在配置文件中这样配置来使用我们自己的UserDetailsService。其中的myUserDetailsService就是我们自己的UserDetailsService实现类对应的bean。
<security:authentication-manager>
<security:authentication-provider user-service-ref="myUserDetailsService"/>
</security:authentication-manager>
1.1 用户信息从数据库获取
通常我们的用户信息都不会向第一节示例中那样简单的写在配置文件中,而是从其它存储位置获取,比如数据库。根据之前的介绍我们知道用户信息是通过UserDetailsService获取的,要从数据库获取用户信息,我们就需要实现自己的UserDetailsService。幸运的是像这种常用的方式Spring Security已经为我们做了实现了。
1.1.1 使用jdbc-user-service获取
在Spring Security的命名空间中在authentication-provider下定义了一个jdbc-user-service元素,通过该元素我们可以定义一个从数据库获取UserDetails的UserDetailsService。jdbc-user-service需要接收一个数据源的引用。
<security:authentication-manager>
<security:authentication-provider>
<security:jdbc-user-service data-source-ref="dataSource"/>
</security:authentication-provider>
</security:authentication-manager>
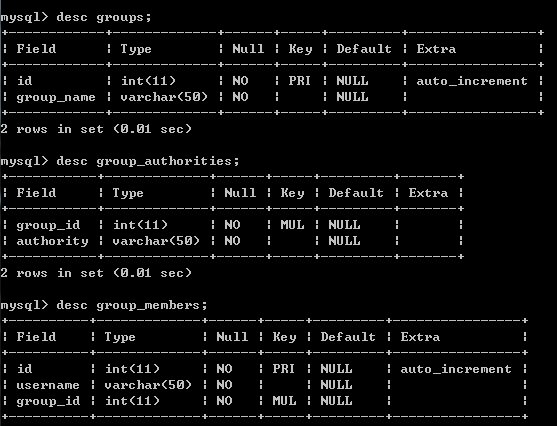
上述配置中dataSource是对应数据源配置的bean引用。使用此种方式需要我们的数据库拥有如下表和表结构。
这是因为默认情况下jdbc-user-service将使用SQL语句“select username, password, enabled from users where username = ?”来获取用户信息;使用SQL语句“select username, authority from authorities where username = ?”来获取用户对应的权限;使用SQL语句“select g.id, g.group_name, ga.authority from groups g, group_members gm, group_authorities ga where gm.username = ? and g.id = ga.group_id and g.id = gm.group_id”来获取用户所属组的权限。需要注意的是jdbc-user-service定义是不支持用户组权限的,所以使用jdbc-user-service时用户组相关表也是可以不定义的。如果需要使用用户组权限请使用JdbcDaoImpl,这个在后文后讲到。
当然这只是默认配置及默认的表结构。如果我们的表名或者表结构跟Spring Security默认的不一样,我们可以通过以下几个属性来定义我们自己查询用户信息、用户权限和用户组权限的SQL。
| 属性名 |
说明 |
| users-by-username-query |
指定查询用户信息的SQL |
| authorities-by-username-query |
指定查询用户权限的SQL |
| group-authorities-by-username-query |
指定查询用户组权限的SQL |
假设我们的用户表是t_user,而不是默认的users,则我们可以通过属性users-by-username-query来指定查询用户信息的时候是从用户表t_user查询。
<security:authentication-manager>
<security:authentication-provider>
<security:jdbc-user-service
data-source-ref="dataSource"
users-by-username-query="select username, password, enabled from t_user where username = ?" />
</security:authentication-provider>
</security:authentication-manager>
role-prefix属性
jdbc-user-service还有一个属性role-prefix可以用来指定角色的前缀。这是什么意思呢?这表示我们从库里面查询出来的权限需要加上什么样的前缀。举个例子,假设我们库里面存放的权限都是“USER”,而我们指定了某个URL的访问权限access=”ROLE_USER”,显然这是不匹配的,Spring Security不会给我们放行,通过指定jdbc-user-service的role-prefix=”ROLE_”之后就会满足了。当role-prefix的值为“none”时表示没有前缀,当然默认也是没有的。
1.1.2 直接使用JdbcDaoImpl
JdbcDaoImpl是UserDetailsService的一个实现。其用法和jdbc-user-service类似,只是我们需要把它定义为一个bean,然后通过authentication-provider的user-service-ref进行引用。
<security:authentication-manager>
<security:authentication-provider user-service-ref="userDetailsService"/>
</security:authentication-manager>
<bean id="userDetailsService" class="org.springframework.security.core.userdetails.jdbc.JdbcDaoImpl">
<property name="dataSource" ref="dataSource"/>
</bean>
如你所见,JdbcDaoImpl同样需要一个dataSource的引用。如果就是上面这样配置的话我们数据库表结构也需要是标准的表结构。当然,如果我们的表结构和标准的不一样,可以通过usersByUsernameQuery、authoritiesByUsernameQuery和groupAuthoritiesByUsernameQuery属性来指定对应的查询SQL。
用户权限和用户组权限
JdbcDaoImpl使用enableAuthorities和enableGroups两个属性来控制权限的启用。默认启用的是enableAuthorities,即用户权限,而enableGroups默认是不启用的。如果需要启用用户组权限,需要指定enableGroups属性值为true。当然这两种权限是可以同时启用的。需要注意的是使用jdbc-user-service定义的UserDetailsService是不支持用户组权限的,如果需要支持用户组权限的话需要我们使用JdbcDaoImpl。
<security:authentication-manager>
<security:authentication-provider user-service-ref="userDetailsService"/>
</security:authentication-manager>
<bean id="userDetailsService" class="org.springframework.security.core.userdetails.jdbc.JdbcDaoImpl">
<property name="dataSource" ref="dataSource"/>
<property name="enableGroups" value="true"/>
</bean>
1.2 PasswordEncoder
1.2.1 使用内置的PasswordEncoder
通常我们保存的密码都不会像之前介绍的那样,保存的明文,而是加密之后的结果。为此,我们的AuthenticationProvider在做认证时也需要将传递的明文密码使用对应的算法加密后再与保存好的密码做比较。Spring Security对这方面也有支持。通过在authentication-provider下定义一个password-encoder我们可以定义当前AuthenticationProvider需要在进行认证时需要使用的password-encoder。password-encoder是一个PasswordEncoder的实例,我们可以直接使用它,如:
<security:authentication-manager>
<security:authentication-provider user-service-ref="userDetailsService">
<security:password-encoder hash="md5"/>
</security:authentication-provider>
</security:authentication-manager>
其属性hash表示我们将用来进行加密的哈希算法,系统已经为我们实现的有plaintext、sha、sha-256、md4、md5、{sha}和{ssha}。它们对应的PasswordEncoder实现类如下:
| 加密算法 |
PasswordEncoder实现类 |
| plaintext |
PlaintextPasswordEncoder |
| sha |
ShaPasswordEncoder |
| sha-256 |
ShaPasswordEncoder,使用时new ShaPasswordEncoder(256) |
| md4 |
Md4PasswordEncoder |
| md5 |
Md5PasswordEncoder |
| {sha} |
LdapShaPasswordEncoder |
| {ssha} |
LdapShaPasswordEncoder |
使用BASE64编码加密后的密码
此外,使用password-encoder时我们还可以指定一个属性base64,表示是否需要对加密后的密码使用BASE64进行编码,默认是false。如果需要则设为true。
<security:password-encoder hash="md5" base64="true"/>
加密时使用salt
加密时使用salt也是很常见的需求,Spring Security内置的password-encoder也对它有支持。通过password-encoder元素下的子元素salt-source,我们可以指定当前PasswordEncoder需要使用的salt。这个salt可以是一个常量,也可以是当前UserDetails的某一个属性,还可以通过实现SaltSource接口实现自己的获取salt的逻辑,SaltSource中只定义了如下一个方法。
public Object getSalt(UserDetails user);
下面来看几个使用salt-source的示例。
(1)下面的配置将使用常量“abc”作为salt。
<security:authentication-manager>
<security:authentication-provider user-service-ref="userDetailsService">
<security:password-encoder hash="md5" base64="true">
<security:salt-source system-wide="abc"/>
</security:password-encoder>
</security:authentication-provider>
</security:authentication-manager>
(2)下面的配置将使用UserDetails的username作为salt。
<security:authentication-manager>
<security:authentication-provider user-service-ref="userDetailsService">
<security:password-encoder hash="md5" base64="true">
<security:salt-source user-property="username"/>
</security:password-encoder>
</security:authentication-provider>
</security:authentication-manager>
(3)下面的配置将使用自己实现的SaltSource获取salt。其中mySaltSource就是SaltSource实现类对应的bean的引用。
<security:authentication-manager>
<security:authentication-provider user-service-ref="userDetailsService">
<security:password-encoder hash="md5" base64="true">
<security:salt-source ref="mySaltSource"/>
</security:password-encoder>
</security:authentication-provider>
</security:authentication-manager>
需要注意的是AuthenticationProvider进行认证时所使用的PasswordEncoder,包括它们的算法和规则都应当与我们保存用户密码时是一致的。也就是说如果AuthenticationProvider使用Md5PasswordEncoder进行认证,我们在保存用户密码时也需要使用Md5PasswordEncoder;如果AuthenticationProvider在认证时使用了username作为salt,那么我们在保存用户密码时也需要使用username作为salt。如:
Md5PasswordEncoder encoder = new Md5PasswordEncoder();
encoder.setEncodeHashAsBase64(true);
System.out.println(encoder.encodePassword("user", "user"));
1.2.2 使用自定义的PasswordEncoder
除了通过password-encoder使用Spring Security已经为我们实现了的PasswordEncoder之外,我们也可以实现自己的PasswordEncoder,然后通过password-encoder的ref属性关联到我们自己实现的PasswordEncoder对应的bean对象。
<security:authentication-manager>
<security:authentication-provider user-service-ref="userDetailsService">
<security:password-encoder ref="passwordEncoder"/>
</security:authentication-provider>
</security:authentication-manager>
<bean id="passwordEncoder" class="com.xxx.MyPasswordEncoder"/>
在Spring Security内部定义有两种类型的PasswordEncoder,分别是org.springframework.security.authentication.encoding.PasswordEncoder和org.springframework.security.crypto.password.PasswordEncoder。直接通过password-encoder元素的hash属性指定使用内置的PasswordEncoder都是基于org.springframework.security.authentication.encoding.PasswordEncoder的实现,然而它现在已经被废弃了,Spring Security推荐我们使用org.springframework.security.crypto.password.PasswordEncoder,它的设计理念是为了使用随机生成的salt。关于后者Spring Security也已经提供了几个实现类,更多信息请查看Spring Security的API文档。我们在通过password-encoder使用自定义的PasswordEncoder时两种PasswordEncoder的实现类都是支持的。
(注:本文是基于Spring Security3.1.6所写)
(注:原创文章,转载请注明出处。原文地址:http://haohaoxuexi.iteye.com/blog/2157769)

