OPhone/Android的学习(2)—从分析Eclipse自动生成的代码到以XML控制UI
OPhone/Android的学习(2)—从分析Eclipse自动生成的代码到以XML控制UI
write by 九天雁翎(JTianLing) -- blog.csdn.net/vagrxie
一、 综述
以XML来控制UI我们已经不陌生了,这样的方式比硬代码方式(即将UI的控制完全放在代码中)更加灵活,更加易于管理及改变。特别是在用C++编写UI的时代,这简直就是突飞猛进似的进步。虽然XML也有很多缺点,并因此被人诟病,但是其对UI控制方面带来的好处确实是非常实在的,并且是今日非常流行的网页技术AJAX的核心组成部分之一(X就代表XML)。事实上,不仅是网页技术的应用,用过CEGUI这样著名开源UI的人也能知道,XML对界面的控制简直就是其UI控制的核心。再辅以LUA/Python脚本语言处理界面逻辑及事件响应,对界面层及其逻辑的开发效率可以比用C++这样的语言快上N倍。。。。。
Android提供了一种比较原生的方式来让我们使用XML控制界面,并且配置了很多可以用XML控制的界面Widget属性,我们不需要去了解XML解析和配置的一套系统,(什么SAX,DOM,我们都不用去管了)Google为我们将所有额外复杂的功能都做了,我们需要做的就是编写一个文本文件,然后实现我们想要的功能!虽然XML这样的所谓标记文本文件其实并不是太直观。。。。。(被人诟病的地方)
二、 分析ADT生成的HelloWorld
从一个HelloWorld程序来看,ADT生成的程序是比较复杂的了。但是这里不再排斥XML引入带来的复杂性(仅仅是还不了解的时候会这样感觉),重新建立一个程序,并审视我们的程序。
程序由src,gen,res三个主要的目录组成。
1. res目录下面就是资源:
从我们今天的主题最相关的资源部分入手,因为XML文件在OPhone/Android程序中属于资源。
资源又分成三个组成部分:
drawable
可以绘制的元素,初次生成的程序中带有一个icon.png的图标,这个图标就是最后我们生成的应用程序在OPhone/Android中的图标。
layout
由XML文件组成,如其名,用XML文件在此描述了我们的应用程序的框架构成。初次生成的程序中带有一个main.xml的文件。双击此文件打开的话会进入ADT的可视化XML编辑器,这样可以使的编辑XML文件更为容易一点,但是我们直接来看看源代码,毕竟还是比较简单的:
<?xml version="1.0" encoding="utf-8"?>
<LinearLayout xmlns:android="http://schemas.android.com/apk/res/android"
android:orientation="vertical"
android:layout_width="fill_parent"
android:layout_height="fill_parent"
>
<TextView
android:layout_width="fill_parent"
android:layout_height="wrap_content"
android:text="@string/hello"
/>
</LinearLayout>
对于完全不懂XML语言的人了解HTML也会有帮助,无非就是以一堆尖括号括起来的一堆属性而已(XML算不上完全的编程语言,虽然可以完成一些这样的任务)。
首先,我们可以看到,此程序中有一个LinearLayout,一个TextView,这些都是很熟悉的东西,不熟悉的看看此系列前面的文章。
《OPhone/Android的学习(1)—初步知识,TextView,Button,Layout及事件响应》
原来,一个默认生成的程序中已经包含了一个LinearLayout了。。。害得我以前找那么久。它有3个有效的属性:分别是
android:orientation="vertical"
android:layout_width="fill_parent"
android:layout_height="fill_parent"
意思很明确,方向是“vertical”垂直的,大小都填充父窗口。android表示的是类似命名空间的概念。
xmlns:android那一句是说明此程序用的是通常的android的命名空间属性,在Google的文档中明确描述道:
The outermost tag in every Android layout file must have this attribute.即最外层的layout文件必须有此属性。
TextView其他属性与layout类似,text属性表示的是TextView的文字。这里的使用就如同我们用TextView对象的setText方法一样。
@string/hello表示的意义见下面关于values的描述。
values
也是由XML文件构成,如其名所述,这里定义了一些我们用到的values,不过这里的values更加像平时我们在编程语言中用到常量,类似C++中的const,JAVA中的final。
目前只有一个strings.xml文件,双击也会进入ADT特有的XML可视化编辑器,使用非常方便,这里不多描述了,我们看看源码:
<?xml version="1.0" encoding="utf-8"?>
<resources>
<string name="hello">Hello World, DevXMLUI!</string>
<string name="app_name">DevXMLUI</string>
</resources>
内容很简单,我们有两个resources,分别是名为hello和app_name的string,string的内容如上面的黑体字描述的内容。我们可以在这里方便的修改,统一的管理,当程序规模扩大的时候才能看到这样的好处,那时候在这里修改一个string比去程序里面漫天的查找一个字符串要容易的多。这里的资源怎么被其他部分利用呢?在其他资源中利用的方式其实我们已经看到过了。TextView的属性android:text="@string/hello" 即是使用了string类型的名为hello的字符串,从strings.xml中我们可以看到,就是Hello World, DevXMLUI!了。
详细的资源的描述可以从Google的在线文档中查看:Resources and Internationalization
这里的资源怎么被程序利用呢?这是个问题。包括layout怎么被程序利用其实我们也遗漏了。那么我们再来看源码。
2. src目录下面就是源代码:
src下面的源码将是我们主要的程序代码编辑区。
目前所有的程序代码如下
package com.JTianLing;
import android.app.Activity;
import android.os.Bundle;
public class DevXMLUI extends Activity {
/** Called when the activity is first created. */
@Override
public void onCreate(Bundle savedInstanceState) {
super.onCreate(savedInstanceState);
setContentView(R.layout.main);
}
}
程序主要逻辑的意思我们应该了解了,这里大概再描述一下,DevXMLUI类继承自Activity,属于整个程序的代表类(类似MFC中的CApp),Activity的onCreate会在程序创建的时候自动调用,(类似MFC中窗口的OnCreate)。setContentView的意思是指定此程序的内容显示。我们以前也用过了,不过那个时候用的是直接创建的TextView对象,这里是R.layout.main,R.layout.main指的是什么呢?看下节的描述。
gen表示是Google为我们自动生成的代码
Google的文档明确的表示不希望我们手工改动此目录下的代码,此代码都有程序自动生成(在Eclipse中及时生成,不是IDE时在调用aapt时生成),目前所有的代码如下;
/* AUTO-GENERATED FILE. DO NOT MODIFY.
*
* This class was automatically generated by the
* aapt tool from the resource data it found. It
* should not be modified by hand.
*/
package com.JTianLing;
public final class R {
public static final class attr {
}
public static final class drawable {
public static final int icon=0x7f020000;
}
public static final class layout {
public static final int main=0x7f030000;
}
public static final class string {
public static final int app_name=0x7f040001;
public static final int hello=0x7f040000;
}
}
注释中也明确的表示了DO NOT MODIFY.!这里,类R的名字表示了其代表的即是我们通过XML编辑的资源,R是resource的首字母大小。
这里我们可以看到我们编辑过的XML属性,包括icon.png都能在这里一一找到对应的int值,OPhone/Android程序就是通过这些整数找到对应的属性的。了解MFC的话,这里可以做一个对比,这里不就是我们在Resource.h头文件中定义的那一堆宏的升级版嘛?其实总的看来,整个的Android的Resource都可以看做MFC Resource的升级版,之所以说升级,是因为XML比rc那样的格式更加通用,更加易于管理,其实从新版开始,VS自己都开始利用XML来管理配置和属性了,Office2007不都开始用XML格式来保存文件了吗?
讲述完上面的部分,我们应该能猜到了setContentView(R.layout.main); 中的R.layout.main不就是上面R类的layout类的main属性吗?因为都是static的,我们可以这样不通过对象直接使用,这点不用我多说了吧。
三、 通过修改程序运行印证分析
总体的分析了一下ADT为我们生成的Hello World程序,大概也知道了OPhone/Android程序的总体结构了。为了印证一下,我们来修改一些内容,看看是否运行后符合我们的设想。
1. 字符串内容的改变
先来将hello改变如下:
<string name="hello">Hello World, XML UI Application!</string>
运行后:
效果不错,如我们所想。
2. 框架的改动
将TextView改为我们同样熟悉的Button,效果如下:
效果也不错:)
一、 了解XML对UI的控制力
现在基本可以肯定我们的分析是正确的了,那么我们具体使用的XML的时候是怎么样的呢?比如,现在设定一个目标,我们给此程序加上三个Button,排成一横排,每点击其中一个Button,三个Button同时向左边移动的效果。(前面一篇文章的升级版:))
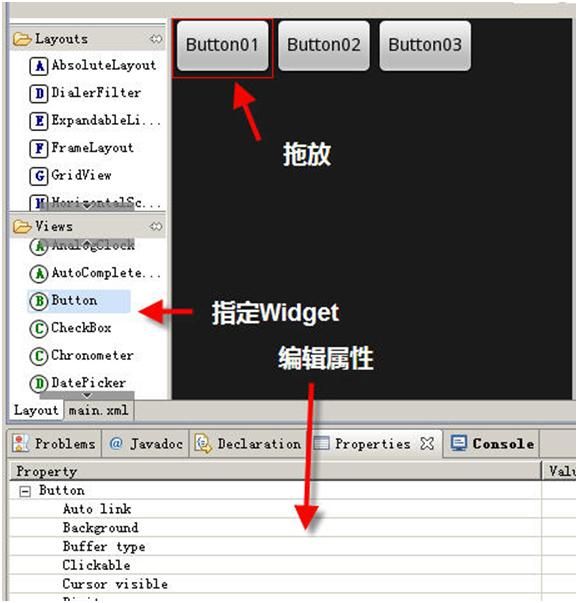
首先在可视化的XML编辑器中编辑layout,ADT的可视化XML编辑器几乎相当于一个RAD工具。。。相当强大,如下图:

从左边拖放适当的Button放在右边,按钮会按实际适用的layout放在恰当的位置,因为我先将LinearLayout的Orientation属性改成了
horizontal,所以这里自动将按钮排成了水平的了。可以看看生成的XML代码:
<?xml version="1.0" encoding="utf-8"?>
<LinearLayout xmlns:android="http://schemas.android.com/apk/res/android"
android:layout_width="fill_parent"
android:layout_height="fill_parent"
android:orientation="horizontal">
<Button android:text="Button01" android:id="@+id/Button01" android:layout_width="wrap_content" android:layout_height="wrap_content"></Button>
<Button android:text="Button02" android:id="@+id/Button02" android:layout_width="wrap_content" android:layout_height="wrap_content"></Button>
<Button android:text="Button03" android:id="@+id/Button03" android:layout_width="wrap_content" android:layout_height="wrap_content"></Button>
</LinearLayout>
还算是比较直观的,仅仅是id命名的方式有点奇怪,需要特别注意一下,我们留待以后再描述,不过有了上面的蓝本,依样画葫芦,手动编辑XML文件也不是不可行的。现在运行程序看看:
通过手动修改XML文件来生成字符串及换上对应的string值,此时对应的文件分别为:
strings.xml:
<?xml version="1.0" encoding="utf-8"?>
<resources>
<string name="hello">Hello World, DevXMLUI!</string>
<string name="button1">I'm Button 1</string>
<string name="button2">I'm Button 2</string>
<string name="button3">I'm Button 3</string>
<string name="app_name">DevXMLUI</string>
</resources>
main.xml:
<?xml version="1.0" encoding="utf-8"?>
<LinearLayout xmlns:android="http://schemas.android.com/apk/res/android"
android:layout_width="fill_parent"
android:layout_height="fill_parent"
android:orientation="horizontal">
<Button android:text="@string/button1" android:id="@+id/Button01" android:layout_width="wrap_content" android:layout_height="wrap_content"></Button>
<Button android:text="@string/button2" android:id="@+id/Button02" android:layout_width="wrap_content" android:layout_height="wrap_content"></Button>
<Button android:text="@string/button3" android:id="@+id/Button03" android:layout_width="wrap_content" android:layout_height="wrap_content"></Button>
</LinearLayout>
会发现R类也自动做出的相应的更改:
package com.JTianLing;
public final class R {
public static final class attr {
}
public static final class drawable {
public static final int icon=0x7f020000;
}
public static final class id {
public static final int Button01=0x7f050000;
public static final int Button02=0x7f050001;
public static final int Button03=0x7f050002;
}
public static final class layout {
public static final int main=0x7f030000;
}
public static final class string {
public static final int app_name=0x7f040004;
public static final int button1=0x7f040001;
public static final int button2=0x7f040002;
public static final int button3=0x7f040003;
public static final int hello=0x7f040000;
}
}
此时,从
public static final int Button01=0x7f050000;
public static final int Button02=0x7f050001;
public static final int Button03=0x7f050002;
从平时xml文件引用变量的方式是类似@string/的语法和上面的三句代码可以推断@+id/的意思了,意思就是没有对应的变量引用,创建新的变量。。。。。呵呵,+嘛,不就是添加嘛,还算是比较直观
运行程序看看:
果然如同我们设想的一样。现在就差时间的响应了,UI都布置好了。。。。(别看我上面描述的非常复杂,其实真正的操作可以1分钟内完成,实际的操作效果不说比RAD工具好,其他也差不到哪去)
剩下的就是实际的点击响应了,这点暂时XML没有办法帮你做了,呵呵,程序源代码如下:
DevXMLUI.java:
package com.JTianLing;
import java.util.Random;
import android.app.Activity;
import android.os.Bundle;
import android.view.View;
import android.view.View.OnClickListener;
import android.widget.Button;
public class DevXMLUI extends Activity implements OnClickListener{
Random random = new Random();
Button button1;
Button button2;
Button button3;
@Override
public void onClick(View v)
{
// 3个中没有使用过的boolean数组
boolean[] testUse = { false, false, false };
int i = random.nextInt(3);
testUse[i] = true;
button1.setText("I'm Button " + (i+1));
while(true) {
i = random.nextInt(3);
if (!testUse[i]) {
testUse[i] = true;
break;
}
}
button2.setText("I'm Button " + (i+1));
if (!testUse[0]) {
i = 1;
}
else if (!testUse[1]) {
i = 2;
}
else
{
i = 3;
}
button3.setText("I'm Button " + i);
}
/** Called when the activity is first created. */
@Override
public void onCreate(Bundle savedInstanceState) {
super.onCreate(savedInstanceState);
setContentView(R.layout.main);
button1 = (Button) findViewById(R.id.Button01);
button2 = (Button) findViewById(R.id.Button02);
button3 = (Button) findViewById(R.id.Button03);
// 三者的消息响应都设为一致的
button1.setOnClickListener(this);
button2.setOnClickListener(this);
button3.setOnClickListener(this);
}
}
onClick的响应程序用了random来随机生成一个0~2的整数,并通过一个boolean的数组来保证不会重复,基本的思想还是比较简单的,这里还可以看出一点,实际上OnClickListener是比较单纯的,也是足够可以复用的。
今天就到这里了。。。。
write by 九天雁翎(JTianLing) -- blog.csdn.net/vagrxie
<script type="text/javascript"><!-- var sitebro_tracker_atc={u:'http://www.sitebot.com.cn/754892/',w:'NzU0ODky',bt:'#804000',bg:'#FFFFCC',cf:'#ffffff',ca:'#666666',bh:'#f4f4c6',cp:'%E6%9C%AC%E7%AB%99%E7%83%AD%E9%97%A8%E6%96%87%E7%AB%A0',l:10,s:0,lang:'zh_CN'}; // --></script><script src="http://www.sitebot.com.cn/js/widget_track2/tracker_atc.js" type="text/javascript"></script><script type="text/javascript"><!-- var sitebro_tracker_atc_kw = {u:'http://www.sitebot.com.cn/754892/',w:'NzU0ODky',bt:'#804000',bg:'#FFFFCC',fs:1,ca:'#666666',bh:'#f4f4c6',cp:'',l:10,s:1,lang:'zh_CN'}; // --></script><script src="http://www.sitebot.com.cn/js/widget_track2/tracker_atc_kw.js" type="text/javascript"></script>


