下拉列表框实现
下拉列表框实现
一、实现框架1
二、实现根视图1
三、实现DropDownList类2
四、一些改进6
cocoa touch不提供下拉框控件,因为他们提供了UIPickerView。为什么还要使用已经成为windows标准控件之一的下拉框呢?“这不是苹果的体验”——“苹果体验”推崇者们这样反对。但作为从windows开发平台转移过来的程序员,他们只需要一个理由就足够反驳了:UIPickerView太大了,远没有下拉框控件节省屏幕空间。真实情况就是这样的,放一个UIPickerView,足够放3个下拉框都绰绰有余了。
一、实现框架
1、新建一个Window-based-application。
2、新建一个UIViewController:RootViewController。在其loadView方法中增加:self.view=[[UIViewalloc]initWithFrame:
[[UIScreenmainScreen]bounds]];
3、修改 AppDelegate, 加入以下两句并导入相关类,使应用程序启动时加载一个RootViewController:
RootViewController* root=[[RootViewControlleralloc]init];
[windowaddSubview:root.view];
二、实现根视图
1、在根视图中添加几个文本框,用来模拟下拉列表框(后面实现),在loadView方法中加入代码:
//1个textfield
UITextField* tf=[[UITextFieldalloc]initWithFrame:
CGRectMake(144, 73, 140,30)];
tf.borderStyle=UITextBorderStyleRoundedRect;
[self.viewaddSubview:tf];
[tfrelease];
//2个textfield
tf=[[UITextFieldalloc]initWithFrame:
CGRectMake(144, 129, 140,30)];
tf.borderStyle=UITextBorderStyleRoundedRect;
[self.viewaddSubview:tf];
[tfrelease];
运行效果如下:
2、将上面的UITextField替换为DropDownList。下面,我们准备自己实现这个DropDownList。
三、实现DropDownList类
1、新建UIView子类DropDownList。
2、我们准备用一个文本输入框加上一个TableView控件来实现这个下拉框。在头文件中声明如下,注意相应的 @synthesize语句:
@interfaceDropDownList : UIView {
UITextField* textField;//文本输入框
NSArray* list;//下拉列表数据
BOOLshowList;//是否弹出下拉列表
UITableView* listView;//下拉列表
CGRectoldFrame,newFrame;//整个控件(包括下拉前和下拉后)的矩形
UIColor *lineColor,*listBgColor;//下拉框的边框色、背景色
CGFloatlineWidth;//下拉框边框粗细
UITextBorderStyleborderStyle;//文本框边框style
}
@property (nonatomic,retain)UITextField *textField;
@property (nonatomic,retain)NSArray* list;
@property (nonatomic,retain)UITableView* listView;
@property (nonatomic,retain)UIColor *lineColor,*listBgColor;
@property (nonatomic,assign)UITextBorderStyleborderStyle;
-(void)drawView;
@end
3、然后在initWithFrame方法中初始化变量, 并调用drawView绘制控件:
if(self=[superinitWithFrame:frame]){
//默认的下拉列表中的数据
list=[[NSArrayalloc]initWithObjects:@"1",@"2",@"3",@"4",nil];
borderStyle=UITextBorderStyleRoundedRect;
showList=NO;//默认不显示下拉框
oldFrame=frame;//未下拉时控件初始大小
//当下拉框显示时,计算出控件的大小。
newFrame=CGRectMake(frame.origin.x, frame.origin.y, frame.size.width, frame.size.height*5);
lineColor=[UIColorlightGrayColor];//默认列表边框线为灰色
listBgColor=[UIColorwhiteColor];//默认列表框背景色为白色
lineWidth=1;//默认列表边框粗细为1
//把背景色设置为透明色,否则会有一个黑色的边
self.backgroundColor=[UIColorclearColor];
[selfdrawView];//调用方法,绘制控件
}
returnself;
4、先在drawView方法中绘制一个文本框:
//文本框
textField=[[UITextFieldalloc]
initWithFrame:CGRectMake(0, 0,
oldFrame.size.width,
oldFrame.size.height)];
textField.borderStyle=borderStyle;//设置文本框的边框风格
[selfaddSubview:textField];
运行程序,进行测试。但我们点击DropDownList控件的输入框时,键盘会自动弹出,我们需要屏蔽掉它。在上面的代码后加上:
//增加文本框的触摸事件响应
[textFieldaddTarget:selfaction:@selector(dropdown)
forControlEvents:UIControlEventAllTouchEvents];
然后实现dropdown方法:
-(void)dropdown{
[textFieldresignFirstResponder];
}
现在,键盘不会自动弹出了。
5、在drawView方法中添加代码,以绘制tableView控件:
//下拉列表
listView=[[UITableViewalloc]initWithFrame:
CGRectMake(lineWidth,oldFrame.size.height+lineWidth,
oldFrame.size.width-lineWidth*2,
oldFrame.size.height*4-lineWidth*2)];
listView.dataSource=self;
listView.delegate=self;
listView.backgroundColor=listBgColor;
listView.separatorColor=lineColor;
listView.hidden=!showList;//一开始listView是隐藏的,此后根据showList的值显示或隐藏
[selfaddSubview:listView];
[listViewrelease];
现在我们必须实现tableView的协议方法(别忘记在头文件中声明UITableViewDataSource和UITableViewDelegate协议):
#pragma mark listViewdataSource method and delegate method
-(NSInteger)tableView:(UITableView *)table numberOfRowsInSection:(NSInteger)section{
returnlist.count;
}
-(UITableViewCell*)tableView:(UITableView *)tableViewcellForRowAtIndexPath:(NSIndexPath *)indexPath{
staticNSString *cellid=@"listviewid";
UITableViewCell* cell=[tableViewdequeueReusableCellWithIdentifier:cellid];
if(cell==nil){
cell=[[[UITableViewCellalloc]initWithStyle:UITableViewCellStyleDefault
reuseIdentifier:cellid]autorelease];
}
//文本标签
cell.textLabel.text=(NSString*)[listobjectAtIndex:indexPath.row];
cell.textLabel.font=textField.font;
cell.selectionStyle=UITableViewCellSelectionStyleGray;
return cell;
}
-(CGFloat)tableView:(UITableView *)tableViewheightForRowAtIndexPath:(NSIndexPath *)indexPath{
returnoldFrame.size.height;
}
//当选择下拉列表中的一行时,设置文本框中的值,隐藏下拉列表
-(void)tableView:(UITableView *)tableViewdidSelectRowAtIndexPath:(NSIndexPath *)indexPath{
//NSLog(@"select");
textField.text=(NSString*)[listobjectAtIndex:indexPath.row];
//NSLog(@"textField.text=%@",textField.text);
[selfsetShowList:NO];
}
setShowList是showList变量的setter方法。该方法根据给定的参数隐藏或显示下拉框。showList变量的访问方法如下:
-(BOOL)showList{//setShowList:No为隐藏,setShowList:Yes为显示
returnshowList;
}
-(void)setShowList:(BOOL)b{
showList=b;
NSLog(@"showlist is set ");
if(showList){
self.frame=newFrame;
}else {
self.frame=oldFrame;
}
listView.hidden=!b;
}
运行程序,点击文本框,下拉框没有出来。别急,我们的dropdown方法还没有相关的代码:
if (showList) {//如果下拉框已显示,什么都不做
return;
}else {//如果下拉框尚未显示,则进行显示
//把dropdownList放到前面,防止下拉框被别的控件遮住
[self.superviewbringSubviewToFront:self];
[selfsetShowList:YES];//显示下拉框
}
运行程序,点击文本框,下拉列表可以显示了。但是tableView是没有边框的:
要为下拉框加上边框,我们需要实现以下方法:
//为tableView加上边框
-(void)drawRect:(CGRect)rect{
//NSLog(@"%@",rect);
CGContextRefctx=UIGraphicsGetCurrentContext();
CGRectdrawRect;
if (showList) {
CGContextSetStrokeColorWithColor(ctx, [lineColorCGColor]);
drawRect=listView.frame;
CGContextStrokeRect(ctx,drawRect);
//CGContextStrokeRectWithWidth(ctx,drawRect,lineWidth);
}else {
return;
}
//[selfdrawListBorder:ctx :drawRect];
}
这个方法会在收到setNeedsDisplay方法时被调用,因此我们需要在显示下拉列表时,发送setNeedsDisplay消息。在setShowList方法最后发送setNeedsDisplay消息:
[selfsetNeedsDisplay];//调用drawRect重绘
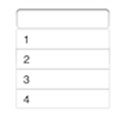
运行效果如下:
如果我们要在列表中显示自己的数据,可以在构造dropDownList后对list属性赋值:
DropDownList* tf=[[DropDownListalloc]initWithFrame:
CGRectMake(144, 73, 140,30)];
tf.borderStyle=UITextBorderStyleRoundedRect;
tf.textField.placeholder=@"请输入联系方式";
NSArray* arr=[[NSArrayalloc]initWithObjects:@"电话",@"email",@"手机",nil];
tf.list=arr;
[arrrelease];
[self.viewaddSubview:tf];
[tfrelease];
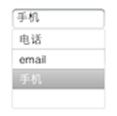
运行效果如下:
四、一些改进
1、使用NSDictionary作为模型数据
由于下拉框选项一般会由两部分的数据构成:显示文本和数据,所以使用由“键-值”对组成的Dictionary类型来表示下拉框的数据模型更为适宜。因此我们把DropDownList的list修改为NSDictionary类型:
NSString* data;//变量,存储选中项的key值
NSDictionary* list;//下拉列表数据
NSArray* allKeys;//所有键
⋯⋯
@property (nonatomic,retain)NSString* data;
-(void)setList:(NSDictionary *)val;
⋯⋯
@synthesize data
⋯⋯
list=[[NSDictionarydictionaryWithObjectsAndKeys:
@"市场部",@"1",@"行政部",@"2",nil]retain];
allKeys=[list.allKeysretain];
⋯⋯
-(void)setList:(NSDictionary *)val{
list=val;
allKeys=val.allKeys;
allKeys.retain;
[listViewreloadData]; //刷新textView显示
textField.text=@"";//清空文本框内容,不能让文本框的内容与下拉列表中的内容不一致
}
同时修改tableView数据源方法和委托方法中的代码:
-(UITableViewCell*)tableView:(UITableView *)tableViewcellForRowAtIndexPath:(NSIndexPath *)indexPath{
⋯⋯
//获得字典中的键和值
NSString* sKey=[list.allKeysobjectAtIndex:indexPath.row];
NSString* sVal=(NSString*)[listobjectForKey:skey];
//文本标签
cell.textLabel.tag=sKey;
cell.textLabel.text=sVal;
[sKeyrelease];
[sValrelease];
⋯⋯
}
-(void)tableView:(UITableView *)tableViewdidSelectRowAtIndexPath:(NSIndexPath *)indexPath{
//获得字典中的键和值
data=[allKeysobjectAtIndex:indexPath.row];
textField.text=(NSString*)[listobjectForKey:data];
[selfsetShowList:NO];
}
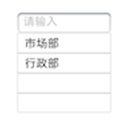
现在仅仅是构造一个DropDownList对象,不用修改什么属性,结果如下:
当你选择一个下拉选项后,文本框内的文字会发生改变。
2、定义协议并通过委托进行扩展
仅仅是显示列表供用户选择,而不进行任何动作显然是不够的。我们可以定义一个委托属性,把选择后的动作交给委托来做。
首先,需要在头文件中定义要委托的工作,即协议:
@protocolDropDownListDelegate
@required
-(void)selected:(NSString*)k displayLabel:(NSString*)v;
@end
其次,在头文件中定义一个id属性:
id<DropDownListDelegate>delegate;//委托,当选定下拉项后处理
⋯⋯
@property (nonatomic,assign)id<DropDownListDelegate> delegate;
然后在implementation部分@synthesize delegate;
并在-(void)tableView: didSelectRowAtIndexPath:方法中加入:
if (delegate!=nil) {
[delegateperformSelector:@selector(selected:displayLabel:)
withObject:datawithObject:textField.text];
}
回到RootViewController,在interface部分,再类名后增加<DropDownListDelegate>
在loadView方法中增加droplist.delegate=self;
最后实现协议中定义的方法:
-(void)selected:(NSString *)k displayLabel:(NSString *)v{
NSLog(@"%@:%@",k,v);
}
运行程序,选择下拉项,委托方法(协议方法)会被调用,后台输出如下:
2010-08-17 15:13:05.104 DropDownBox[3048:207] 1:市场部
2010-08-17 15:13:07.288 DropDownBox[3048:207] 2:行政部
2010-08-17 15:13:09.153 DropDownBox[3048:207] 1:市场部
2010-08-17 15:13:11.371 DropDownBox[3048:207] 2:行政部
通过委托和协议的方式对类进行扩展,与通过子类进行扩展比较而言,显然更加的灵活,代码更为分散。