上传图片
在asp.net里上传文件是很简单的一件事。先在项目里新建一个文件:upfile.aspx
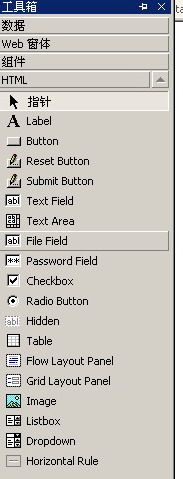
然后添加一个HTML的File Field组件,再添加一个Button1控件。
点开upfile的HTML编辑器,将“<INPUT type="file">”改成“<INPUT type="file" runat=server id=myfile name=myfile>”
回到upfile的设计窗口,双击button,自动跳到upfile.aspx.cs页面。先添加“using System.IO;”的引用,然后在“Page_Load”事件里输入以下代码:
if (!this.IsPostBack)
{}
{}
再在“Button1_Click”事件里加入以下代码:
if (this.myfile.PostedFile!=null)
{
string FullFileName = this.myfile.PostedFile.FileName;
string FileName = FullFileName.Substring(FullFileName.LastIndexOf('\\')+1);
this.myfile.PostedFile.SaveAs(Server.MapPath("")+" \\"+FileName);
}
{
string FullFileName = this.myfile.PostedFile.FileName;
string FileName = FullFileName.Substring(FullFileName.LastIndexOf('\\')+1);
this.myfile.PostedFile.SaveAs(Server.MapPath("")+" \\"+FileName);
}
编译后看看效果吧。完整代码如下:
upfile.aspx:
<%@ Page language="c#" Codebehind="upfile.aspx.cs" AutoEventWireup="false" Inherits="test.upfile" %>
<!
DOCTYPE
HTML
PUBLIC
"-//W3C//DTD HTML 4.0 Transitional//EN"
>
<
HTML
>
<HEAD>
<title>upfile</title>
<metaname="GENERATOR"Content="Microsoft Visual Studio .NET 7.1">
<metaname="CODE_LANGUAGE"Content="C#">
<metaname="vs_defaultClientScript"content="JavaScript">
<metaname="vs_targetSchema"content="http://schemas.microsoft.com/intellisense/ie5">
<styletype="text/css">BODY { FONT-SIZE: 9pt; BACKGROUND-COLOR: #ffffff }
.button { BORDER-RIGHT: #b2c2d7 1px solid; BORDER-TOP: #b2c2d7 1px solid; FONT-SIZE: 9pt; BORDER-LEFT: #b2c2d7 1px solid; COLOR: #205064; BORDER-BOTTOM: #b2c2d7 1px solid; BACKGROUND-COLOR: #fef8ef }
</style>
</HEAD>
<body>
<formid="Form1"method="post"runat="server">
<FONTface="
宋体"><
INPUT
type
="file"
runat
="server"
id
="myfile"
name
="myfile">
<asp:Buttonid="Button1"runat="server"Text="Button"></asp:Button></FONT>
</form>
</body>
</
HTML
>
upfile.aspx.cs:
using
System;
using
System.Collections;
using
System.ComponentModel;
using
System.Data;
using
System.Drawing;
using
System.Web;
using
System.Web.SessionState;
using
System.Web.UI;
using
System.Web.UI.WebControls;
using
System.Web.UI.HtmlControls;
namespace
test
{
///<summary>
/// upfile
的摘要说明。
///</summary>
public class upfile : System.Web.UI.Page
{
protected System.Web.UI.HtmlControls.HtmlInputFile myfile;
protected System.Web.UI.WebControls.Button Button1;
private void Page_Load(object sender, System.EventArgs e)
{
if (!this.IsPostBack)
{}
}
#region
Web
窗体设计器生成的代码
override protected void OnInit(EventArgs e)
{
//
// CODEGEN:
该调用是 ASP.NET Web 窗体设计器所必需的。
//
InitializeComponent();
base.OnInit(e);
}
///<summary>
///
设计器支持所需的方法 - 不要使用代码编辑器修改
///
此方法的内容。
///</summary>
private void InitializeComponent()
{
this.Button1.Click += new System.EventHandler(this.Button1_Click);
this.Load += new System.EventHandler(this.Page_Load);
}
#endregion
private void Button1_Click(object sender, System.EventArgs e)
{
if (this.myfile.PostedFile!=null)
{
string FullFileName = this.myfile.PostedFile.FileName;
//
这个filename是获取客户端文件的路径和文件名,而我们用得着的,只有文件名,完整的路径是没有用的。
//
以下是获得文件名
string FileName = FullFileName.Substring(FullFileName.LastIndexOf('\\')+1);
this.myfile.PostedFile.SaveAs(Server.MapPath("")+"\\"+FileName);
//
注意,上面的保存语句,如果在该目录下有同名文件的话,将被覆盖。如果同名文件是只读的,会出现“对路径“……”的访问被拒绝。”
//
如果出现“未找到路径“……”的一部分。”的错误信息的话,则是保存的路径错误。可以把this.myfile.PostedFile.SaveAs();里的内
//
容输出看一下,是不是有目录没有建立。
//
如果文件大于4M不能上传的话,在\Microsoft.NET\Framework\v1.0.3705\CONFIG\machine.config文件中,定位maxRequestLength,
//
改变其值为你需要的值,如maxRequestLength="10240",表示可以上传10M的文件
}
}
}
}
 0 && image.height>0){if(image.width>=510){this.width=510;this.height=image.height*510/image.width;}}" border=0>