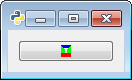
pygtk-xpm 和button
#!/usr/bin/env python

# example pixmap.py

import pygtk
pygtk.require('2.0')
import gtk

# XPM data of Open-File icon
#从内存生成的图像数据
xpm_data = [
"10 12 4 1",
"  c Green",
". c Red",
"X c Blue",
"Y c #00000FFFFFF",
"XXXXXXXXXX",
" XXXXXXXX ",
"  XXXXXX  ",
"   YYYY   ",
"    YY    ",
"    YY    ",
"    YY    ",
"    YY    ",
"..........",
"..........",
"..........",
".........."
]

class PixmapExample:
# when invoked (via signal delete_event), terminates the application.
	def close_application(self, widget, event, data=None):
		gtk.main_quit()
		return False

# is invoked when the button is clicked. It just prints a message.
	def button_clicked(self, widget, data=None):
		print "button clicked"

	def __init__(self):

		#create the main window, and attach delete_event signal to terminating
		# the application
		window = gtk.Window(gtk.WINDOW_TOPLEVEL)
		window.connect("delete_event", self.close_application)
		window.set_border_width(10)
		window.show()

		# now for the pixmap from XPM data
		#从内存生成的图像数据中读取
		#pixmap, mask = gtk.gdk.pixmap_create_from_xpm_d(window, transparent_color,data)
		pixmap, mask = gtk.gdk.pixmap_create_from_xpm_d(window.window,
		None,
		xpm_data)

		# an image widget to contain the pixmap
		image = gtk.Image()
		image.set_from_pixmap(pixmap, mask)
		image.show()

		# a button to contain the image widget
		button = gtk.Button()
		button.add(image)
		window.add(button)
		button.show()

		button.connect("clicked", self.button_clicked)

def main():
	gtk.main()
	return 0

if __name__ == "__main__":
	PixmapExample()
	main()
XPM格式说明:
xpm_data = [
"10 12 4 1",
" c Green",
". c Red",
"X c Blue",
"Y c #00000FFFFFF",
"XXXXXXXXXX",
" XXXXXXXX ",
" XXXXXX ",
" YYYY ",
" YY ",
" YY ",
" YY ",
" YY ",
"..........",
"..........",
"..........",
".........."
]
"10 12 4 1",其中10表示象素宽度,12表示象素高度,4表示色彩种类,最后一个数字说明的是每个字母当作各个颜色的标记
下面4行就是每个字符代表的色彩
再下面的10列12行的字符表示图像的每个像素