Windows 下 Spring + ActiveMq + maven 集成配置 之一 服务端配置
一、环境
1、本机localhost 64bit win7操作系统
2、jdk1.7。同时配置 JAVA_HOME环境变量
3、apache-activemq-5.11.1。这里假设解压后文件路径为C:\activemq5.11.1
二、ActiveMq服务启动
启动双击 C:\activemq5.11.1\bin\win64 下的activemq.bat文件即可
三、服务端配置
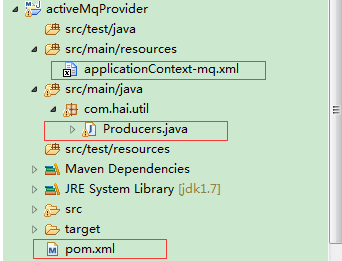
1)eclipse中新建服务端maven工程activeMqProvider
项目目录结构如下
2)pom.xml配置片段
<properties>
<project.build.sourceEncoding>UTF-8</project.build.sourceEncoding>
<spring_version>4.0.3.RELEASE</spring_version>
<activemq_version>5.7.0</activemq_version>
</properties>
<dependencies>
<dependency>
<groupId>junit</groupId>
<artifactId>junit</artifactId>
<version>3.8.1</version>
<scope>test</scope>
</dependency>
<dependency>
<groupId>org.springframework</groupId>
<artifactId>spring-core</artifactId>
<version>${spring_version}</version>
</dependency>
<dependency>
<groupId>org.springframework</groupId>
<artifactId>spring-context</artifactId>
<version>${spring_version}</version>
</dependency>
<dependency>
<groupId>org.springframework</groupId>
<artifactId>spring-aop</artifactId>
<version>${spring_version}</version>
</dependency>
<dependency>
<groupId>org.springframework</groupId>
<artifactId>spring-aspects</artifactId>
<version>${spring_version}</version>
</dependency>
<dependency>
<groupId>org.springframework</groupId>
<artifactId>spring-beans</artifactId>
<version>${spring_version}</version>
</dependency>
<dependency>
<groupId>org.springframework</groupId>
<artifactId>spring-test</artifactId>
<version>${spring_version}</version>
</dependency>
<dependency>
<groupId>org.springframework</groupId>
<artifactId>spring-context-support</artifactId>
<version>${spring_version}</version>
</dependency>
<dependency>
<groupId>org.springframework</groupId>
<artifactId>spring-webmvc</artifactId>
<version>${spring_version}</version>
</dependency>
<dependency>
<groupId>org.springframework</groupId>
<artifactId>spring-web</artifactId>
<version>${spring_version}</version>
</dependency>
<dependency>
<groupId>org.springframework</groupId>
<artifactId>spring-orm</artifactId>
<version>${spring_version}</version>
</dependency>
<dependency>
<groupId>org.springframework</groupId>
<artifactId>spring-jms</artifactId>
<version>${spring_version}</version>
</dependency>
<dependency>
<groupId>org.apache.activemq</groupId>
<artifactId>activemq-core</artifactId>
<version>${activemq_version}</version>
</dependency>
<dependency>
<groupId>org.apache.activemq</groupId>
<artifactId>activemq-pool</artifactId>
<version>${activemq_version}</version>
</dependency>
</dependencies>
3)applicationContext-mq.xml代码片段
<!-- 配置ConnectionFactory -->
<!-- 真正可以产生Connection的ConnectionFactory,由对应的 JMS服务厂商提供-->
<bean id="targetConnectionFactory" class="org.apache.activemq.ActiveMQConnectionFactory">
<property name="brokerURL" value="tcp://localhost:61616"/>
</bean>
<!-- 连接池配置 -->
<bean id="jmsFactory" class="org.apache.activemq.pool.PooledConnectionFactory" destroy-method="stop">
<property name="connectionFactory" ref="targetConnectionFactory"></property>
</bean>
<!-- Spring JMS Template -->
<bean id="jmsTemplate" class="org.springframework.jms.core.JmsTemplate">
<property name="connectionFactory" ref="jmsFactory">
</property>
<property name="explicitQosEnabled" value="true" />
<!-- deliveryMode, priority, timeToLive 的开关,要生效,必须配置为true,默认false-->
<property name="deliveryMode" value="1" />
<!-- 发送模式 DeliveryMode.NON_PERSISTENT=1:非持久 ; DeliveryMode.PERSISTENT=2:持久-->
<property name="pubSubDomain" value="false" />
</bean>
<!-- 发送消息的目的地(一个队列) -->
<bean id="destination" class="org.apache.activemq.command.ActiveMQTopic">
<!-- 设置消息队列的名字 -->
<constructor-arg index="0" value="subject" />
</bean>
4)Producers.java 代码片段
package com.hai.util;
import javax.jms.JMSException;
import javax.jms.Session;
import javax.jms.Destination;
import javax.jms.Message;
import org.springframework.context.ApplicationContext;
import org.springframework.context.support.ClassPathXmlApplicationContext;
import org.springframework.jms.core.JmsTemplate;
import org.springframework.jms.core.MessageCreator;
public class Producers {
/**
* @param args
* jmsTemplate和destination都是在spring配置文件中进行配制的
* Sender只使用了配置文件中的jmsFactory,jmsTemplate,还有destination这三个属性
*/
public static void main(String[] args) {
ApplicationContext applicationContext = new ClassPathXmlApplicationContext("applicationContext-mq.xml");
JmsTemplate template = (JmsTemplate) applicationContext.getBean("jmsTemplate");
Destination destination = (Destination) applicationContext.getBean("destination");
template.send(destination, new MessageCreator() {
public Message createMessage(Session session) throws JMSException {
return session.createTextMessage("发送消息:Hello ActiveMQ Text Message2!");
}
});
System.out.println("成功发送了一条JMS消息");
}
}
四、调试
执行Producers.java中的main方法,输出如下
成功发送了一条JMS消息
至此,Windowss 下 Spring + ActiveMq + maven 集成配置 之一 服务端配置成功.
