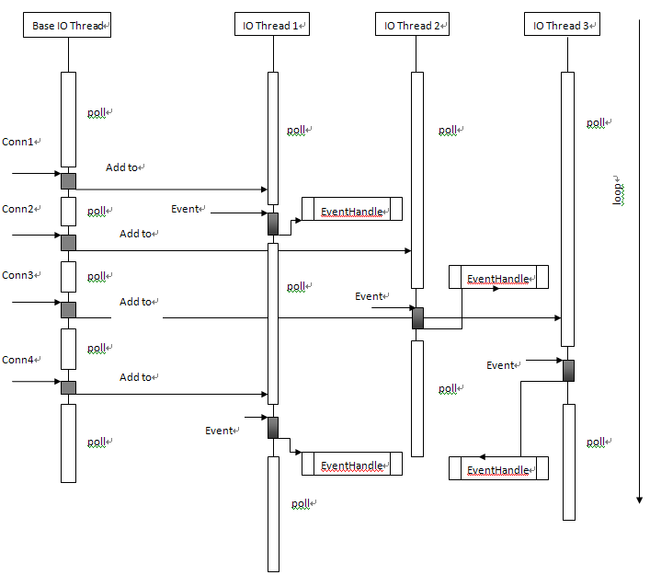
Muduo网络库分析(二)
上一篇博文已经将网络库在处理连接的步骤分析了一下。本片主要分析在IOThread中的操作。IOThread要从server_.start()开始说起。还是把简化的代码再次贴出吧
int main(int argc, char* argv[])
{
    LOG_INFO << "pid = " << getpid() << ", tid = " << CurrentThread::tid();
    if (argc > 1)
    {
        numThreads = atoi(argv[1]);
    }
    EventLoop loop;
    InetAddress listenAddr(2007);
    TcpServer server_(loop, listenAddr, "EchoServer");
    server_.setConnectionCallback(
        boost::bind(&EchoServer::onConnection, this, _1));
    server_.setMessageCallback(
        boost::bind(&EchoServer::onMessage, this, _1, _2, _3));
    server_.setThreadNum(numThreads);
    loop->runEvery(3.0, boost::bind(&EchoServer::printThroughput, this));

    server_.start();

    loop.loop();
}
server_.start()封装得比较深:
void TcpServer::start()
{
  if (started_.getAndSet(1) == 0)
  {
    threadPool_->start(threadInitCallback_);//建立多个或一个IOThread

    assert(!acceptor_->listenning());
    loop_->runInLoop(
        boost::bind(&Acceptor::listen, get_pointer(acceptor_)));//在主线程的loop中调用
    //Acceptor::listen()方法。查看其源代码可以看到主要是执行listen(2)系统调用,然后将listen的fd注册到
    //poller的读事件中,至此新到的连接就会完全按照上篇所讲的流程被处理。
  }
}
下面重点分析threadPool_->start(threadInitCallback):
void EventLoopThreadPool::start(const ThreadInitCallback& cb)
{
  assert(!started_);
  baseLoop_->assertInLoopThread();

  started_ = true;

  for (int i = 0; i < numThreads_; ++i)//numThreads_已经在server_.setThreadNum(numThreads)中赋值
    //表示需要开启的IOThread的个数
  {
    EventLoopThread* t = new EventLoopThread(cb);
    threads_.push_back(t);
    loops_.push_back(t->startLoop());
  }
  if (numThreads_ == 0 && cb)
  {
    cb(baseLoop_);//不需要建立IOThread
  }
}
EventLoopThread* t = new EventLoopThread(cb);
查看EventLoopThread的构造函数:
EventLoopThread::EventLoopThread(const ThreadInitCallback& cb)
  : loop_(NULL),
    exiting_(false),
    thread_(boost::bind(&EventLoopThread::threadFunc, this), "EventLoopThread"), // FIXME: number it
    mutex_(),//配合cond_使用的互斥量
    cond_(mutex_),//用于同步的条件变量
    callback_(cb)//callback_主要是在该IOThread执行循环之前需要执行的自定义函数操作(可不赋值)
{
}
上述代码中thread_是EventLoopThread的Thread对象:
Thread::Thread(ThreadFunc&& func, const string& n)
  : started_(false),
    joined_(false),
    pthreadId_(0),
    tid_(new pid_t(0)),
    func_(std::move(func)),
    name_(n)
{
  setDefaultName();//设置线程的名字为默认名。
}
在threadPool_->start(threadInitCallback)中可以看出EventLoopThreadPool维护了一个EventLoopThread指针队列:threads_
可以说是所建立的线程信息都被维护在这个队列中。
现在线程封装的对象已经入队列。下面就是开启各个线程了:EventLoopThreadPool::start(const ThreadInitCallback& cb)的loops_.push_back(t->startLoop());
t->startLoop():
EventLoop* EventLoopThread::startLoop()
{
  assert(!thread_.started());
  thread_.start();//开启线程
  {
    MutexLockGuard lock(mutex_);
    while (loop_ == NULL)
    {
      cond_.wait();//阻塞至线程开启成功
    }
  }

  return loop_;//返回该IOThread运行时所处的loop对象
}
重点分析thread_.start():
void Thread::start()
{
  assert(!started_);
  started_ = true;
  // FIXME: move(func_)
  detail::ThreadData* data = new detail::ThreadData(func_, name_, tid_);
  if (pthread_create(&pthreadId_, NULL, &detail::startThread, data))//调用pthread_create系统调用创建线程
  {
    started_ = false;
    delete data; // or no delete?
    LOG_SYSFATAL << "Failed in pthread_create";
  }
}
detail::ThreadData中封装了一些启动线程是的异常处理。在此就不做过多分析。线程开启时是以detail::startThread()函数为入口的该函数最终还是要调用到Thread的func_而func_早在EventLoopThread的构造函数中被赋值为EventLoopThread::threadFunc:
void EventLoopThread::threadFunc()
{
  EventLoop loop;

  if (callback_)
  {
    callback_(&loop);//运行自定义的回调操作
  }

  {
    MutexLockGuard lock(mutex_);
    loop_ = &loop;//赋值loop以便EventLoopThread::startLoop()返回
    cond_.notify();//线程运行成功将使cond_.wait()唤醒
  }

  loop.loop();//进入循环
  //assert(exiting_);
  loop_ = NULL;
}
线程已经建立成功,此后主线程接收到的连接就会被分配到这些IOThread中进行读写操作。
下面简单介绍loop():
void EventLoop::loop()
{
  assert(!looping_);
  assertInLoopThread();
  looping_ = true;
  quit_ = false;  // FIXME: what if someone calls quit() before loop() ?
  LOG_TRACE << "EventLoop " << this << " start looping";

  while (!quit_)
  {
    activeChannels_.clear();
    pollReturnTime_ = poller_->poll(kPollTimeMs, &activeChannels_);//在kPollTimeMs时间间隔内阻塞等待
    //各个连接上的读写事件。并将活动的Channel对象放入activeChannels_队列中
    ++iteration_;
    if (Logger::logLevel() <= Logger::TRACE)
    {
      printActiveChannels();//调试用
    }
    // TODO sort channel by priority
    eventHandling_ = true;
    for (ChannelList::iterator it = activeChannels_.begin();
        it != activeChannels_.end(); ++it)
    {
      currentActiveChannel_ = *it;
      currentActiveChannel_->handleEvent(pollReturnTime_);//根据触发的标志进行相应的事件处理
    }
    currentActiveChannel_ = NULL;
    eventHandling_ = false;
    doPendingFunctors();//处理待处理队列中的操作
  }

  LOG_TRACE << "EventLoop " << this << " stop looping";
  looping_ = false;
}
所有的线程就是在loop()中不停地循环处理不同事件。后续将详细介绍muduo的多路复用IO接口以及对定时器的实现。
下面完善一下上篇的流程图:
