Android学习二
建立简单的用户界面
Adnroid图形用户界面是由多个View和ViewGroup构建出来的。
1.View是通用的UI窗体小组件,比如按钮(Button)或者文本框(Text Field)。
2.ViewGroup是不可见的用于定义子View布局方式的容器,比如网格部件(grid)或者垂直列表部件(list)。
ViewGroup如何组织布局分支和包含其他view对象。
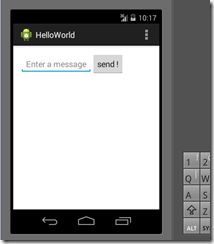
这一节的目标是使用xml创建一个带有文本输入框和按钮的界面
一、创建一个LinearLayout
从目录res/layout中打开activity_main.xml文件,进入xml编辑,会看见有<RelativeLayout>根节点和<TextView>子节点。
1、删除TextView子节点,修改RelativeLayout根节点名称为LinearLayout
2、给LinearLayout添加一个属性为:android:orientation=”horizontal”
<LinearLayout xmlns:android="http://schemas.android.com/apk/res/android"
    xmlns:tools="http://schemas.android.com/tools"
    android:layout_width="match_parent"
    android:layout_height="match_parent"
    android:paddingBottom="@dimen/activity_vertical_margin"
    android:paddingLeft="@dimen/activity_horizontal_margin"
    android:paddingRight="@dimen/activity_horizontal_margin"
    android:paddingTop="@dimen/activity_vertical_margin"
    tools:context="com.example.helloworld.MainActivity"
    android:orientation="horizontal">


</LinearLayout>
LinearLayout是ViewGroup的一个子类,用户放置水平或者垂直放置子视图的部件,由属性andoroid:orientation来设定方向。LinearLayout里的子布局按照XML里定义的顺序显示在屏幕上。
android:layout_width和android:layout_height,对于所有的Views都需要对这两个属性进行设置。
android:layout_width="match_parent"
android:layout_height="match_parent"
LinearLayout是整个视图的根布局,对于宽和高是充满整个屏幕的,通过指定match_parent,表示匹配父控件的布局。
添加一个文本输入框
 <EditText android:id="@+id/edit_messsage"
     android:layout_width="wrap_content"
     android:layout_height="wrap_content"
     android:hint="@string/edit_message" />
这边需要给文本框设置一个id,因为在后面可能会用到,所以需要唯一的指定它。
想从xml里使用资源类的时候必须使用@符号,紧随@符号之后的是资源的类型(这里是id),然后是资源的名称,例如@string/zhoujie。
在这个代码中有+id这样的形式存在,+号只是在第一次定义一个资源id的时候需要
android:hint是默认在文本框中显示的字符,android:hint=”@string/edit_message”
我们这是使用的类型是string类型,资源名称叫edit_message,直接使用会报错,因为我们还没有设置这样一个string,打开res/values/strings.xml,
<string name="app_name">HelloWorld</string>
   <string name="edit_message">Enter a message</string>
   <string name="action_settings">Settings</string>
   <string name="zj">send !</string>
edit_message的值为 Enter a message
添加一个按钮
<Button
     android:layout_width="wrap_content"
     android:layout_height="wrap_content"
     android:text="@string/send"
     />
按钮不需要设置id,在strings.xml中设置send的值为:send!
设置结束,我们运行项目!
这里可以发现,文本框的宽度不是很合适,我们把文本框的宽度设置一样,是用android:weight这个属性设置,表示权重
<EditText android:id="@+id/edit_messsage"
    android:layout_weight="1"
    android:layout_width="0dp"
    android:layout_height="wrap_content"
    android:hint="@string/edit_message" />

<Button
    android:layout_width="wrap_content"
    android:layout_height="wrap_content"
    android:text="@string/send"
    />
设置之后样式为:
好的,大功告成!


