wicket 集成 spring
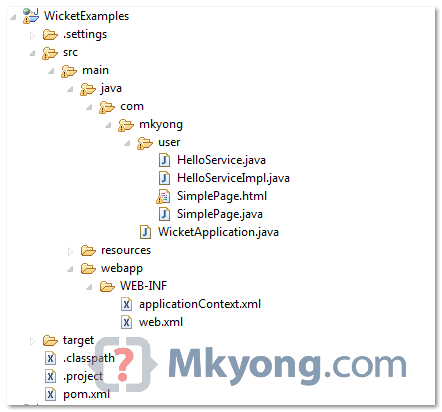
1. Project Structure
Final project directory structure of this tutorial, nothing special, just a standard Maven project.
2. Project Dependency
Get Wicket and Spring dependencies, to integrate both, you need “wicket-spring.jar“.
<dependencies>
        <!-- Wicket framework-->
        <dependency>
            <groupId>org.apache.wicket</groupId>
            <artifactId>wicket</artifactId>
            <version>1.4.17</version>
        </dependency>
        <!-- Integrate Wicket with Spring -->
        <dependency>
            <groupId>org.apache.wicket</groupId>
            <artifactId>wicket-spring</artifactId>
            <version>1.4.17</version>
        </dependency>
        <!-- Spring framework -->
        <dependency>
            <groupId>org.springframework</groupId>
            <artifactId>spring-core</artifactId>
            <version>3.0.5.RELEASE</version>
        </dependency>
        <dependency>
            <groupId>org.springframework</groupId>
            <artifactId>spring-context</artifactId>
            <version>3.0.5.RELEASE</version>
        </dependency>
        <dependency>
            <groupId>org.springframework</groupId>
            <artifactId>spring-web</artifactId>
            <version>3.0.5.RELEASE</version>
        </dependency>
        <!-- slf4j-log4j -->
        <dependency>
            <groupId>org.slf4j</groupId>
            <artifactId>slf4j-log4j12</artifactId>
            <version>1.5.6</version>
        </dependency>
    </dependencies>
3. Spring Bean
Create a Spring bean, annotate it with @Service .
package com.mkyong.user;
public interface HelloService {
     String getHelloWorldMsg();
}
package com.mkyong.user;
import org.springframework.stereotype.Service;
@Service
public class HelloServiceImpl implements HelloService {
    public String getHelloWorldMsg() {
		return "Spring : hello world";
    }
}
4. Inject into Spring container
Create a standard Spring applicationContext.xml file, enable the auto component scanning feature.
File : applicationContext.xml
<beans xmlns="http://www.springframework.org/schema/beans" xmlns:xsi="http://www.w3.org/2001/XMLSchema-instance"
           xmlns:context="http://www.springframework.org/schema/context">
    <context:component-scan base-package="com.mkyong.user"/>
</beans>
5. Integrate Wicket with Spring
Override Wicket application init() method with this “addComponentInstantiationListener(new SpringComponentInjector(this));“.
File : Wicket application class
package com.mkyong;
import org.apache.wicket.protocol.http.WebApplication;
import org.apache.wicket.spring.injection.annot.SpringComponentInjector;
import com.mkyong.user.SimplePage;
public class WicketApplication extends WebApplication {
    @Override
    public Class<SimplePage> getHomePage() {
	return SimplePage.class; // return default page
    }
    @Override
    protected void init() {
        super.init();
	addComponentInstantiationListener(new SpringComponentInjector(this));
    }
 }
Now, you can inject Spring bean into Wicket component via @SpringBean.
package com.mkyong.user;
import org.apache.wicket.PageParameters;
import org.apache.wicket.markup.html.basic.Label;
import org.apache.wicket.markup.html.WebPage;
import org.apache.wicket.spring.injection.annot.SpringBean;

public class SimplePage extends WebPage {
    @SpringBean
    private HelloService helloService;
    public SimplePage(final PageParameters parameters) {
	add(new Label("msg", helloService.getHelloWorldMsg()));
    }
}
<html>
    <body>
        <h1>Wicket + Spring integration example</h1>
        <h2 wicket:id="msg"></h2>
    </body>
</html>
6. web.xml
Last step, make your web project know what is Wicket and Spring. Declares both in web.xml.
File : web.xml
<?xml version="1.0" encoding="ISO-8859-1"?>
<web-app xmlns="http://java.sun.com/xml/ns/j2ee"
    xmlns:xsi="http://www.w3.org/2001/XMLSchema-instance"
    xsi:schemaLocation="http://java.sun.com/xml/ns/j2ee
    http://java.sun.com/xml/ns/j2ee/web-app_2_4.xsd"
    version="2.4">
	<display-name>Wicket Web Application</display-name>
     	<filter>
		<filter-name>wicket.wicketTest</filter-name>
		<filter-class>org.apache.wicket.protocol.http.WicketFilter</filter-class>
		<init-param>
			<param-name>applicationClassName</param-name>
			<param-value>com.mkyong.WicketApplication</param-value>
		</init-param>
	</filter>
        <filter-mapping>
		<filter-name>wicket.wicketTest</filter-name>
		<url-pattern>/*</url-pattern>
	</filter-mapping>
        <listener>
		<listener-class>
                     org.springframework.web.context.ContextLoaderListener
                 </listener-class>
	</listener>
</web-app>
7.具体的方法要根据相应jar包支持的最新版本进行转换。
