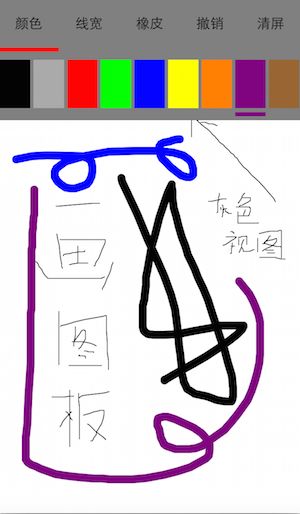
iOS开发·制作简易画板
学了手势处理与2D绘图,今天花了1个多小时做了一个简易画板,基于iOS平台。由于是新手,求轻拍。
工具:MAC、Xcode 6、一颗耐心。
首先新建一个工程,在ViewController.m中开始我们的代码吧。
第一步:规划好这个控制器中的视图组成结构
@interface ViewController () {
    UIView* _grayView;      //顶部的灰色视图,承载工具栏
    UIView* _redLineView1;  //工具栏下面的红色标记
    UIView* _redLineView2;  //颜色下面的标记
    UIView* _redLineView3;  //线宽下面的标记
    UIView* _colorView;     //承载各颜色按钮的视图
    BOOL _colorViewIsShow;  //标记颜色视图是否显示
    UIView* _lineWidthView; //线宽视图

    DrawView* _drawView;    //画图板
}
第二步:添加各个视图
- (void)viewDidLoad {
    [super viewDidLoad];
    // Do any additional setup after loading the view, typically from a nib.

    _grayView = [[UIView alloc] initWithFrame:CGRectMake(0, 30, kWidth, 150)];
    _grayView.backgroundColor = [UIColor grayColor];
    [self.view addSubview:_grayView];

    [self _createToolButtons];
    [self _createColorView];
    [self _createLineWidthView];
    [self _createDrawView];
}
- (void)_createToolButtons {
    NSArray* titleArray = @[@"颜色",@"线宽",@"橡皮",@"撤销",@"清屏"];

    for (int i = 0; i < titleArray.count; i++) {
        MyButton* button = [[MyButton alloc] initWithFrame:CGRectMake(i*kWidth/5, 0, kWidth/5, 60)];
        button.tag = (i+1)*100;
        button.title = titleArray[i];
        [_grayView addSubview:button];
        button.block = ^ {
            [UIView animateWithDuration:0.3 animations:^{//红色标记移动动画
                [_redLineView1 setCenter:CGPointMake(i*kWidth/5+kWidth/10, 62.5)];
            }];
            if (button.tag == 100) {        //颜色
                _colorView.hidden = NO;
                _redLineView2.hidden = NO;
                _colorViewIsShow = YES;
                _lineWidthView.hidden = YES;
                _redLineView3.hidden = YES;
            } else if (button.tag == 200) { //线宽
                _colorView.hidden = YES;
                _redLineView2.hidden = YES;
                _colorViewIsShow = NO;
                _lineWidthView.hidden = NO;
                _redLineView3.hidden = NO;
            } else if (button.tag == 300) { //橡皮
                _drawView.color = [UIColor whiteColor];
            } else if (button.tag == 400) { //撤销
                [_drawView undo];
            } else {                        //清屏
                [_drawView clear];
            }
        };
    }

    _redLineView1 = [[UIView alloc] initWithFrame:CGRectMake(0, 60, kWidth/5, 5)];
    [_grayView addSubview:_redLineView1];
    _redLineView1.backgroundColor = [UIColor redColor];
}

- (void)_createColorView {
    _colorView = [[UIView alloc] initWithFrame:CGRectMake(0, 70, kWidth, 70)];
    [_grayView addSubview:_colorView];
    _colorViewIsShow = YES;


    NSArray* colorArray = @[[UIColor blackColor],[UIColor lightGrayColor],[UIColor redColor],[UIColor greenColor],[UIColor blueColor],[UIColor yellowColor],[UIColor orangeColor],[UIColor purpleColor],[UIColor brownColor]];
    CGFloat width = kWidth/9-4;
    CGFloat height = 60;
    for (int i = 0; i < colorArray.count; i++) {
        MyButton* button = [[MyButton alloc] initWithFrame:CGRectMake(2+(kWidth/9)*i, 5, width, height)];
        [_colorView addSubview:button];
        button.tag = (i+1)*100;
        button.backgroundColor = colorArray[i];
        button.block = ^ {
            [UIView animateWithDuration:0.3 animations:^ {
                [_redLineView2 setFrame:CGRectMake(2+(kWidth/9)*i, 140, width, 5)];
                _redLineView2.backgroundColor = colorArray[i];
            }];
            _drawView.color = colorArray[i];
        };
    }

    _redLineView2 = [[UIView alloc] initWithFrame:CGRectMake(2, 140, width, 5)];
    _redLineView2.backgroundColor = [UIColor blackColor];
    [_grayView addSubview:_redLineView2];
}

- (void)_createLineWidthView {
    _lineWidthView = [[UIView alloc] initWithFrame:CGRectMake(0, 70, kWidth, 70)];
    [_grayView addSubview:_lineWidthView];
    _lineWidthView.hidden = YES;

    NSArray* widthArray = @[@"1点",@"5点",@"10点",@"15点",@"20点",@"30点"];
    NSArray* width = @[@1,@5,@10,@15,@20,@30];

    for (int i = 0; i < widthArray.count; i++) {
        MyButton* button = [[MyButton alloc] initWithFrame:CGRectMake(i*kWidth/6, 0, kWidth/6, 60)];
        button.title = widthArray[i];
        button.tag = (i+1)*100;
        [_lineWidthView addSubview:button];
        button.block = ^ {
            [UIView animateWithDuration:0.3 animations:^ {
                [_redLineView3 setFrame:CGRectMake(i*kWidth/6, 140, kWidth/6, 5)];
            }];
            _drawView.lineWidth = [width[i] integerValue];
        };
    }

    _redLineView3 = [[UIView alloc] initWithFrame:CGRectMake(0, 140, kWidth/6, 5)];
    _redLineView3.backgroundColor = [UIColor redColor];
    [_grayView addSubview:_redLineView3];
    _redLineView3.hidden = YES;
}

- (void)_createDrawView {
    _drawView = [[DrawView alloc] initWithFrame:CGRectMake(0, 180, kWidth, kHeight-180)];
    [self.view addSubview:_drawView];
}
代码中出现的MyButton,其实是我自己自制的一个按钮,继承自UIView,有三个属性,可以通过Block传递基本信息,基本实现按钮功能。这里只是为了练习Block的用法,不习惯的朋友可以直接用button实现
@property (nonatomic,copy) BlockType block;
@property (nonatomic,strong) NSString* title;
@property (nonatomic,strong) UILabel* label;
第三步:定制画板DrawView(重点来了)
(写在前面:最重要的思想就是实时记录触摸点的移动,并将它们连成线,等手指离开时将这一条线(点集合成的数组)存入线数组。而当画另一条线时,就先遍历线数组,将之前画过的线先画出来,再实时监控现在的触摸点移动,绘制出当前正在画的线。橡皮其实就是将线颜色设为白色,撤销操作其实就是将线数组最后一个元素删除然后重绘,清屏其实就是将线数组中所有元素删除然后重绘)
新建文件画板DrawView,继承于UIView
它有两个属性,分别是线条颜色和线宽;有两个对象方法,分别是撤销和清屏
@property (nonatomic) UIColor* color;
@property (nonatomic) NSInteger lineWidth;

- (void)undo;       //撤销
- (void)clear;      //清屏
(1)新建四个可变数组
@implementation DrawView {
    NSMutableArray* _lineArray;     //存储线条,里面的item也是数组,就是点集合
    NSMutableArray* _pointArray;    //存储点,是点的集合,用完后存入_lineArray

    NSMutableArray* _colorArray;    //存储之前线条的颜色
    NSMutableArray* _widthArray;    //存储之前线条的宽度
}
(2)复写它的init方法,在其中为各个数组和各个数值初始化
- (instancetype)initWithFrame:(CGRect)frame {
    if (self = [super initWithFrame:frame]) {
        self.userInteractionEnabled = YES;
        self.backgroundColor = [UIColor whiteColor];
        _lineArray = [[NSMutableArray alloc] init];
        _pointArray = [[NSMutableArray alloc] init];
        _colorArray = [[NSMutableArray alloc] init];
        _widthArray = [[NSMutableArray alloc] init];
        _color = [UIColor blackColor];
        _lineWidth = 1;
    }

    return self;
}
(3)实现触摸方法,监听触摸事件
//当触摸开始,记录下第一个起始点startPoint并将它加入到点数组,作为第一个元素
- (void)touchesBegan:(NSSet *)touches withEvent:(UIEvent *)event {
    UITouch* touch = [touches anyObject];
    CGPoint startPoint = [touch locationInView:self];
    NSString* startPointStr = NSStringFromCGPoint(startPoint);
    [_pointArray addObject:startPointStr];
}
//当触摸点移动时,实时记录触摸点的位置,将它们存入点数组
- (void)touchesMoved:(NSSet *)touches withEvent:(UIEvent *)event {
    UITouch* touch = [touches anyObject];

    CGPoint point = [touch locationInView:self];
    NSString* pointStr = NSStringFromCGPoint(point);

    [_pointArray addObject:pointStr];

    //实时调用display方法,刷新画板
    [self setNeedsDisplay];
}
//手指抬起,触摸结束。拷贝点数组,新建一个数组,加入到线数组。并将点数组清空,以承载下一次画的点集合
- (void)touchesEnded:(NSSet *)touches withEvent:(UIEvent *)event {
    //这里一定要这么写,相当于复制了一个数组,不能直接等于,否则两数组地址一样,就是同一个
    NSArray* array = [NSArray arrayWithArray:_pointArray];
    [_lineArray addObject:array];
    [_pointArray removeAllObjects];

    //每画完一条线,就把当前线的颜色和线宽这一数据记录下来存入数组
    UIColor* color = _color;
    [_colorArray addObject:color];
    NSInteger width = _lineWidth;
    [_widthArray addObject:[NSString stringWithFormat:@"%li",width]];
}
(4)实现drawRect方法。绘制方法
drawRect在以下情况下会被调用:
1、如果在UIView初始化时没有设置rect大小,将直接导致drawRect不被自动调用。drawRect 掉用是在Controller->loadView, Controller->viewDidLoad 两方法之后掉用的.所以不用担心在 控制器中,这些View的drawRect就开始画了.这样可以在控制器中设置一些值给View(如果这些View draw的时候需要用到某些变量 值).
2、该方法在调用sizeToFit后被调用,所以可以先调用sizeToFit计算出size。然后系统自动调用drawRect:方法。
3、通过设置contentMode属性值为UIViewContentModeRedraw。那么将在每次设置或更改frame的时候自动调用drawRect:。
4、直接调用setNeedsDisplay,或者setNeedsDisplayInRect:触发drawRect:,但是有个前提条件是rect不能为0
- (void)drawRect:(CGRect)rect {
    //获得当前上下文
    CGContextRef context = UIGraphicsGetCurrentContext();

    CGContextBeginPath(context);        //开始一条路径
    CGContextSetLineJoin(context, kCGLineJoinRound);    //线条拐角样式,圆润
    CGContextSetLineCap(context, kCGLineCapRound);      //线条两头样式,圆润

    //如果线条数组有元素,说明前面已经有画好的线条了。在开始画新的线条前,要把之前的线条先画好,显示在屏幕上的效果就是前面的线条还在,已经在画新的线条了
    if (_lineArray.count > 0) {
        //写一个循环,将前面的线一条一条先绘制出来
        for (int i = 0; i < _lineArray.count; i++) {
            NSArray* pointArray = _lineArray[i];
            if (pointArray.count > 0) { //如果点数组有数据,说明有线,才绘制
                [self drawLine:context withPointArray:pointArray withColor:_colorArray[i] andLineWidth:[_widthArray[i] integerValue]];
            }
        }
    }

    //当点集合中有元素时,说明已经开始画新的线条了
    if (_pointArray.count > 0) {
        [self drawLine:context withPointArray:_pointArray withColor:_color andLineWidth:_lineWidth];
    }
}

- (void)drawLine:(CGContextRef)context withPointArray:(NSArray*)pointArray withColor:(UIColor*)color andLineWidth:(NSInteger)lineWidth {
    CGPoint startPoint = CGPointFromString(pointArray[0]);
    CGContextMoveToPoint(context, startPoint.x, startPoint.y);  //设置起始点

    //添加绘制点
    for (int i = 1; i < pointArray.count; i++) {
        CGPoint point = CGPointFromString(pointArray[i]);
        CGContextAddLineToPoint(context, point.x, point.y);
    }


    [color set];                               //线条颜色,为什么setFill就不行了?
    CGContextSetLineWidth(context, lineWidth);     //宽度

//    CGContextDrawPath(context, kCGPathFillStroke);        //万恶啊,这句留着就会有雨刷效果

    CGContextStrokePath(context);
}
(5)撤销和清屏
//撤销,将各数组最后一个元素删除即可,然后重绘画板
- (void)undo {
    [_lineArray removeLastObject];
    [_pointArray removeLastObject];
    [_colorArray removeLastObject];
    [_widthArray removeLastObject];

    [self setNeedsDisplay];
}
//清屏,将各个数组清空然后重绘画板即可
- (void)clear {
    [_lineArray removeAllObjects];
    [_pointArray removeAllObjects];
    [_colorArray removeAllObjects];
    [_widthArray removeAllObjects];

    [self setNeedsDisplay];
}
源码地址:https://git.oschina.net/924531378.com/drawingBoard.git
转载请注明出处(哈哈,如果有人转载的话)
效果图如下:
