高性能高可用方案Nginx (一)LNMP环境搭建
1、理论部分
1.1、负载均衡的实现
负载进程架构的实现方式有多种,一般分为:
1)TCP层实现的负载均衡
2)应用层实现的负载均衡
1.1.1、TCP层实现的负载均衡
例如:
lvs(调度性能强悍)
1.1.2、应用层实现的负载均衡
例如:
nginx,haproxy,apache(mod_proxy),varnish,squid
1.2、nginx的功能:
1.2.1、基本的HTTP服务器特性
1)提供静态和指数文件,自动标引;打开的文件描述符缓存;
2)加速反向代理缓存;负载平衡和容错;
3)加速与缓存的支持FastCGI,uwsgi,SCGI,memcached服务器;负载平衡和容错;
4)模块化的体系结构。过滤器包括gzip字节范围,分块反应,XSLT,SSI,图像变换过滤器。多个SSI包含在单个页面可以并行处理,如果他们通过代理或FastCGI处理/ uwsgi SCGI服务器;
SSL和TLS SNI的支持;
5)支持HTTP / 2加权和基于依赖关系的优先级。
1.2.2、其他HTTP服务器功能
基于名称的和基于ip的虚拟服务器;
维生和管线式连接支持;
灵活的配置;
重新配置和一个可执行的升级没有客户服务的中断;
访问日志格式,缓冲写日志,快日志轮转,syslog日志;
1.3、nginx架构

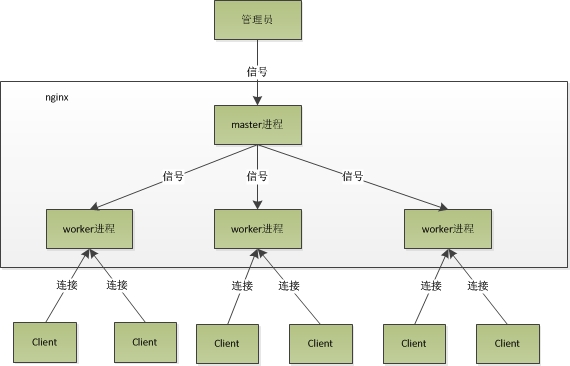
1.3.1、进程的分类
1)一个master进程
2)多个worker进程
1.3.2、进程的功能
master进程用来管理worker进程
1)master进程接收来自外界的信号,向worker进程发送信号。
2)master监控worker进程的运行状态,当worker进程异常退出,会自动重启worker进程
worker进程
1)处理基本的网络事件
2)进程间对等并相互独立,同等竞争来自客户端的请求
3)同一请求只能由一个worker进程处理,其他进程不作处理。
4)worker进程数是可以设置的(一般与机器cpu核心数一致)
1.3.3、master进程的管理
方法一:
kill -HUP pid #重启master进程
方法二:
./nginx -s reload     #重启master进程
./nginx -s stop    #停止master进程
1.3.4、进程重启过程
1)master重新加载配置文件
2)启动新的worker进程并接受新的请求
3)通知老的worker进程关闭
4)老的worker进程接收到信号后,不再接受新的处理请求并处理完成已接受请求后关闭
1.3.5、worker进程的请求处理过程
1)master进程建立listen的socket(listenfd)
2)客户端访问服务器的80端口触发请求
3)master进程fork出多个worker进程
4)worker进程抢accept_mutex,抢到互斥锁的进程注册listenfd读事件并调用accept接受该链接
5)当worker进程accept这个连接后开始读取请求,解析请求,处理请求并产生数据返回客户端
1.3.6、worker进程的优点
1)worker进程保持独立性,不需要加锁,保持锁带来的系统资源开销
2)行的进程独立不相互影响,一个进程退出,其他进程仍然继续工作,保持服务的稳定性
1.4、nginx的事件处理
nginx处理请求的方式:
异步非阻塞
apache常用工作方式:
1)异步非阻塞(与自带某些模块有冲突)
2)独占工作线程(几千并发时,同时开启几千线程,线程占用大量内存,其上下文切换带来大量cpu开销)
请求的过程,接受请求->建立连接->接收数据后发送数据的本质是读写事件,非阻塞事件处理是每个环节无需等待,防止因为等待下一个环节的事件而耗费系统资源。
非阻塞:
事件没有准备好,马上返回EAGAIN,告诉你,事件还没有准备好,等待一段时间再次检查事件,直到事件准备好再执行,没有准备好期间可以进行其他事件处理(反复检查也带来系统开销)
异步非阻塞:
同时监听多个事件,调用事件是阻塞的,但可以设置超时时间。在超时时间内,如果有事件准备好就返回
例子:事件准备好了,我们就去读写,当读写返回eagain时,我们再次将他加入epoll里面等着。(事件准备好就处理,没有准备好就加入到epoll里面)
2、实验部分
2.1、LNMP的实现
2.1.1、主机信息
wwwSer:
ipaddress=10.168.0.180
hostname=lnmp
client:
ipaddress=10.168.0.181
hostname=client
2.1.2、RPM包的安装
In wwwSer:
安装基础nginx相关包:
yum -y install http://nginx.org/packages/centos/6/noarch/RPMS/nginx-release-centos-6-0.el6.ngx.noarch.rpm
yum -y install nginx
安装MySQL相关包
yum -y install mysql-server mysql mysql-devel
安装PHP相关包
yum -y install php-fpm php-cli php-mysql php-gd php-imap php-ldap php-odbc php-pear php-xml php-xmlrpc php-mbstring php-mcrypt php-mssql php-snmp php-soap php-tidy
2.1.3、PHP部分配置
In wwwSer:
vim编辑/etc/php.ini并将以下行的注解去掉(启用)
cgi.fix_pathinfo=1
2.1.4、Nginx部分配置
In wwwSer:
1)增加Nginx默认目录的fastcgi解析(可选)
vim编辑/etc/nginx/nginx.conf
在“include /etc/nginx/conf.d/*.conf;”语句前加入如下代码:
   server {
        listen       80;
        server_name  _;
        #charset koi8-r;
        #access_log  logs/host.access.log  main;
        location / {
            root   /usr/share/nginx/html;
            index  index.php index.html index.htm;
        }
        error_page  404              /404.html;
        location = /404.html {
            root   /usr/share/nginx/html;
        }
        # redirect server error pages to the static page /50x.html
        #
        error_page   500 502 503 504  /50x.html;
        location = /50x.html {
            root   /usr/share/nginx/html;
        }
        # proxy the PHP scripts to Apache listening on 127.0.0.1:80
        #
        #location ~ \.php$ {
        #    proxy_pass   http://127.0.0.1;
        #}

        # pass the PHP scripts to FastCGI server listening on 127.0.0.1:9000
        #
        location ~ \.php$ {
            root           /usr/share/nginx/html;
            fastcgi_pass   127.0.0.1:9000;
            fastcgi_index  index.php;
            fastcgi_param  SCRIPT_FILENAME  /usr/share/nginx/html$fastcgi_script_name;
            include        fastcgi_params;
        }
        # deny access to .htaccess files, if Apache's document root
        # concurs with nginx's one
        #
        location ~ /\.ht {
            deny  all;
        }
    }
2)增加虚拟机(必须)
创建虚拟机跟目录:
mkdir /home/cmdschool
chown -R apache:apache /home/cmdschool
vim编辑/etc/nginx/conf.d/www.cmdschool.org.conf
server {
    listen       80;
    server_name  www.cmdschool.org;
    location / {
        root   /home/cmdschool/;
        index  index.php index.html index.htm;
    }
    access_log   /var/log/www.cmdschool.org.access.log  main;
    location ~ [^/]\.php(/|$) {
        fastcgi_split_path_info ^(.+?\.php)(/.*)$;
        if (!-f $document_root$fastcgi_script_name) {
            return 404;
        }
        root /home/cmdschool/;
        fastcgi_pass 127.0.0.1:9000;
        fastcgi_index index.php;
        fastcgi_param  SCRIPT_FILENAME  /usr/share/nginx/html$fastcgi_script_name;
        include fastcgi_params;
    }
}
2.2.5、启动服务
In wwwSer:
启动php服务并设置开机自启动
/etc/init.d/php-fpm start
chkconfig php-fpm on
启动nginx服务并设置开机自启动
/etc/init.d/nginx start
chkconfig nginx on
启动mysql服务并设置自动启动
/etc/init.d/mysqld start
chkconfig mysqld on
注:关于mysql的安全选项,请运行以下脚本设置,这里不详述
mysql_secure_installation
2.2.6、防火墙设置
In wwwSer:
vim编辑/etc/sysconfig/iptables
-A INPUT -m state --state NEW -m tcp -p tcp --dport 80 -j ACCEPT
重启iptables
/etc/init.d/iptables restart
2.2.7、测试
In wwwSer:
1)服务php解析测试:
vim编辑/usr/share/nginx/html/index.php
加入如下内容:
<?php
phpinfo();
?>
In client:
curl http://10.168.0.180
2)虚拟服务器测试:
In wwwSer:
vim编辑/home/cmdschool/index.php
加入如下内容:
<?php
phpinfo();
?>
In client:
vim编辑/etc/hosts
加入如下内容(DNS解析):
10.168.0.180 www.cmdschool.org
测试:
curl http://www.cmdschool.org
----------------------------------------------------------
理论部分参阅资料:
1)官方:
http://www.nginx.org
2)Tengine:
http://tengine.taobao.org
实验部分参阅资料:
1)Nginx官方下载路径:
http://nginx.org/en/download.html
2)LNMP环境
http://www.360doc.com/content/12/0116/14/4330887_179711310.shtml
3)mod_fastcgi和mod_fcgid的区别
http://www.361way.com/aboutcgi/627.html