cacti安装文档
环境:centos 5.4 cacti服务器地址:192.168.1.1
1.通过yum源自动安装rrdtool(绘图用)
# vi /etc/yum.repos.d/dag.repo
[dag]
name=Dag RPM Repository for Red Hat Enterprise Linux
baseurl=http://apt.sw.be/redhat/el$releasever/en/$basearch/dag
gpgcheck=1
gpgkey=http://dag.wieers.com/rpm/packages/RPM-GPG-KEY.dag.txt
enabled=1
然后
yum 安装:
#yum install rrdtool
2 .
安装lamp环境(参考我写的lamp安装)
需要注意点:
a. 编译
php 需要加参数--enable-sockets 否则 访问cacti会提示:Error
The following PHP extensions are missing:
* sockets
Please install those PHP extensions and retry
b.lamp需要增加
gd支持
3
安装 snmp
#yum install net-snmp-devel net-snmp-utils net-snmp
修改
snmp配置文件,为了安全将管理串设置为testsnmp
a. 将
com2sec notConfigUser 127.0.0.1 public 更改为
com2sec notConfigUser 127.0.0.1
testsnmp
将
access notConfigGroup "" any noauth exact systemview none none 修改为:access notConfigGroup "" any noauth exact all none none
将以下行的
#号删除
view all
included .1 80
b 重新启动
snmp 并设置开机服务启动
service snmpd restart
chkconfig --levels 35 snmpd on
4
安装cacti
mkdir –p /usr/local/httpd/htdocs/cacti
tar –zxvf cacti-0.8.7g.tar.gz
cd cacti-0.8.7g
mv * /usr/local/httpd/htdocs/cacti
chmod +w /usr/local/httpd/htdocs/cacti
5
启动apache
/usr/local/httpd/bin/apachectl start
6
使用mysql root登陆mysql 创建cacti的数据库
Create database cacti;
Use cacti
Source /usr/local/httpd/htdocs/cacti/cacti.sql
7 为了提高安全性,
cacti读取数据库不应用root 创建cacit对应的用户
grant all privileges on cacti.* to cactitest@"%" identified by "cactitest";
Flush privileges;
8
修改cacti配置文件/usr/local/httpd/htdocs/cacti/include/config.php 如下
$database_type = "mysql";
$database_default = "cacti";
$database_hostname = "localhost";
$database_username = "cactitest";
$database_password = "cactitest";
$database_port = "3306";
9
通过浏览器访问http://192.168.1.1/cacti
选择
new install
Cacti会自动选择所需要的软件路径,找不到则手工指定
PHP Binary Path 选择
/usr/local/php/bin/php
10 cacti
默认管理员密码都为admin
11
使用如下命令生成初始图像文件
/usr/local/php/bin/php /usr/local/httpd/htdocs/cacti/poller.php >/dev/null 2>&1
12
使用crontab –e增加自动执行内容
*/5 * * * * /usr/local/php/bin/php /usr/local/httpd/htdocs/cacti/poller.php > /dev/null 2>&1
13
登陆系统查看 ,点击 graphs。系统默认五分钟采集一次数据 ,过会将看到图
14
考虑到5分钟采集一次数据时间间隔太大,于是请按下面的方法改成1分钟每次
a. 将
crontab从5分钟一次更改为1分钟一次
b. console—settings—poller Poller Interval和
Cron Interval修改为每分钟—save
c.Data Sources 的
step(采样时间)修改为60,heartbeat(超时)修改为120,也可以简单用SQL命令修改下
use cacti
UPDATE data_template_data SET rrd_step=60 WHERE rrd_step=300;
UPDATE data_template_rrd SET rrd_heartbeat=120 WHERE rrd_heartbeat=600;
UPDATE poller_item SET rrd_step = 60 WHERE rrd_step = 300;
d. 修改
RRAs,将显示时间修改为1分钟,画图时间还是保留5分钟
将
RRAS的年月日的steps缩小五倍,Rows增加五倍,也可以用SQL语句
mysql> DELETE FROM rra;
mysql> insert into rra values(1,"c21df5178e5c955013591239eb0afd46","Daily (1 Minute Average)",0.5,1,8000,86400);
insert into rra values(2,"0d9c0af8b8acdc7807943937b3208e29","Weekly (30 Minute Average)
",0.5,30,1600,604800);
insert into rra values(3,"6fc2d038fb42950138b0ce3e9874cc60","Monthly (2 Hour Average)",0.5,120,1600,2678400);
insert into rra values(4,"e36f3adb9f152adfa5dc50fd2b23337e","Yearly (1 Day Average)",0.5,1440,1600,33053184);
e、就是放弃原来以每
5分钟取得的数据,把rra目录下的文件都删除了
rm –rf /usr/local/httpd/htdocs/cacti/rra/*
下面我们配置一个本机监测对象,监测网卡流量
1 选择
console—device 然后单击 add
2 进入监测点添加页面后,输入描述
(Description),监测主机的ip地址(Hostname) 这里填写127.0.0.1,选择Host Templete 为 ucd/net, SNMP Host Snmp Options 选择Version 2 SNMP Community 填写 testsnmp,其余默认。然后单击 create 然后再弹出的界面选择保存如果出现snmp信息表示配置成功
3 单击右上角的
Create Graphs for this Host 在网卡右边的方框内打对勾 然后点击 create
4 想要在
graph里看到图形界面,点击Graph Trees 点 Default Tree 点击 Add
Parent Item 选择
root ,Tree Item Type 选择 Host,Host 选择对应的主机,Graph Grouping Style 选择Graph Template 然后点 Create 然后点 save
过几分钟左右将在
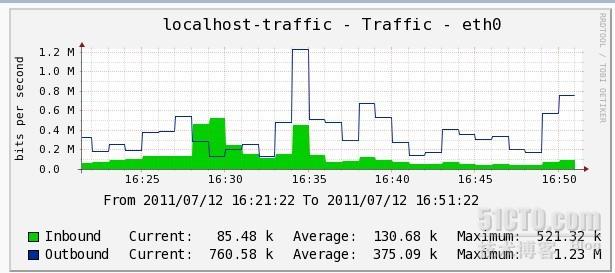
graphs中将看到网卡流量图
