邮件服务系列之 postfix+sasl+dovecot+虚拟域+虚拟用户+webmail+webman综合演练
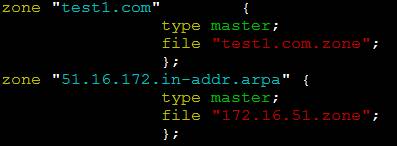
   directory       "/var/named";


   dump-file       "/var/named/data/cache_dump.db";


   statistics-file "/var/named/data/named_stats.txt";


   memstatistics-file "/var/named/data/named_mem_stats.txt";


   recursion yes;


   /* Path to ISC DLV key */


   bindkeys-file
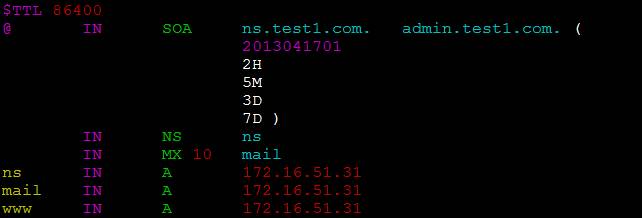


nameserver 172.16.51.31 -----指定DNS服务器


   install_root: [/]                                 ------postfix安装路径


   tempdir: [/root/postfix-2.9.1] /tmp/postfix       ------临时文件的生成目录


   config_directory: [/etc/postfix] /etc/postfix    -------配置文件目录


   daemon_directory: [/usr/libexec/postfix]         -------服务进程目录


   command_directory: [/usr/sbin]                    ------bash命令目录


   queue_directory: [/var/spool/postfix]              ---邮件队列


   sendmail_path: [/usr/sbin/sendmail]                ---smtp的客户端,用于实现与sendmail客户端


   兼容的


   newaliases_path: [/usr/bin/newaliases]             ---生成新别名


   mailq_path: [/usr/bin/mailq]                       ---邮件队列程序


   mail_owner: [postfix]                              ---邮件服务器的运行者


   setgid_group: [postdrop]                           ---用于实现将用户的邮件投递到它的邮箱中去的


   html_directory: [no]/var/www/html/postfix          ---当web服务器没有配置好就使用no选项


   manpages: [/usr/local/man]                         ---man文档的安装路径


   readme_directory: [no]                             ---帮助文档


   data_directory:[/var/lib/postfix]                 ---可读写文件的存放路径


   #vim /etc/postfix/main.cf


   myhostname = mail.test1.com                 ------指定自己的邮件服务器


   mydomain = test1.com                        ------自己创建的域名


   myorign = $mydomain                         -----定义出站邮件使用的域名


   mydestination = $myhostname, localhost.$mydomain, localhost, $mydomain, ns.$mydomain


   定义哪些域接收邮件


   mynetworks = 172.16.0.0/16  127.0.0.0/8       --------定义允许中继的网络


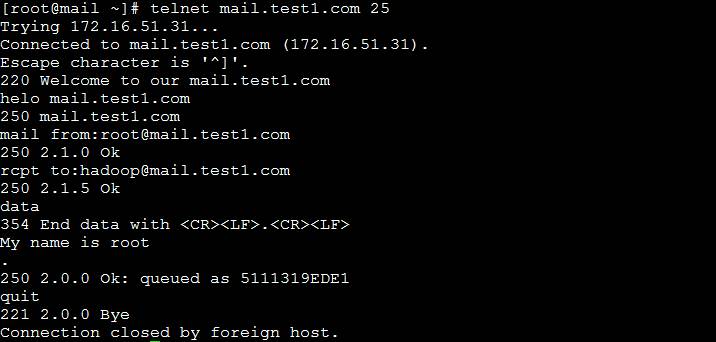

protocols = pop3

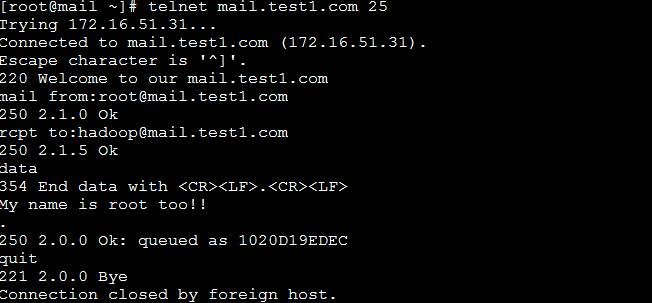

MECH=shadow


mynetworks = 127.0.0.0/8
   ############################ CYRUS-SASL ############################


   broken_sasl_auth_clients = yes


   smtpd_recipient_restrictions=permit_mynetworks,permit_sasl_authenticated,reject_unauth_destination


   smtpd_sasl_auth_enable = yes


   smtpd_sasl_local_domain = $myhostname


   smtpd_sasl_security_options = noanonymous


   smtpd_sasl_path = smtpd


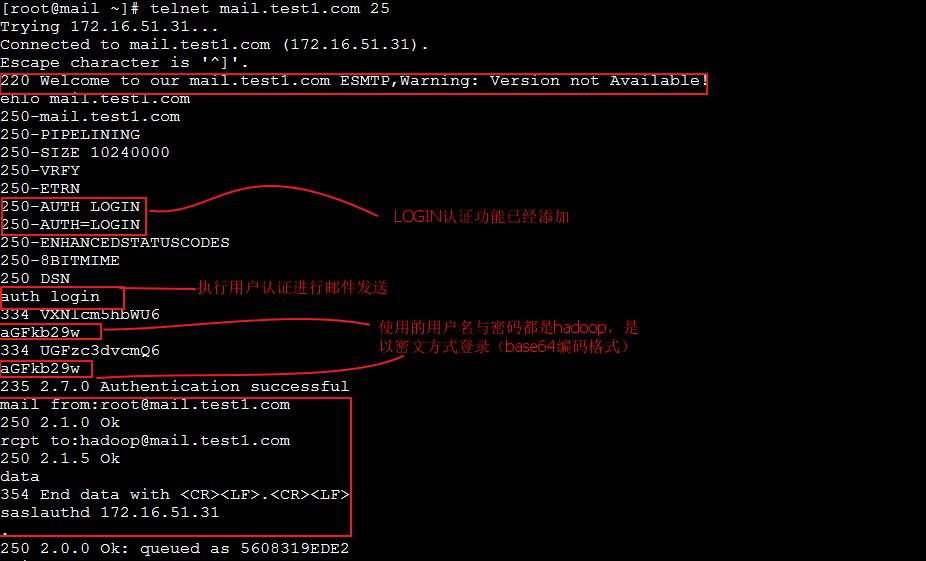
   smtpd_banner = Welcome to our $myhostname ESMTP,Warning: Version not Available!

--prefix=/usr/local/courier-authlib \
--sysconfdir=/etc \
--without-authshadow \
--without-authvchkpw \
--without-authpgsql \
--with-authmysql \
--with-mysql-libs=/usr/lib/mysql \
--with-mysql-includes=/usr/include/mysql \
--with-redhat \
--with-authmysqlrc=/etc/authmysqlrc \
--with-authdaemonrc=/etc/authdaemonrc \
--with-mailuser=postfix \
--with-mailgroup=postfix \
--with-ltdl-lib=/usr/lib \
--with-ltdl-include=/usr/include
   反斜线的意思是续行符


   --prefix=/usr/local/courier-authlib \            -----文件的安装路径


   --sysconfdir=/etc \                              -----配置文件的安装位置


   --without-authpam  --without-authshadow  --without-authvchkpw  --without-authpgsql


   -----不支持pam/shadow/vchkpw/pgsql认证,这些选项不添加也可以


   -with-authmysql                                 ----支持mysql认证(重要就是支持者一项)


   --with-mysql-libs=/usr/lib/mysql                ------指明mysql的库文件路径的安装位置


   --with-mysql-includes=/usr/include/mysql        -------指明mysql的头文件的安装路径


   --with-redhat                                   ------说明系统类型,表示根据redhat系统实现一些系统优化


   --with-authmysqlrc=/etc/authmysqlrc             -----指定courier-authlib服务进程配置文件路径


   --with-authdaemonrc=/etc/authdaemonrc            -----守护进程,courier-authlib服务进程的配置文件


   --with-mailuser=postfix                          ----邮件收发管理的用户


   --with-mailgroup=postfix                         -----邮件收发管理的组


   --with-ltdl-lib=/usr/lib                         -----ltdl动态模块加载器,提供一个运行环境


   --with-ltdl-include=/usr/include                 ----ltdl文件的头文件路径
   authmodulelist="authmysql"-----指明认证的模块


   authmodulelistorig="authmysql"------保留的原始模块


   daemons=10                              ------默认启动启动的进程个数(根据需要修改)


   DEBUG_LOGIN=2                           ----打开调试调试功能(三个取值“0”是关闭,“1”是打开调试;“2”是打开调试并且把登陆时的密码记录下来;当第一次使用虚拟用户登陆,但是登陆不上时这个就需要打开)


   编辑/etc/authmysqlrc配置文件


   MYSQL_SERVER localhost                  -----指定服务器所在位置


   MYSQL_USERNAME  extmail                 -----连接mysql使用的文档


   MYSQL_SOCKET   /var/lib/mysql/mysql.sock  ----指定mysql套接字文件所在位置


   MYSQL_PORT      3306                     -----mysql端口号


   MYSQL_DATABASE  extmail                  -----在mysql的哪个库中为postfix提供虚拟用户(这里这样的设定是与下文extmail的配置保持一致,自己定义也行)


   MYSQL_USER_TABLE  mailbox                 -----mysql的用户账号存放的表的位置


   MYSQL_CRYPT_PWFIELD  password-----mysql中哪个字段是用户密码


   MYSQL_UID_FIELD  2525                     -----mysql用户账户的UID就是postfix用户的UID


   MYSQL_GID_FIELD  2525                     -----mysql用户账号的GID就是postfix组的ID号


   MYSQL_LOGIN_FIELD  username                ------哪个字段是用户的账号


   MYSQL_HOME_FIELD  concat('/var/mailbox/',homedir)        -----用户账号的家目录所在位置,虚拟用户没有家目录,homedir是变量,等同于用户名称;concat是mysql内置的函数用于将两个字符串连接起来


   MYSQL_NAME_FIELD  name-----用户名称在哪个字段上


   MYSQL_MAILDIR_FIELD  concat('/var/mailbox/',maildir)   -----用户邮箱目录


   ######################## Virtual Mailbox Settings  ########################


   virtual_mailbox_base = /var/mailbox                 ----用户邮箱默认目录


   virtual_mailbox_maps = mysql:/etc/postfix/mysql_virtual_mailbox_maps.cf


   -----邮箱映射表在mysql_virtual_mailbox_maps.cf配置文件中定义的就是就是如何查询这些用户相关信息


   也就是一些查找语句


   virtual_mailbox_domains = mysql:/etc/postfix/mysql_virtual_domains_maps.cf


   -----虚拟域,在mysql_virtual_domains_maps.cf定义的是如何在mysql表中查找域


   virtual_alias_domains =                              -----定义别名域


   virtual_alias_maps = mysql:/etc/postfix/mysql_virtual_alias_maps.cf


   ----用户账号别名,在mysql_virtual_alias_maps.cf配置文件中定义如何查询


   (上述这三个配置文件会在下文配置extman的时候提供)


   virtual_uid_maps = static:2525                       ----定义邮箱的所有者


   virtual_gid_maps = static:2525                       ----定义邮箱的组


   (static意思是静态地图类型使用自己已经创建的特定的用户与组)


   virtual_transport = virtual                          ----用户投递代理


   ########################## QUOTA Settings ########################


   message_size_limit = 14336000                        ----邮件大小最大值限定


   virtual_mailbox_limit = 20971520                     ----用户邮箱最大值限定

   mysql> GRANTALL LPRIVILEGES ON extmail.* TO extmail@localhost IDENTIFIED BY'extmail';


   -----在数据库extmail上的所有表上创建extmail用户,密码也是extmail


   mysql> GRANTALL LPRIVILEGES ON extmail.* TO extmail@‘127.0.0.1’ IDENTIFIED BY'extmail';


   -----与上条命令意思一样,考虑到使用本机表示方式不同


   mysql> FLUSH PRIVILEGES;  ----更新mysql的系统权限相关表




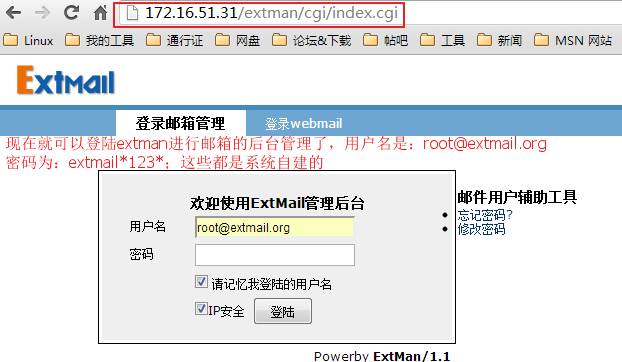

用户登陆后界面
