[Lab9]交换
[Lab9]交换
提纲
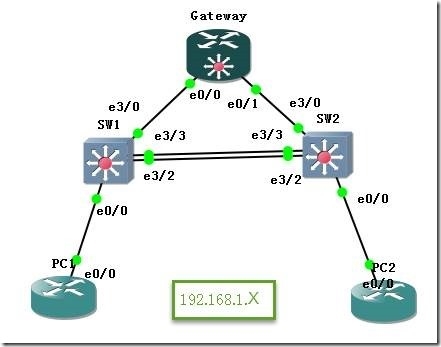
1 Trunk Port
SW2(config)#in e3/3 \\连接交换机的端口配置
SW2(config-if)#switchport trunk encapsulation dot1q
SW2(config-if)#switchport mode trunk
SW2(config-if)#switchport trunk native vlan 1 \\两端要一致
SW2#sh int trunk
Port Mode Encapsulation Status Native vlan
Et3/3 on 802.1q trunking 1
Port Vlans allowed on trunk
Et3/3 1-4094
Port Vlans allowed and active in management domain
Et3/3 1
Port Vlans in spanning tree forwarding state and not pruned
Et3/3 1
SW2#sh int e3/3 switchport \\看一个端口的二层属性
Name: Et3/3
Switchport: Enabled
Administrative Mode: trunk
Operational Mode: trunk
Administrative Trunking Encapsulation: dot1q
Operational Trunking Encapsulation: dot1q
Negotiation of Trunking: On
Access Mode VLAN: 1 (default)
Trunking Native Mode VLAN: 1 (default)
Administrative Native VLAN tagging: enabled
Voice VLAN: none
Administrative private-vlan host-association: none
Administrative private-vlan mapping: none
Administrative private-vlan trunk native VLAN: none
Administrative private-vlan trunk Native VLAN tagging: enabled
Administrative private-vlan trunk encapsulation: dot1q
Administrative private-vlan trunk normal VLANs: none
Administrative private-vlan trunk associations: none
Administrative private-vlan trunk mappings: none
Operational private-vlan: none
Trunking VLANs Enabled: ALL
Pruning VLANs Enabled: 2-1001
Capture Mode Disabled
Capture VLANs Allowed: ALL
配置DTP模式:
“switch mode { trunk | dynamic desirable | dynamic auto }”:
trunk:这个设置将端口置为永久trunk 模式,封装类型由“switchport trunk encapsulation”命令决定
dynamic desirable:端口主动变为trunk,如果另一端为negotiate、dynamic desirable 、dynamic auto 将成功协商
dynamic auto:被动协商,如果另一端为negotiate、dynamic desirable 将成功协商
如果想关闭DTP的话: switchport nonegotiate Trunk 链路上不发送协商包,默认是发送的
连接PC client端口配置如下:
SW1(config)#int e0/0
SW1(config-if)#switchport mode access
SW1(config-if)#switchport access vlan 1
2 EtherChannel
我们用SW1和SW2的E3/3 E3/2的端口来做这个二层捆绑实验
最好先把端口关闭掉
二层捆绑:
SW2(config)#int range e3/2 - 3
SW2(config-if-range)#shut
SW2(config-if-range)#switchport trunk encapsulation dot1q
SW2(config-if-range)#channel-group 1 mode ?
active Enable LACP unconditionally
auto Enable PAgP only if a PAgP device is detected
desirable Enable PAgP unconditionally
on Enable Etherchannel only
passive Enable LACP only if a LACP device is detected
\\自动协商port-channel
LACP: Active(主动)\Passive (被动)
PAGP: Desirable(主动)\Auto(被动)
SW2(config-if-range)#channel-group 1 mode on
SW2(config-if-range)#no shut
SW1(config)#int port-channel 1
SW1(config-if)#switchport mode trunk
SW2#sh etherchannel summary
Flags: D - down P - bundled in port-channel
I - stand-alone s - suspended
H - Hot-standby (LACP only)
R - Layer3 S - Layer2
U - in use f - failed to allocate aggregator
M - not in use, minimum links not met
u - unsuitable for bundling
w - waiting to be aggregated
d - default port
Number of channel-groups in use: 1
Number of aggregators: 1
Group Port-channel Protocol Ports
------+-------------+-----------+-----------------------------------------------
1 Po1(SU) - Et3/2(P) Et3/3(P)
同时PC1 PING PC2 可以通,说明 port-channel生效

如果要配置三层 port-channel 的话,需要提前敲一条命令 (以前命令前需要敲入这条命令)
S1(config)#interface port-channel 1
S1(config-if)#no switchport
SW1#sh etherchannel port-channel
Channel-group listing:
----------------------
Group: 1
----------
Port-channels in the group:
---------------------------
Port-channel: Po1
------------
Age of the Port-channel = 0d:00h:20m:45s
Logical slot/port = 16/0 Number of ports = 2
GC = 0x00000000 HotStandBy port = null
Port state = Port-channel Ag-Inuse
Protocol = -
Port security = Disabled
Ports in the Port-channel:
Index Load Port EC state No of bits
------+------+------+------------------+-----------
0 00 Et3/2 On 0
0 00 Et3/3 On 0
Time since last port bundled: 0d:00h:20m:06s Et3/3
Time since last port Un-bundled: 0d:00h:20m:09s Et3/3
[可选] port-channel负载均衡模式:
S1(config)# port-channel load-balance dst-mac
3 SPAN
3-1 Local SPAN
监控设备和流量源在同一个设备上
Monitor Session 1 source vlan100 both
Monitor session 1 destination interface f0/1
3-2 Remote SPAN
监控设备和流量没在同一个设备上
Vlan 999 \\所有交换机都要配置
Remote-span
被采集的交换机:Monitor session 2 source Vlan 100 both
Monitor session 2 destination remote vlan 999 \\被采集设备要划入VLAN 100
采集流量设备:
Monitor session 3 source remote vlan 999
Monitor session 3 destination inter f0/8 \\采集设备要划入valn 999
4-PVLAN
PVLAN:私有VLAN , 是一个两层VLAN隔离技术
PVALN其实是一组VLAN的集合。对外可见的VLAN叫主VLAN(并且只有一个),内部可见的VLAN叫辅助VLAN。
辅助VLAN可以分成2种:
团体VLAN:属于相同团体VLAN的成员互相可以访问,不同团体vlan的用户之间不能互相问。
孤立VLAN:孤立VLAN中的任何成员都不能与其他辅助VLAN中的成员通信,并且相同孤立VLAN内的成员也不能互相通信。
团体VLAN和孤立VLAN中的成员需要访问外部网络时,需用通过混杂端口进行流量转发。
PVLAN中可以分为三种端口:
团体属性端口:划分到团体VLAN的端口
孤立端口:划分到孤立VLAN的端口
混杂端口:连接网关设备的端口,可以帮助PVLAN内部成员访问外部网络。
PVLAN实验
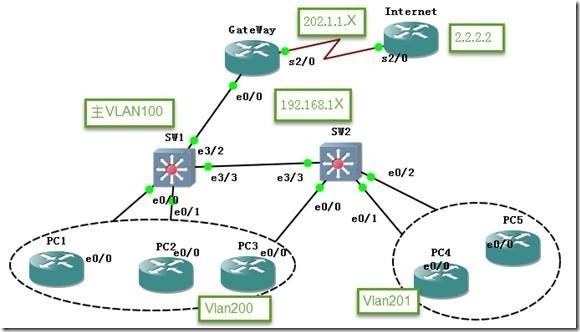
Step1 :配置PVLAN的前提:vtp模式为透明模式
SW1(config)#vtp mode transparent
Step2 :创建 团体/辅助VLAN
SW1(config)#vlan 201
SW1(config-vlan)#private-vlan isolated
SW1(config)#vlan 200
SW1(config-vlan)#private-vlan community
Step3:创建主VLAN
SW1(config)#vlan 100
SW1(config-vlan)#private-vlan primary
SW1(config-vlan)#private-vlan association 200-201
注意:一个PVLAN内只能有一个孤立VLAN
Step4:配置端口
SW1(config)#int e0/0
SW1(config-if)#switchport mode access
SW1(config-if)#switchport access vlan 200
SW1(config-if)#int e0/1
SW1(config-if)#switchport mode access
SW1(config-if)#switchport access vlan 201
SW1(config-if)#int e0/0
SW1(config-if)#switchport mode private-vlan host
SW1(config-if)#switchport private-vlan host-association 100 200
SW1(config)#int e0/1
SW1(config-if)#switchport mode private-vlan host
SW1(config-if)#switchport private-vlan host-association 100 200
Step5:配置混杂端口
SW1(config)#int e3/2
SW1(config-if)#switchport mode access
SW1(config-if)#switchport access vlan 100
SW1(config-if)#switchport mode private-vlan promiscuous
SW1(config-if)#switchport private-vlan mapping 100 add 200
SW1(config-if)#switchport private-vlan mapping 100 add 201
SW1# sh vlan private-vlan [type]
Primary Secondary Type Ports
------- --------- ----------------- ------------------------------------------
100 200 non-operational Et0/0, Et0/1, Et3/2
100 201 non-operational Et3/2
\\混杂端口 Et3/2即和团体vlan和隔离vlan同时关联
Show interface e3/2 switch port \\这个命令也可以显示该接口的二层详细信息.
由于IOU不支持该功能,所以做出的效果么办法测试
5-STP
Cisco默认的生成树模式是PVST+
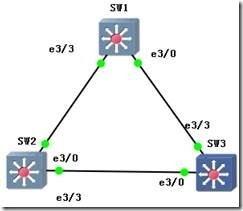
在IOU拖动三个交换机
<每个交换机的预先配>
int range e0/0 - 3
shutdown
int range e1/0 - 3
shutdown
int range e2/0 - 3
shutdown
int e3/1
shutdown
int e3/2
shutdown
int e3/3
switchport trunk encapsulation dot1q
switchport mode trunk
int e3/0
switchport trunk encapsulation dot1q
switchport mode trunk
SW1# show spanning-tree summary \\这条命令可以看到生成树开启的模式及一些feature
Switch is in pvst mode
Root bridge for: VLAN0001
Extended system ID is enabled
Portfast Default is disabled
PortFast BPDU Guard Default is disabled
Portfast BPDU Filter Default is disabled
Loopguard Default is disabled
EtherChannel misconfig guard is enabled
Configured Pathcost method used is short
UplinkFast is disabled
BackboneFast is disabled
Name Blocking Listening Learning Forwarding STP Active
---------------------- -------- --------- -------- ---------- ----------
VLAN0001 0 0 0 16 16
---------------------- -------- --------- -------- ---------- ----------
1 vlan 0 0 0 16 16
SW1#show spanning-tree
VLAN0001
Spanning tree enabled protocol ieee
Root ID Priority 32769
Address aabb.cc00.0100
This bridge is the root \\说明SW1 就是根桥
Hello Time 2 sec Max Age 20 sec Forward Delay 15 sec
Bridge ID Priority 32769 (priority 32768 sys-id-ext 1)
Address aabb.cc00.0100
Hello Time 2 sec Max Age 20 sec Forward Delay 15 sec
Aging Time 15 sec
SW3#show spanning-tree
VLAN0001
Spanning tree enabled protocol ieee
Root ID Priority 32769 \\这里显示的是SW1的信息
Address aabb.cc00.0100
Cost 100
Port 16 (Ethernet3/3) 通过E3/3连接到SW1
Hello Time 2 sec Max Age 20 sec Forward Delay 15 sec
Bridge ID Priority 32769 (priority 32768 sys-id-ext 1)
Address aabb.cc00.0300
Hello Time 2 sec Max Age 20 sec Forward Delay 15 sec
Aging Time 300 sec
Interface Role Sts Cost Prio.Nbr Type
------------------- ---- --- --------- -------- --------------------------------
Et3/0 Altn BLK 100 128.13 Shr
Et3/3 Root FWD 100 128.16 Shr
STP 端口状态 |
|||
收/发BPDU |
是否转发数据包 |
学习MAC地址 |
|
阻塞 |
只收BPDU |
不转发 |
不学习 |
监听 |
只收BPDU |
不转发 |
不学习 |
学习 |
只收BPDU |
不转发 |
学习 |
转发 |
收发BPDU |
转发 |
学习 |
STP端口选举原理如下:
step1: BPDU = priority (default 32768) + mac address , 2s 发一次,通过中继链路,用于选RB
step2: 非根桥上选RP(根端口),自己的接口跟自己的接口选RP (接受BPDU)
2.1 比较 cop cost of path, (可以理解为按接口出方向开销累加)
2.2 比较Sender BID,转发者更改BID
2.3 比较发送BPDU者的port id(越小越好),转发者更改port id
step3: 选DP: RP 对端端口一定是DP, DP的选举时在中继链路两端的端口选举的
3.1 发送者cop (可以理解为进/出方向选最优的)
3.2 发送者BID
3.3 比较 PID
Step 4: 剩下的口就是Block状态
现在SW1是root bridge ,SW2是次优的.如果想把SW3改为次优的Bridge
SW1(config)#spanning-tree vlan 1 priority 4096
SW3(config)#spanning-tree vlan 1 priority 8192
(优先级默认值为: 32768)
或者修改接口的cost值
Spanning-tree vlan 1 cost ?
SW3#sh spanning-tree
*Jul 26 22:12:17.001: %SYS-5-CONFIG_I: Configured from console by console
SW3#sh spanning-tree
VLAN0001
Spanning tree enabled protocol ieee 《PVST》
Root ID Priority 4097
Address aabb.cc00.0100
Cost 100
Port 16 (Ethernet3/3)
Hello Time 2 sec Max Age 20 sec Forward Delay 15 sec
Bridge ID Priority 8193 (priority 8192 sys-id-ext 1)
Address aabb.cc00.0300
Hello Time 2 sec Max Age 20 sec Forward Delay 15 sec
Aging Time 300 sec
Interface Role Sts Cost Prio.Nbr Type
------------------- ---- --- --------- -------- --------------------------------
Et3/0 Desg FWD 100 128.13 Shr
Et3/3 Root FWD 100 128.16 Shr
5-1 PVST+之优化PortFast
修改下拓扑图
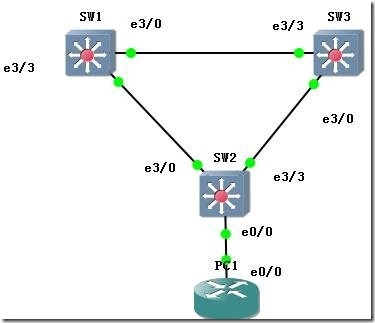
我们在SW2上: SW2#debug spanning-tree events
E0/0 关闭再开启下
SW2(config)#
*Jul 26 22:25:45.890: setting bridge id (which=3) prio 32769 prio cfg 32768 sysid 1 (on) id 8001.aabb.cc00.0200
*Jul 26 22:25:45.891: set portid: VLAN0001 Et0/0: new port id 8001
*Jul 26 22:25:45.891: STP: VLAN0001 Et0/0 -> listening
*Jul 26 22:25:45.891: set portid: VLAN0001 Et3/0: new port id 800D
*Jul 26 22:25:45.891: STP: VLAN0001 Et3/0 -> listening
*Jul 26 22:25:45.891: set portid: VLAN0001 Et3/3: new port id 8010
*Jul 26 22:25:45.891: STP: VLAN0001 Et3/3 -> listening
SW2(config)#
*Jul 26 22:25:47.874: STP: VLAN0001 heard root 8193-aabb.cc00.0300 on Et3/3
*Jul 26 22:25:47.874: supersedes 32769-aabb.cc00.0200
*Jul 26 22:25:47.874: STP: VLAN0001 new root is 8193, aabb.cc00.0300 on port Et3/3, cost 100
*Jul 26 22:25:47.879: STP: VLAN0001 heard root 4097-aabb.cc00.0100 on Et3/0
*Jul 26 22:25:47.879: supersedes 8193-aabb.cc00.0300
*Jul 26 22:25:47.879: STP: VLAN0001 new root is 4097, aabb.cc00.0100 on port Et3/0, cost 100
*Jul 26 22:25:48.878: STP: VLAN0001 Et3/3 -> blocking
SW2(config)#
*Jul 26 22:26:00.896: STP: VLAN0001 Et0/0 -> learning
*Jul 26 22:26:00.896: STP: VLAN0001 Et3/0 -> learning
SW2(config)#
*Jul 26 22:26:15.904: STP[1]: Generating TC trap for port Ethernet0/0
*Jul 26 22:26:15.904: STP: VLAN0001 sent Topology Change Notice on Et3/0
*Jul 26 22:26:15.904: STP: VLAN0001 Et0/0 -> forwarding
*Jul 26 22:26:15.904: STP[1]: Generating TC trap for port Ethernet3/0
*Jul 26 22:26:15.904: STP: VLAN0001 Et3/0 -> forwarding
可以看出E0/0从启动到forwarding需要30s时间 (这个时间是不能接受的)
SW2(config-if)#spanning-tree portfast \\这个feature能缩短30s

5-2 PVST+之优化UplinkFast
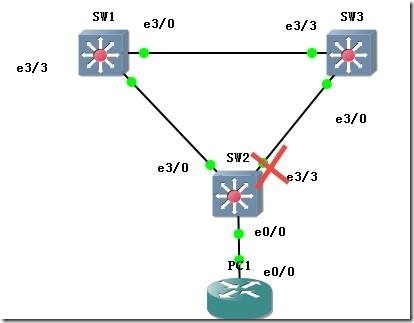
现在我们可以知道E3/3是block状态,现在我们把E3/0 shutdown
SW2(config)#int e3/0
SW2(config-if)#shut
SW2(config-if)#
*Jul 26 22:59:14.429: STP: VLAN0001 new root port Et3/3, cost 200
*Jul 26 22:59:14.429: STP: VLAN0001 Et3/3 -> listening
*Jul 26 22:59:14.429: STP[1]: Generating TC trap for port Ethernet3/0
SW2(config-if)#
*Jul 26 22:59:16.432: %LINK-5-CHANGED: Interface Ethernet3/0, changed state to administratively down
SW2(config-if)#
*Jul 26 22:59:16.432: STP: VLAN0001 sent Topology Change Notice on Et3/3
*Jul 26 22:59:17.440: %LINEPROTO-5-UPDOWN: Line protocol on Interface Ethernet3/0, changed state to down
SW2(config-if)#
*Jul 26 22:59:29.435: STP: VLAN0001 Et3/3 -> learning
SW2(config-if)#
*Jul 26 22:59:44.435: STP[1]: Generating TC trap for port Ethernet3/3
*Jul 26 22:59:44.435: STP: VLAN0001 sent Topology Change Notice on Et3/3
*Jul 26 22:59:44.436: STP: VLAN0001 Et3/3 -> forwarding
可以看出来E3/3 变为forwarding需要等待30S(这个时间我们无法接受)
SW2(config)#spanning-tree uplinkfast \\只需要在接入层交换机上敲这个命令就可以了
SW2(config-if)#int e3/0
SW2(config-if)#shut
*Jul 26 23:06:05.429: STP: VLAN0001 new root port Et3/3, cost 3200
*Jul 26 23:06:05.429: %SPANTREE_FAST-7-PORT_FWD_UPLINK: VLAN0001 Ethernet3/3 moved to Forwarding (UplinkFast) \\e3/3立即变为转发状态,缩短了30s
这个优化策略是基于数据层面(mac表),即为下层的主机发送组播针,缩短每个交换机的MAC老化时间至15s.
5-3 PVST+之优化 BackBone Fast
这个优化功能需要在所有交换机上敲 <全局>spanning-tree backbonefast
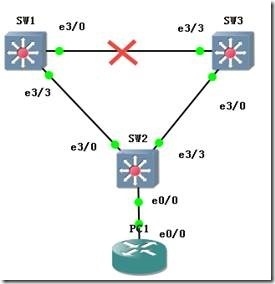
当SW1与SW3之间的链路down掉了,SW3就认为自己是root bridge 会发送BPDU给SW2 (E3/0置为DP) ,由于E3/3处于block状态,需要等待20s (bpdu max age time)才可以发送BPDU给SW3说SW1还是存在的,导致SW2/SW3需要进行DP的选举(一条链路只有一个DP),这个过程需要30s
所以等待完全收敛的时间需要50s
Block端口:不接受/发送报文,接受但不发送BPDU,不进行MAC地址学习
如果在所有交换机开启了BackboneFast ,则缩短了等待的那20S
6-RSTP
RSTP有两个新参数:
1 边缘端口 edge port = port fast
2 链路类型只有在edge和P2P端口上才能快速进入转发状态
P2P:端口全双工
shared: 端口半双工
SW3(config-if)#int e3/0
SW3(config-if)#spanning-tree link-type point-to-point \\更改连路类型
新端口角色:
替代端口:如果根端口故障,则替代端口成为根端口 功能相当于PVST里的UPLINK FAST
备份端口: 在共享网络中(HUB),备份端口可以立马成为指定端口成为备份作用
RSTP保留了cisco的BACKbone Fast,原理相同
RSTP的BPDU:
一个端口在3个2S内没有收到BPDU,协议信息马上超时.RSTP中有两种特殊的BPDU Proposal和 Agrrement
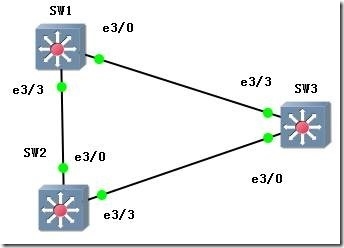
SW3#sh spanning-tree
VLAN0001
Spanning tree enabled protocol rstp
Root ID Priority 32769
Address aabb.cc00.0100
Cost 100
Port 16 (Ethernet3/3)
Hello Time 2 sec Max Age 20 sec Forward Delay 15 sec
Bridge ID Priority 32769 (priority 32768 sys-id-ext 1)
Address aabb.cc00.0300
Hello Time 2 sec Max Age 20 sec Forward Delay 15 sec
Aging Time 300 sec
Interface Role Sts Cost Prio.Nbr Type
------------------- ---- --- --------- -------- --------------------------------
Et3/0 Altn BLK 100 128.13 P2p
Et3/3 Root FWD 100 128.16 P2p
SW3#debug spanning-tree events
Spanning Tree event debugging is on
SW3#conf t
SW3(config)#int e3/3
SW3(config-if)#shut
*Jul 27 18:47:16.708: RSTP(1): updt roles, root port Et3/3 going down
*Jul 27 18:47:16.708: RSTP(1): Et3/0 is now root port \\立即跳成根端口 RSTP的特性
7-MST
在PVST 中,交换机为每个VLAN 都构建一棵STP 树,不仅会带来CPU 的很大负载,也会
占用大量的带宽。MST 则是把多个VLAN 映射到一个STP 实例上,从而减少了STP 实例。MST
可以和STP、PVST 配合使用。对于运行STP、PVST 的交换机来说,一个MST 域看起来就像一
台交换机。
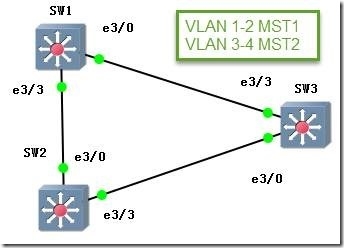
SW1/2/3:<都需要配置>
spanning-tree mst configuration
name test12
revision 1
instance 1 vlan 1-2
instance 2 vlan 3-4
为了可以负载均衡,我们让SW1 成为 vlan1-2的根桥,让SW2 成为vlan3-4的根桥
SW2(config)#spanning-tree mst 1 priority 8192
SW2(config)#spanning-tree mst 2 priority 4096
SW1(config)#spanning-tree mst 1 priority 4096
SW1(config)#spanning-tree mst 2 priority 8192
SW1#sh spanning-tree
MST0
Spanning tree enabled protocol mstp
Root ID Priority 32768
Address aabb.cc00.0100
This bridge is the root
Hello Time 2 sec Max Age 20 sec Forward Delay 15 sec
Bridge ID Priority 32768 (priority 32768 sys-id-ext 0)
Address aabb.cc00.0100
Hello Time 2 sec Max Age 20 sec Forward Delay 15 sec
Interface Role Sts Cost Prio.Nbr Type
------------------- ---- --- --------- -------- --------------------------------
Et3/0 Desg FWD 2000000 128.13 P2p
Et3/3 Desg FWD 2000000 128.16 P2p
//以上的MST00 是系统要使用的实例,BPDU 是通过它来发送的
MST1
Spanning tree enabled protocol mstp
Root ID Priority 4097
Address aabb.cc00.0100
This bridge is the root \\MST1的主根桥
Hello Time 2 sec Max Age 20 sec Forward Delay 15 sec
Bridge ID Priority 4097 (priority 4096 sys-id-ext 1)
Address aabb.cc00.0100
Hello Time 2 sec Max Age 20 sec Forward Delay 15 sec
Interface Role Sts Cost Prio.Nbr Type
------------------- ---- --- --------- -------- --------------------------------
Et3/0 Desg FWD 2000000 128.13 P2p
Et3/3 Desg FWD 2000000 128.16 P2p
--More--
*Jul 27 19:04:09.211: %SYS-5-CONFIG_I: Configured from console by console
MST2
Spanning tree enabled protocol mstp
Root ID Priority 4098
Address aabb.cc00.0200
Cost 2000000
Port 16 (Ethernet3/3)
Hello Time 2 sec Max Age 20 sec Forward Delay 15 sec
Bridge ID Priority 8194 (priority 8192 sys-id-ext 2)
Address aabb.cc00.0100
Hello Time 2 sec Max Age 20 sec Forward Delay 15 sec
Interface Role Sts Cost Prio.Nbr Type
------------------- ---- --- --------- -------- --------------------------------
Et3/0 Desg FWD 2000000 128.13 P2p
Et3/3 Root FWD 2000000 128.16 P2p
SW3(config)#int f0/2
SW3(config-if)#spanning-tree vlan 3 cost 10 \\这条命令可以修改COST值
8-STP保护
STP 协议并没有什么措施对交换机的身份进行认证。在稳定的网络中如果接入非法的交
换机将可能给网络中的STP 树带来灾难性的破坏。有一些简单的措施来保护网络,虽然这些
措施显得软弱无力。Root Guard 特性将使得交换机的接口拒绝接收比原有根桥优先级更高
的BPDU。而BPDU Guard 主要是和portfast 特性配合使用,portfast 使得接口一有计算机
接入就立即进入转发状态,然而万一这个接口接入的是交换机很可能造成环路。BPDU Guard
可以使得portfast 接口一旦接收到BPDU,就关闭该接口。
8-1Root Guard
为了保证SW1和SW2 为主根桥和次根桥,我们需要分表在E3/0 和E3/3下作根保护
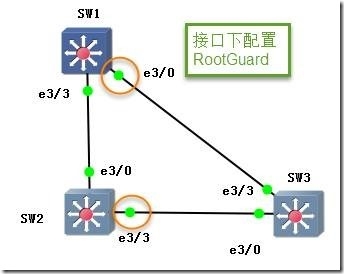
SW1(config-if)#spanning-tree guard root
SW2(config-if)#spanning-tree guard root
如果我们在R3上把优先级调低
SW3(config)#spanning-tree vlan 1 priority 0
*Jul 27 21:19:13.131: STP: VLAN0001 heard root 1-aabb.cc00.0300 on Et3/3
*Jul 27 21:19:13.131: supersedes 4097-aabb.cc00.0100
*Jul 27 21:19:13.131: %SPANTREE-2-ROOTGUARD_BLOCK: Root guard blocking port Ethernet3/3 on VLAN0001.
SW2#
*Jul 27 21:19:13.131: STP: VLAN0001 sent Topology Change Notice on Et3/0
*Jul 27 21:19:13.131: STP[1]: Generating TC trap for port Ethernet3/3
*Jul 27 21:19:13.131: STP: VLAN0001 Et3/3 -> blocking
SW2#sh spanning-tree vlan 1
VLAN0001
Spanning tree enabled protocol ieee
Root ID Priority 4097
Address aabb.cc00.0100
Cost 100
Port 13 (Ethernet3/0)
Hello Time 2 sec Max Age 20 sec Forward Delay 15 sec
Bridge ID Priority 8193 (priority 8192 sys-id-ext 1)
Address aabb.cc00.0200
Hello Time 2 sec Max Age 20 sec Forward Delay 15 sec
Aging Time 300 sec
Interface Role Sts Cost Prio.Nbr Type
------------------- ---- --- --------- -------- --------------------------------
Et3/0 Root FWD 100 128.13 Shr
Et3/3 Desg BKN*100 128.16 Shr *ROOT_Inc
8-2 BPDU Guard
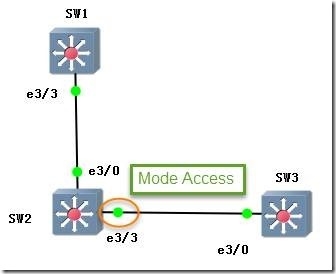
BPDU Guard 一般跟portfast 同时使用
SW2(config-if)#spanning-tree portfast
SW2(config-if)#spanning-tree bpduguard enable \\接口模式
SW2(config)#spanning-tree portfast bpduguard default \\全局模式
在SW3上制造出BPDU
SW3(config)#spanning-tree vlan 1 priority 0
SW2# \\在SW2上显示E3/3会自动关闭
*Jul 27 21:38:24.134: %SPANTREE-2-BLOCK_BPDUGUARD: Received BPDU on port Et3/3 with BPDU Guard enabled. Disabling port.
SW2#
*Jul 27 21:38:24.134: %PM-4-ERR_DISABLE: bpduguard error detected on Et3/3, putting Et3/3 in err-disable state
*Jul 27 21:38:25.141: %LINEPROTO-5-UPDOWN: Line protocol on Interface Ethernet3/3, changed state to down
如果我们把交换机SW3 E3/0关闭掉,SW2 E3/3 永远也起不来,我们可以配置下面的命令让它自己恢复
SW2(config)#errdisable recovery interval 30
SW2(config)#errdisable recovery cause bpduguard
8-3 BPDU Filter
根BPDU Guard作用是相同的是为了防止下游来发送更低的BPDU,该功能可以过滤掉BPDU报文
SW2(config-if)#spanning-tree bpdufilter enable \\接口下启动
SW2(config)#spanning-tree portfast bpdufilter default \\或者全局下启动
8-4 LoopGuard & DULD
这个feature主要是用于光纤连接防止单通道问题
<全局>spanning-tree loop Guard Default
<全局>udld enable
8-5 STP 命令汇总
show spanning-tree 查看STP 树信息
spanning-tree vlan 1 priority 4096 配置VLAN1 的桥优先级
spanning-tree portfast 配置接口为portfast,当有设备接入时立即
进入转发状态
spanning-tree uplinkfast 配置uplinkfast 特性
spanning-tree backbonefast 配置backbonefast 特性
spanning-tree mode rapid-pvst 把STP 的运行模式设为RSTP+PVST
spanning-tree link-type point-to-point 把接口的链路类型改为点对点
spanning-tree mode mst 把生成树的模式改为MST
spanning-tree mst configuration 进入MST 的配置模式
name TEST-MST 命名MST 的名字
revision 1 配置MST 的revision 号
instance 1 vlan 1-2 把VLAN 1 和VLAN 2 的生成树映射到实例1
spanning-tree guard root 在接口上配置root guard 特性
spanning-tree bpduguard enable 在接口上配置bpduguard 特性
9-NAT双出口
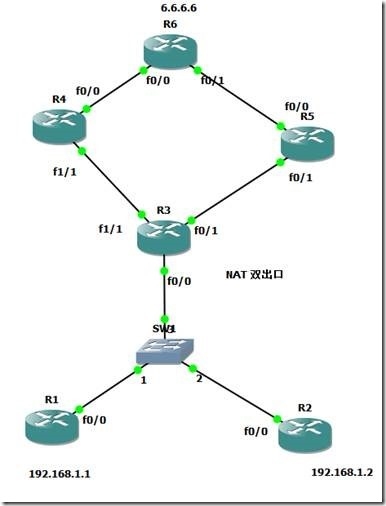
我们贴出R3的配置
interface FastEthernet0/0
ip address 192.168.1.250 255.255.255.0
ip nat inside
ip virtual-reassembly
duplex auto
speed auto
!
!
interface FastEthernet0/1
ip address 35.1.1.3 255.255.255.0
ip nat outside
ip virtual-reassembly
duplex auto
speed auto
!
interface FastEthernet1/1
ip address 34.1.1.3 255.255.255.0
ip nat outside
ip virtual-reassembly
duplex auto
speed auto
!
ip nat inside source list 1 interface FastEthernet1/1 overload
ip nat inside source list 2 interface FastEthernet0/1 overload
ip route 0.0.0.0 0.0.0.0 34.1.1.4 \\写两条出去的路由
ip route 0.0.0.0 0.0.0.0 35.1.1.5
!
access-list 1 permit 192.168.1.1
access-list 2 permit 192.168.1.2
关闭掉R3其中一个接口F1/1,则R1/R2再也ping不通6.6.6.6
原因是R3的转发是基于CEF的
R3#sh ip cef exact-route 192.168.1.1 6.6.6.6
192.168.1.1 -> 6.6.6.6 => IP adj out of FastEthernet1/1, addr 34.1.1.4
R3#sh ip cef exact-route 192.168.1.2 6.6.6.6
192.168.1.2 -> 6.6.6.6 => IP adj out of FastEthernet1/1, addr 34.1.1.4
这样如果我们用PBR来解决这个问题就可以了,因为PBR的优先级高于CEF
R3 配置如下:
route-map zou1 permit 10
match ip address 1
set ip next-hop 34.1.1.4
!
route-map zou1 permit 20
match ip address 2
set ip next-hop 35.1.1.5
interface FastEthernet0/0 \\应用在内部接口上
ip address 192.168.1.250 255.255.255.0
ip nat inside
ip virtual-reassembly
ip policy route-map zou1
我们在R1/R2上看效果
R1#traceroute 6.6.6.6
Type escape sequence to abort.
Tracing the route to 6.6.6.6
1 192.168.1.250 104 msec 60 msec 64 msec
2 34.1.1.4 104 msec 112 msec 104 msec
3 46.1.1.6 128 msec 136 msec 148 msec
R2#traceroute 6.6.6.6
Type escape sequence to abort.
Tracing the route to 6.6.6.6
1 192.168.1.250 112 msec 68 msec 56 msec
2 35.1.1.5 84 msec 120 msec 72 msec
3 56.1.1.6 148 msec 132 msec 100 msec
注意事项 traceroute 是使用6.6.6.6的进程交换 一次发三个包
快速转发开启的命令: <接口下> ip route-cache 和察看命令 show ip cache X.X.X.X
改变IP cef 负载均衡 <接口下> ip loading-share ?
10-代理ARP
Router 会去回应client 问得arp广播包
开启/关闭命令: <接口>ip proxy-arp
下面的试验就是client R3不用设置网关,来实现了一个网关的冗余
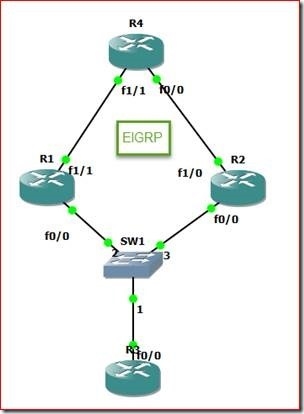
注:R3是没有配置网关的
R3#show arp
Protocol Address Age (min) Hardware Addr Type Interface
Internet 4.4.4.4 1 ca00.1de8.0000 ARPA FastEthernet0/0
Internet 192.168.1.3 - ca02.0890.0000 ARPA FastEthernet0/0
\\目前R1是client R3的网关,但是如果R1 的 f0/0 关闭了,那么要一直等到R3 ARP表超时才会切换到R1去.
![]()
R3#sh arp 4.4.4.4 detail
ARP entry for 4.4.4.4, link type IP.
Dynamic, via FastEthernet0/0, last updated 1 minute ago.
Encap type is ARPA, hardware address is ca00.1de8.0000, 6 bytes long.
ARP subblocks:
* Dynamic ARP Subblock
Entry will be refreshed in 250 minutes and 42 seconds.\\自动刷新的时间
It has 2 chances to be refreshed before it is purged.
Entry is complete.
* IP ARP Adjacency
Adjacency (for 4.4.4.4 on FastEthernet0/0) was installed.
R1(config)#int f0/0 \\关闭接口,清下R3的ARP缓存表或者接口shutdown/no shut下
R1(config-if)#shut
R3#sh arp
Protocol Address Age (min) Hardware Addr Type Interface
Internet 4.4.4.4 0 ca01.1de8.0000 ARPA FastEthernet0/0
Internet 192.168.1.3 - ca02.0890.0000 ARPA FastEthernet0/0
11-ICMP重定向
还是使用上图:
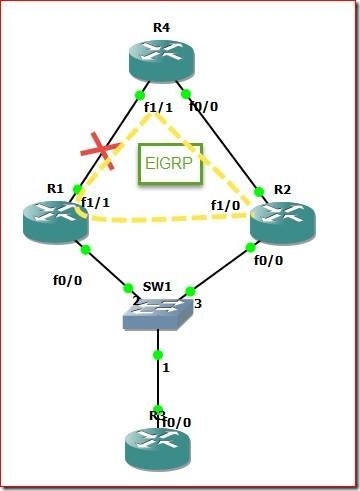
我把R1-R4间的链路断开,我们继续ping 4.4.4.4 还是可以通的,通的原因是router有ICMP重定向,在MA中非常常见,定义如下:若收到的数据包的入接口和这个数据包目标IP的路由出接口一致,则像源IP发送重定向报文,截图如下:
![]()
12-网关冗余
为了减少交换机故障的影响,交换机上有STP 技术。然而作为网关的路由器故障了,
又有什么办法?HSRP 和VRRP 是最常用的网关冗余技术,HSRP 和VRRP 类似,由多个路由器
共同组成一个组,虚拟出一个网关,其中的一台路由器处于活动状态,当它故障时由备份路
由器接替它的工作,从而实现对用户透明的切换。然而我们希望在冗余的同时,能同时实现
负载平衡,以充分利用设备的能力,GLBP 同时提供了冗余和负载平衡的能力
12-1 HSRP
HSRP 是Cisco 的专有协议。HSRP(Hot Standby Router Protocol)把多台路由器组成
一个“热备份组”,形成一个虚拟路由器。这个组内只有一个路由器是活动的(Active),并
由它来转发数据包,如果活动路由器发生了故障,备份路由器将成为活动路由器。从网络内
的主机来看,网关并没有改变。
HSRP 路由器利用HELLO 包来互相监听各自的存在。当路由器长时间没有接收到HELLO
包,就认为活动路由器故障,备份路由器就会成为活动路由器。HSRP 协议利用优先级决定
哪个路由器成为活动路由器。如果一个路由器的优先级比其它路由器的优先级高,则该路由
器成为活动路由器。路由器的缺省优先级是100。一个组中,最多有一个活动路由器和一
个备份路由器。
HSRP 路由器发送的多播消息有以下三种:
(1) HELLO: HELLO 消息通知其它路由器发送路由器的HSRP 优先级和状态信息,HSRP 路
由器默认为每3 秒钟发送一个HELLO 消息;
(2) Coup:当一个备用路由器变为一个活动路由器时发送一个coup 消息;
(3) Resign:当活动路由器要宕机或者当有优先级更高的路由器发送HELLO 消息时,主
动发送一个resign 消息。
HSRP 路由器有以下六种状态:
(1) Initial:HSRP 启动时的状态,HSRP 还没有运行,一般是在改变配置或接口刚刚启
动时进入该状态;
(2) Learn:路由器已经得到了虚拟IP 地址,但是它既不是活动路由器也不是备份路由
器。它一直监听从活动路由器和备份路由器发来的HELLO 报文;
(3) Listen:路由器正在监听HELLO 消息;
(4) Speak:在该状态下,路由器定期发送HELLO 报文,并且积极参加活动路由器或备份
路由器的竞选;
(5) Standby:当活动路由器失效时路由器准备接管数据传输功能;
(6) Active:路由器执行数据传输功能。
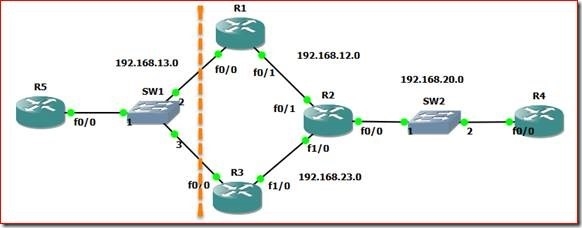
R1:
interface FastEthernet0/0
ip address 192.168.13.1 255.255.255.0
duplex auto
speed auto
standby 1 ip 192.168.13.250
\\启用 HSRP 功能,并设置虚拟IP 地址,1 为standby 的组号。相同组号的路由器属于同一个HSRP 组,所有属于同一个HSRP 组的路由器的虚拟地址必须一致
standby 1 priority 120
//配置HSRP 的优先级,如果不设置该项,缺省优先级为100,该值大抢占为活动路由器的
优先权越高。
standby 1 preempt
\\该设置允许该路由器在优先级是最高时成为活动路由器。如果不设置,即使该路由器权值
再高,也不会成为活动路由器。开启抢占
standby 1 authentication md5 key-string cisco
\\以上是配置认证密码,防止非法设备加入到HSRP 组中,同一个组的密码必须一致。
R3:
interface FastEthernet0/0
ip address 192.168.13.3 255.255.255.0
duplex auto
speed auto
standby 1 ip 192.168.13.250
standby 1 preempt
standby 1 authentication md5 key-string cisco
R1#sh run | se router rip
router rip
version 2
passive-interface FastEthernet0/0 \\不让路由信息到内部网络中
network 0.0.0.0
no auto-summary
R2#sh run | se router rip
router rip
version 2
passive-interface FastEthernet0/0
network 0.0.0.0
no auto-summary
R3#sh run | se router rip
router rip
version 2
passive-interface FastEthernet0/0
network 0.0.0.0
no auto-summary
R1#sh standby brief
P indicates configured to preempt.
|
Interface Grp Pri P State Active Standby Virtual IP
Fa0/0 1 120 P Active local 192.168.13.3 192.168.13.250
如何保证上行链路的冗余呢?
R1(config-if)#standby 1 track f0/1
<有时候我们会用多个standby组来组成一个负载均衡>
如果我们把R2的f0/1的关闭掉,其实上面的track并不起作用。
R2(config)#int f0/1
R2(config-if)#shutdown
我们来看下其他配置
track 2 rtr 1 reachability
ip sla 1
icmp-echo 192.168.12.2 source-ip 192.168.12.1 \\条件:12.1 ping 通 12.2
ip sla schedule 1 life forever start-time now \\ SLA 立即生效
那么在R5 ping R4可以不用担心上行链路问题

12-2 VRRP
VRRP 的工作原理和HSRP 非常类似,不过VRRP 是国际上的标准,允许在不同厂商的设备之间运行。VRRP 中虚拟网关的地址可以和接口上的地址相同,默认开启抢占,VRRP 中接口只有3 个状态:
初始状态(Initialize)、主状态(Master)、备份状态(Backup)。VRRP 有一种报文。
R1(config)#do sh run int f0/0
Building configuration...
Current configuration : 173 bytes
!
interface FastEthernet0/0
ip address 192.168.13.1 255.255.255.0
duplex auto
speed auto
vrrp 1 ip 192.168.13.250
vrrp 1 priority 120
vrrp 1 track 2 decrement 30
end
R3#sh run int f0/0
Building configuration...
Current configuration : 123 bytes
!
interface FastEthernet0/0
ip address 192.168.13.3 255.255.255.0
duplex auto
speed auto
vrrp 1 ip 192.168.13.250
end
13-3 GLBP
HSRP和VRRP能实现网关的冗余,然而如果要实现负载平衡,需要创建多个组,并让客户
端指向不同的网关。GLBP(Gateway Load Balance Protocol)也是Cisco的专有协议,不仅
提供冗余网关功能,还在各网关之间提供负载均衡。GLBP也是由多个路由器组成一个组,虚
拟一个网关出来。GLBP选举出一个AVG(Avtive Virtual Gateway),AVG不是负责转发数据的。
AVG分配最多四个MAC地址给一个虚拟网关,并在计算机进行ARP请求时,用不同的MAC进行响
应,这样计算机实际就把数据发送给不同的路由器了,从而实现负载平衡。在GLBP中,真正
负责转发数据的是AVF(Avtive Virtual Forwarder),GLBP会控制GLBP组中哪个路由器是哪
个MAC地址的活动路由器。
AVG的选举和HRSP中活动路由器的选举非常类似,优先级最高的路由器成为AVG,次之的
为Backup AVG,其余的为监听状态。一个GLBP组只能有一个AVG和一个Backup AVG,主的AVG
失败,备份AVG顶上。一台路由器可以同时是AVG和AVF。AVF是某些MAC的活动路由器,也就
是说如果计算机把数据发往这个MAC,它将接收。当某一MAC的活动路由器故障,其它AVF将
成为这一MAC的新的活动路由器,从而实现冗余功能。
GLBP 的负载平衡策略可以是根据不同主机、简单的轮询或者根据路由器的权重平衡,
默认是轮询方式。
基本配置
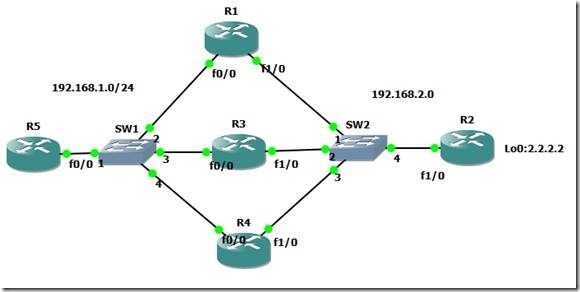
R1#sh run int f0/0
interface FastEthernet0/0
ip address 192.168.1.1 255.255.255.0
duplex auto
speed auto
glbp 1 ip 192.168.1.254
glbp 1 priority 200
glbp 1 preempt
R3#sh run int f0/0
interface FastEthernet0/0
ip address 192.168.1.3 255.255.255.0
duplex auto
speed auto
glbp 1 ip 192.168.1.254
glbp 1 priority 180
glbp 1 preempt
R4#sh run int f0/0
interface FastEthernet0/0
ip address 192.168.1.4 255.255.255.0
duplex auto
speed auto
glbp 1 ip 192.168.1.254
glbp 1 priority 160
glbp 1 preempt
R5 ping一次2.2.2.2,然后清下arp表,再ping一次2.2.2.2
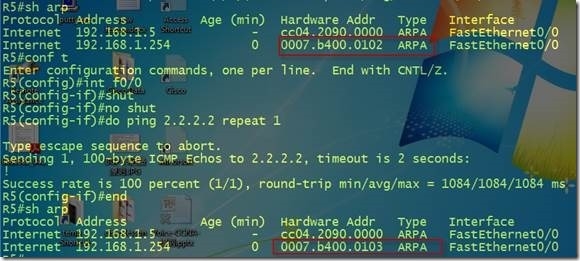
上图可以说明:GLBP是默认负载均衡的方式:轮训方式
我们可以在接口下使用glbp 1 load-blancing 来更改方式.
R1#sh glbp
FastEthernet0/0 - Group 1
State is Active
2 state changes, last state change 00:07:29
Virtual IP address is 192.168.1.254 \\虚拟网关地址
Hello time 3 sec, hold time 10 sec
Next hello sent in 0.284 secs
Redirect time 600 sec, forwarder time-out 14400 sec
Preemption enabled, min delay 0 sec
Active is local \\说明R1是活动的 AVG
Standby is 192.168.1.3, priority 180 (expires in 8.148 sec)\\AVG的backup
Priority 200 (configured) \\自己配置的优先级
Weighting 100 (default 100), thresholds: lower 1, upper 100
Load balancing: round-robin
Group members:
cc00.16c4.0000 (192.168.1.1) local
cc02.16c4.0000 (192.168.1.3)
cc03.16c4.0000 (192.168.1.4) \\显示glbp组成员
There are 3 forwarders (1 active)
….
Forwarder 2
State is Active
1 state change, last state change 00:07:40
MAC address is 0007.b400.0102 (default) \\说明
Owner ID is cc00.16c4.0000
Redirection enabled
Preemption enabled, min delay 30 sec
Active is local, weighting 100
Arp replies sent: 1
GLBP运作
1-活动网关选举
使用类似于HSRP的机制选举活动网关,
优先级最高的路由器成为活动路由器,若优先级相同则IP地址最高的路由器成为活动路由器。称作Active Virtual Gateway,其他非AVG提供冗余。
某路由器被推举为AVG后,和HSRP不同的工作开始了,AVG分配虚拟的MAC地址给其他GLBP组成员。
所有的GLBP组中的路由器都转发包,
但是各路由器只负责转发与自己的虚拟MAC地址的相关的数据包。
2-地址分配
每个GLBP组中最多有4个虚拟MAC地址,非AVG路由器由AVG按序分配虚拟MAC地址,
非AVG也被称作Active Virtual Forwarder(AVF)。
AVF分为两类:Primary Virtual Forwarder和Secondary Virtual Forwarder。
直接由AVG分配虚拟MAC地址的路由器被称作Primary Virtual Forwarder,
后续不知道AVG真实IP地址的组成员,只能使用hellos包来识别其身份,然后被分配虚拟MAC地址,此类被称作Secondary Virtual Forwarder。
GLBP支持使用多台默认路由器同时为相同过的默认网关IP地址提供流量的负载分担,在这种环境中,GLBP支持下列负载分担模式。
GLBP协议支持三种负载均衡方式:
第一:根据不同主机的源mac地址
第二:根据arp请求轮询
第三:根据路由器的权重分配,权重越高被分配的可能性越大
GLBP的加权决定了一台路由器是否充当虚拟转发者的角色。管理员可以设置初始加权值,并且可以指定门限值。管理员可以配置GLBP来追踪接口状态并设置一个减量值,当被追踪的接口关闭时,以这个减量值来降低加权值。当GLBP路由器的加权下降到低于一个特定的值时,路由器就不会再成为活跃虚拟转发者。而当加权上升到高于一个特定的值时,路由器可以恢复其活跃虚拟转发者的角色。
GLBP的加权机制与HSRP或VRRP不同。HSRP和VRRP中只定义了一个门限值。如果路由器优先级下降到这个门限值以下,路由器就会获得活跃状态。GLBP中定义了两个门限值:当路由器加权减少时使用一个较低的门限值,当路由器加权增加时使用一个较高的门限值。这个双门限值机制比单门限值系统更为灵活。
GLBP Track
先定义不同的weight值
R1(config-if)#glbp 1 weighting 200 lower 100 upper 180
R3(config-if)#glbp 1 weighting 180 lower 100 upper 160
R4(config-if)#glbp 1 weighting 160 lower 100 upper 140
定义SLA
ip sla monitor 1
type echo protocol ipIcmpEcho 192.168.2.2 source-ipaddr 192.168.1.1
timeout 1000
threshold 2
ip sla monitor schedule 1 life forever start-time now
track 1 rtr 1 reachability
R1#sh ip sla monitor configuration /show track 1
R1(config)#int f0/0
R1(config-if)#glbp 1 weighting track 1 decrement 110
如果把R1的接口f1/0给关闭掉,那么我们可以看到以下log,R5中断了一会也可以ping通2.2.2.2

12-4命令汇总
standby 1 ip 192.168.13.254 启用 HSRP 功能,并设置虚拟IP 地址
standby 1 priority 120 配置本路由器的HSRP 优先级
standby 1 preempt 配置HSRP 抢占
standby 1 timers 3 10 设置HSRP 的HELLO time 和HOLD time
standby 1 authentication md5 key-stringcisco 配置HSRP 认证密码,认证方式为MD5
show standby brief 查看HSRP 的简要情况
standby 1 track Serial0/0/0 30 跟踪s0/0/0 接口,当接口故障时,HSRP 优先级降低30
vrrp 1 ip 192.168.13.254 启用 VRRP 功能,并设置虚拟IP 地址
vrrp 1 priority 120 配置本路由器的VRRP 优先级
vrrp 1 preempt 配置VRRP 抢占
vrrp 1 authentication md5 key-stringcisco 配置VRRP 认证密码,认证方式为MD5
track 100 interface Serial0/0/0 定义一个跟踪目标号,被跟踪对象为s0/0/0 line-protocol 接口
vrrp 1 track 100 decrement 30 跟踪目标100,当目标故障时,优先级降低30
show vrrp brief 查看VRRP 的简要情况
glbp 1 ip 192.168.1.254 启用 GLBP 功能,并设置虚拟IP 地址
glbp 1 priority 200 配置本路由器的GLBP 优先级
glbp 1 preempt 配置GLBP 抢占
glbp 1 authentication md5 key-stringcisco配置GLBP 认证密码,认证方式为MD5
show glbp 查看GLBP 情况
13-三层交换
三层交换机可以实现路由功能
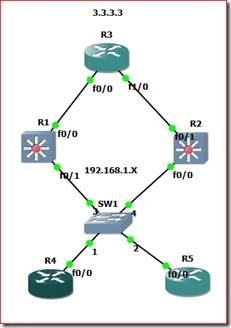
基本上就是把交换机当然路由器使用
基本命令:
Ip routing
Ip cef
interface FastEthernet0/0
no switchport
ip address 13.1.1.1 255.255.255.0
!
interface FastEthernet0/1
no switchport
ip address 192.168.1.1 255.255.255.0
standby 1 ip 192.168.1.254
standby 1 preempt
standby 1 authentication md5 key-string fuyi
14-二层安全
14-1 Port Security
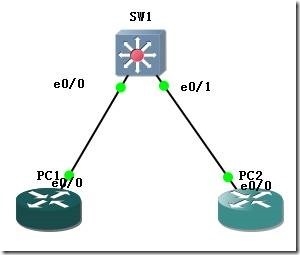
SW1#Sh run int e0/0
Building configuration...
Current configuration : 137 bytes
!
interface Ethernet0/0
switchport mode access
switchport port-security \\一定要敲这个命令来启动这个功能
switchport port-security max 1 \\这个接口下只能 接一个MAC地址,如果有出现2个mac则会报错
switchport port-security violation restrict
duplex auto
end
PC1(config)#int e0/0
PC1(config-if)#mac-address AAAA.AAAA.AAAA
![]()
errdisable recovery cause ALL
errdisable recovery interval 30 \\这个命令可以让它自动还原
SW1#sh port-security
Secure Port MaxSecureAddr CurrentAddr SecurityViolation Security Action
(Count) (Count) (Count)
---------------------------------------------------------------------------
Et0/0 1 1 44 Restrict
---------------------------------------------------------------------------
Total Addresses in System (excluding one mac per port) : 0
Max Addresses limit in System (excluding one mac per port) : 4096
SW1(config-if)#switchport port-security mac-address sticky \\开启MAC地址自动粘贴功能
14-2 DHCP Snooping
DHCP监听将交换机端口划分为两类:
非信任端口:通常为连接终端设备的端口,如PC,网络打印机等
信任端口:连接合法DHCP服务器的端口或者连接汇聚交换机的上行端口
通过开启DHCP监听特性,交换机限制用户端口(非信任端口)只能够发送DHCP请求,丢弃来自用户端口的所有其它DHCP报文,例如DHCP Offer报文等。而且,并非所有来自用户端口的DHCP请求都被允许通过,交换机还会比较DHCP 请求报文的(报文头里的)源MAC地址和(报文内容里的)DHCP客户机的硬件地址(即CHADDR字段),只有这两者相同的请求报文才会被转发,否则将被丢弃。这样就防止了DHCP耗竭攻击。
信任端口可以接收所有的DHCP报文。通过只将交换机连接到合法DHCP服务器的端口设置为信任端口,其他端口设置为非信任端口,就可以防止用户伪造DHCP服务器来攻击网络。DHCP监听特性还可以对端口的DHCP报文进行限速。通过在每个非信任端口下进行限速,将可以阻止合法DHCP请求报文的广播攻击。
DHCP监听还有一个非常重要的作用就是建立一张DHCP监听绑定表(DHCP Snooping Binding)。一旦一个连接在非信任端口的客户端获得一个合法的DHCP Offer,交换机就会自动在DHCP监听绑定表里添加一个绑定条目,内容包括了该非信任端口的客户端IP地址、MAC地址、端口号、VLAN编号、租期等信息。
这张DHCP监听绑定表为进一步部署IP源防护(IPSG)和动态ARP检测(DAI)提供了依据.
试验拓扑还是使用上图:
SW1(config)#ip dhcp snooping
SW1(config)#ip dhcp snooping vlan 1
SW1(config)#int e0/0
SW1(config-if)#ip dhcp snooping trust //连接服务器
SW1(config-if)#int e0/1
SW1(config-if)#ip dhcp snooping limit rate 15 //连接客户端
For detail: http://bbs.51cto.com/thread-1116776-1-1.html
14-3 IP Source Guard
ip源保护默认DHCP Snooping所获得的用户IP地址及MAC表项作为主机正确的配置信息,所以应先启用DHCP SNOOPING功能
1.接口下启用IP源保护
interface FastEthernet0/2
ip verify source port-security
(port-security是可选项,如果启用后会对伪造MAC地址进行检查,但必须启用端口安全功能)
switchport mode access
端口安全的配置
switchport port-security maximum 10
switchport port-security
2.可人工绑定接口下主机信息(可选项)
ip source binding 0001.0001.0001 vlan 1 10.1.1.15 interface e0/0
14-4 DAI
Switch(config)#iparp inspection vlan id/* 定义对哪些 VLAN 进行 ARP 报文检测 。
Switch(config)#iparp inspection validate src-macdst-macip-address /*对src-mac(源mac地
址),dst-mac(目标mac地址)和ip-address(ip地址)进行检查
Switch(config-if)#iparp inspection limit rate number/* 定义接口每秒 ARP 报文数量。
Switch(config-if)#iparp inspection trust /*信任的接口不检查arp报文,默认是检测。上联端口必须设为trust。
本文出自 “Erick WAY” 博客,谢绝转载!