Websphere Application Server 6.1安装配置(二)
命令:
表 1 manageprofiles 的模式
-create: 创建一个新的概要。
-augment 使用给定的概要模板,扩充某个特定的概要。
-delete 删除一个概要。
-unaugment: 取消对概要的扩充。
-deleteAll 删除所有已注册的概要。
-listProfile 列出概要注册中心中的概要。
-getName 返回指定路径下的概要的名称。
-getPath 返回指定概要名称的路径。
-validateRegistry 验证概要注册中心,并返回一个无效概要的列表。
-validateAndUpdateRegistry 验证概要注册中心,列出被清除的无效概要。
-getDefaultName 返回缺省概要的名称。
-setDefaultName 设置缺省概要。
-backupProfile 将指定的概要备份到一个 zip 文件。
-restoreProfile 从 zip 文件中恢复指定的概要。
-response 在一个响应文件中管理概要。
-help 显示帮助。
Profile模板:概要是根据随产品提供的模板创建的。这些模板位于<was_home>/profileTemplates。每个模板都由一组提供概要初始设置的文件和概要创建后将采取的操作列表组成。目前还没有为您提供修改这些模板以及创建新模板的方法。当您使用manageprofiles创建概要时,您需要指定下列模板中的一个:
* Default(对于应用程序服务器概要)
* Dmgr(对于部署管理器概要)
* Managed(对于自定义概要)
* Cell(对于单元概要)
下面是在命令行中添加概要文件方式(大家一定注意路径):
[root@shasys01 bin]# pwd
$was/bin
[root@shasys01 bin]# ./manageprofiles.sh -create -profileName dmgr001 -templatePath $was/profileTemplates/dmgr -nodeName dnmgr001node -cellName dmgr001cell
INSTCONFSUCCESS: Success: Profile dmgr001 now exists. Please consult /list/opt/IBM/WebSphere/AppServer/profiles/dmgr001/logs/AboutThisProfile.txt for more information about this profile.
[root@shasys01 bin]# pwd
$was/bin
[root@shasys01 bin]# ./manageprofiles.sh -create -profileName app001 -templatePath $was/profileTemplates/default/ -nodeName default001node
INSTCONFSUCCESS: Success: Profile app001 now exists. Please consult /list/opt/IBM/WebSphere/AppServer/profiles/app001/logs/AboutThisProfile.txt for more information about this profile.
[root@shasys01 bin]# pwd
$was/profiles/app001/bin
[root@shasys01 properties]# pwd
$was/profiles/dmgr001/properties
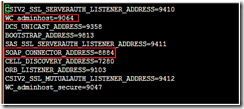
[root@shasys01 properties]# vim portdef.props

[root@shasys01 bin]# pwd
$was/profiles/app001/bin
[root@shasys01 bin]# ./addNode.sh 172.16.248.2 8884为部署管理概要文件SOAP端口
一般出现下面类似结果表示成功
ADMU0116I: Tool information is being logged in file
/list/opt/IBM/WebSphere/AppServer/profiles/app001/logs/addNode.log
ADMU0128I: Starting tool with the app001 profile
CWPKI0308I: Adding signer alias "dummyclientsigner" to local keystore
"ClientDefaultTrustStore" with the following SHA digest:
0B:3F:C9:E0:70:54:58:F7:FD:81:80:70:83:A6:D0:92:38:7A:54:CD
CWPKI0308I: Adding signer alias "dummyserversigner" to local keystore
"ClientDefaultTrustStore" with the following SHA digest:
FB:38:FE:E6:CF:89:BA:01:67:8F:C2:30:74:84:E2:40:2C:B4:B5:65
CWPKI0308I: Adding signer alias "default" to local keystore
"ClientDefaultTrustStore" with the following SHA digest:
A6:3C:83:9B:40:4A:2B:0F:E3:43:C8:40:E3:24:1C:F2:36:BB:15:54
ADMU0001I: Begin federation of node default001node with Deployment Manager at
172.16.248.2:8884.
ADMU0001I: Begin federation of node default001node with Deployment Manager at
172.16.248.2:8884.
ADMU0009I: Successfully connected to Deployment Manager Server:
172.16.248.2:8884
ADMU0505I: Servers found in configuration:
ADMU0506I: Server name: server1
ADMU2010I: Stopping all server processes for node default001node
ADMU0510I: Server server1 is now STOPPED
ADMU0024I: Deleting the old backup directory.
ADMU0015I: Backing up the original cell repository.
ADMU0012I: Creating Node Agent configuration for node: default001node
ADMU0014I: Adding node default001node configuration to cell: dmgr001cell
ADMU0016I: Synchronizing configuration between node and cell.
ADMU0018I: Launching Node Agent process for node: default001node
ADMU0020I: Reading configuration for Node Agent process: nodeagent
ADMU0022I: Node Agent launched. Waiting for initialization status.
ADMU0030I: Node Agent initialization completed successfully. Process id is:
2158
ADMU9990I:
ADMU0300I: The node default001node was successfully added to the dmgr001cell
cell.
ADMU9990I:
ADMU0306I: Note:
ADMU0302I: Any cell-level documents from the standalone dmgr001cell
configuration have not been migrated to the new cell.
ADMU0307I: You might want to:
ADMU0303I: Update the configuration on the dmgr001cell Deployment Manager with
values from the old cell-level documents.
ADMU9990I:
ADMU0306I: Note:
ADMU0304I: Because -includeapps was not specified, applications installed on
the standalone node were not installed on the new cell.
ADMU0307I: You might want to:
ADMU0305I: Install applications onto the dmgr001cell cell using wsadmin
$AdminApp or the Administrative Console.
ADMU9990I:
ADMU0003I: Node default001node has been successfully federated.
每个应用程序服务器概要文件创建好之后都会有一个默认的应用程序服务器server1
[root@shasys01 bin]# pwd
$was/profiles/app001/bin
[root@shasys01 bin]# ./startServer.sh server1
ADMU0116I: Tool information is being logged in file
/list/opt/IBM/WebSphere/AppServer/profiles/app001/logs/server1/startServer.log
ADMU0128I: Starting tool with the app001 profile
ADMU3100I: Reading configuration for server: server1
ADMU3200I: Server launched. Waiting for initialization status.
ADMU3000I: Server server1 open for e-business; process id is 2717
[root@shasys01 bin]# pwd
$was/profiles/app001/bin
[root@shasys01 bin]# ./serverStatus.sh server1
ADMU0116I: Tool information is being logged in file
$was/profiles/app001/logs/server1/serverStatus.log
ADMU0128I: Starting tool with the app001 profile
ADMU0500I: Retrieving server status for server1
ADMU0508I: The Application Server "server1" is STARTED
应用程序服务器概要文件的server1开启之后就可以在IE图形化界面查看配置信息了。
http://172.16.248.2:9067/ibm/console/login.do
[root@shasys01 bin]# pwd
$was/profiles/dmgr001/bin
[root@shasys01 bin]# ./startManager.sh
ADMU0116I: Tool information is being logged in file
$was/profiles/dmgr001/logs/dmgr/startServer.log
ADMU0128I: Starting tool with the dmgr001 profile
ADMU3100I: Reading configuration for server: dmgr
ADMU3200I: Server launched. Waiting for initialization status.
ADMU3000I: Server dmgr open for e-business; process id is 8681
部署管理器概要文件的控制台开启之后就可以在IE图形化界面查看配置信息了
http://172.16.248.2:9064/ibm/console/login.do
如果仔细比较的话,大家会发现应用程序服务器概要文件的图形化信息和部署管理器概要文件的图形化信息还是有很大区别的,这个问题我这里专门提出来主要是因为,我当时对于应用程序服务器概要文件和部署管理器概要文件之间的区别和联系很模糊,所以当我看到应用程序服务器概要文件的图形化信息是很是郁闷,就是找不到从哪里启动server。浪费了很多时间去查资料。
好了到这里WAS的基本配置算是结束了。再往下的路已经很简单了。大家可以在图形化界面玩了。上面我几乎每一个命令都给大家标示了路径希望大家能重视起来,要不让倒时候服务起不来可被怪我没提醒哈!!呵呵,还有就是服务和命令不能重复使用负责会报错,但是在命令提示符下提示的信息却是相当的不明确。跟linux没法比呀。呵呵
总结:
下面是我总结的几句话。相信在大家迷茫的时候会大家有所启发帮助
1. 部署管理器逻辑的为应用程序提供一个单独的管理接口,在部署管理器创建的开始就可以获得管理安全
2. 一个应用程序服务器概要文件都有一个名为server1的缺省服务器
3. 某个结点成为受管结点后,这个结点上的server需要DM+Node Agent启动后,才能启动或者停止server
4. Node Agent协调机器上服务器之间的管理。他是运行服务器,他代表Network Deployment环境中的节点,必须在每个节点启动Node Agent后 Deployment Manager (DM)才能控制节点上的server,你必须以开始就启动Node Agent
5. Node Agent必须正在运行,DM才能管理节点上的服务器。
6. addNode.sh命令将启动Node Agent 当节点不小心stop后./startNode.sh再启动结点
7. 在$was下,还有一层目录,我们发现和$was/profiles/下的各个概要文件中的目录架构是一样的。该层下的命令都是对于缺省概要文件来说的。在其下运行时需要指定-profileName
8. addNode.sh命令来联合概要文件
9. 确定概要文件使用的端口号:$was/profiles/proproties/portdef.props,如果端口冲突了的话可使用ws_ant脚本来手动指定端口号
10. 启动顺序:先同步——启动结点—启动服务
关闭顺序:先关闭结点—再关闭服务