一起搭建linux监控平台之nagios(五)使用以及相关说明
使用及相关如下:
使用脚本如下配套之前的函数:
- addservices () {
- echo "you can add services for web-server or mysql-server "
- echo "1,web-server"
- echo "2,mysql-server"
- echo "3,exit"
- read abc
- case $abc in 1)
- webservices ;;
- 2)
- echo "you can change the mysql type"
- echo "1,master server"
- echo "2,slave server"
- read abcd
- if [ $abcd == 1 ]
- then
- #installclientmysql
- addmysqlservicemaster
- else
- #installclientmysql
- addmysqlserviceslave
- fi
- echo " " ;;
- 3)
- exit ;;
- esac
- }
- actionserver () {
- echo "this is at nagios server:you can change install environment or add services"
- echo "1,Install environment for nagios;"
- echo "2,add the client services!!!!!!!!!"
- read aaa
- case $aaa in 1)
- installserver
- addnagios ;;
- 2)
- addservices ;;
- *)
- echo "this is error,please change again."
- actionserver ;;
- esac
- }
- actionclient () {
- echo "this is at nagios client:you can install the different environment"
- echo "1,install the environment for web-server!!"
- echo "2,install the environment for mysql-server"
- read bbb
- case $bbb in 1)
- installweb ;;
- 2)
- installmysql ;;
- 3)
- echo "this is error,please change again"
- actionclient ;;
- esac
- }
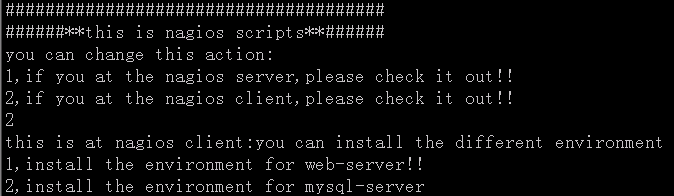
- echo "######################################"
- echo "######**this is nagios scripts**######"
- echo "you can change this action:"
- echo "1,if you at the nagios server,please check it out!!"
- echo "2,if you at the nagios client,please check it out!!"
- read asd
- case $asd in 1)
- actionserver ;;
- 2)
- actionclient ;;
- *)
- exit ;;
- esac
解压完nagios.tar.gz后会出现一个naigos文件夹,进入文件夹执行./install

如果我们在监控端就选择:1
选择 1 后会出现下面

这是选择1:就是开始部署监控端的环境 2:开始添加服务
当我们选择添加服务时:

这时选择1:添加web服务器类型的服务
2:mysql服务器器类型的服务
mysql服务器类型服务
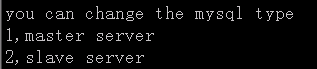
注意一下:目前就支持主服务器的类型,备注:从服务器的还不支持(脚本里面有个函数,你可以自己修改这样也是可以的) 所以请选择1
这样在监控端的操作就完成了
备注:如果数字敲错可以ctrl+删除键 这样可以删除输入的数字
如果我们在被监控端选择: 2
这时,根据自己被监控端服务器类型进行选择就可以了
结果如下:


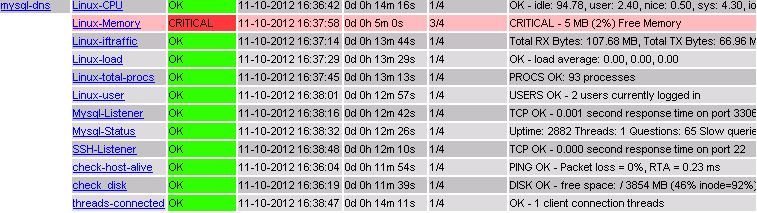
这样具体添加了那些服务 看图比较直接
相关补充:
1,报警频率的设置
- define service{
- host_name $host
- service_description Linux-load
- check_command check_nrpe!check_load
- max_check_attempts 5
- normal_check_interval 3
- retry_check_interval 2
- check_period 24x7
- notification_interval 10
- notification_period 24x7
- notification_options w,u,c,r
- contact_groups mysql-server
- }
max_check_attempts 5 检测异常后最多检测5次后就报警
normal_check_interval 3 每3分钟检测一次
retry_check_interval 2 一旦检测异常后每2分钟检测一次
notification_interval 10 邮件报警的频率 10就是代表10分钟发送一次
我对normal_check_interval 有点疑问 好像你设置成多少 naigos自身好像是30秒或1分钟自己检测一次
所以理论上当服务发生异常时的报警时间:3+(2*4)=13 然后每10分钟发送一次邮件
当然对于比较重要的服务可以适当调整
2,对nagios报警邮件的限制
- define hostescalation{
- host_name $host
- first_notification 5
- last_notification 0
- notification_interval 10
- contact_groups mysql-server
- }
- define serviceescalation{
- host_name $host
- service_description Mysql-Listener
- first_notification 5
- last_notification 0
- notification_interval 10
- contact_groups mysql-server
- }
- define serviceescalation{
- host_name $host
- service_description Mysql-Status
- first_notification 5
- last_notification 0
- notification_interval 10
- contact_groups mysql-server
- } " >> /usr/local/nagios/etc/objects/escalations.cfg
这可以通过创建escalations.cfg进行设置
host_name $host
service_description Mysql-Listener
first_notification 5 从第五份邮件开始
last_notification 0 从第x封结束调整
notification_interval 10 发送频率10 即10分钟发送一次
contact_groups mysql-server
host_name 要与hosts.cfg中的一致
service_description 要与services.cfg一致
contact_groups 与contactgroup.cfg一致
具体参数可以自己调整
具体报警的邮箱在contacts.cfg里面修改就可以了 默认使用sendmail发送 所以记得开启sendmail服务
nagios安装包(里面包含了lamp)地址如下:
http://down.51cto.com/data/596794