zimbra邮件系统
转载地址:http://yanghuawu.blog.51cto.com/2638960/1106390
一、系统环境
拓朴图:
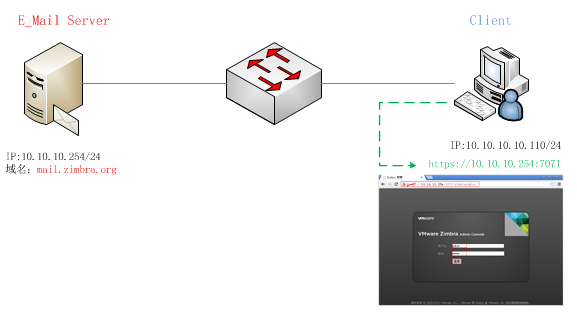
系统 |
域名 |
服务器 |
客户端 |
CentOS 5.8_64bit |
mail.zimbra.org |
10.10.10.254 |
10.10.10.110 |
二、基本配置
1、配置IP
[root@localhost ~]# vim /etc/sysconfig/network-scripts/ifcfg-eth0
DEVICE=eth0
BOOTPROTO=static
IPADDR=10.10.10.254
NETMASK=255.255.255.0
:wq
[root@localhost ~]# service network restart
2、配置DNS文件
[root@localhost ~]# vim /etc/resolv.conf
nameserver 10.10.10.254
3、配置hosts文件
[root@localhost ~]# vim /etc/hosts
127.0.0.1 localhost.localdomain localhost
10.10.10.254 mail.zimbra.org
4、配置主机名:mail.zimbra.org
[root@localhost ~]# vim /etc/sysconfig/network
HOSTNAME=mail.zimbra.org
:wq 保存
[root@localhost ~]# hostname mail.zimbra.org
断开终端,再次连接,这样就需要重新启动系统:ctrl+d
[root@mail ~]# hostname
mail.zimbra.org
5、SELinux关闭、LINUX关闭防火墙
SELinux关闭
1.永久方法�C需要重启服务器
修改/etc/selinux/config文件中设置SELINUX=disabled ,然后重启服务器。
2.临时方法�C设置系统参数
使用命令setenforce 0
LINUX关闭防火墙
1.重启后永久性生效:
开启:chkconfig iptables on
关闭:chkconfig iptables off
2 .即时生效,重启后失效:
开启:service iptables start
关闭:service iptables stop
三、安装所需依赖rpm包
[root@mail ~]# yum install libtool-ltdl compat-libstdc++-33 sysstat
四、安装bind(DNS)
[root@mail ~]# yum install bind-libs ypbind bind-chroot bind bind-utils caching-nameserver
1、配置named文件
[root@mail ~]# cd /var/named/chroot/etc/
[root@mail etc]# cp -p named.caching-nameserver.conf named.conf
[root@mail etc]# cp named.conf named.confbak
[root@mail etc]# vim named.conf
修改:
行数
15 listen-on port 53 { any; };
27 allow-query { any; };
28 allow-query-cache { any; };
37 match-clients { any; };
38 match-destinations { any; };
:wq
[root@Zmail etc]# cp named.rfc1912.zones named.rfc1912.zonesbak
[root@mail etc]# vim named.rfc1912.zones
复制修改以下内容:
21 zone "localhost" IN {
22 type master;
23 file "localhost.zone";
24 allow-update { none; };
25 };
修改如下:
27 zone "zimbra.org" IN {
28 type master;
29 file "zimbra.org.zone";
30 allow-update { none; };
31 };
:wq
2、进入named目录
[root@mail etc]# cd ../var/named/
[root@mail named]# pwd
/var/named/chroot/var/named
3、创建zone文件
[root@mail named]# cp -p localhost.zone zimbra.org.zone
[root@mail named]# cp zimbra.org.zone zimbra.org.zonebak
[root@mail named]# vim zimbra.org.zone
$TTL 86400
@ IN SOA mx.zimbra.org. root (
42 ; serial (d. adams)
3H ; refresh
15M ; retry
1W ; expiry
1D ) ; minimum
@ IN NS mx.zimbra.org.
@ IN A 10.10.10.254
mx IN A 10.10.10.254
mail IN A 10.10.10.254
@ IN MX 10 mail
:wq
4、测试DNS
[root@mail named]# nslookup
> set type=mx
> zimbra.org
Server: 202.96.128.166
Address: 202.96.128.166#53
Non-authoritative answer:
zimbra.org mail exchanger = 10 net109.nonsolocomputer.net.
Authoritative answers can be found from:
zimbra.org nameserver = ns2.dominiofaidate.com.
zimbra.org nameserver = ns1.dominiofaidate.com.
5、启动named
[root@mail named]# service named restart
[root@Zimail named]# chkconfig named on
五、关闭sendmail,并不随机启动或者卸载
[root@mail named]# service sendmail stop
[root@mail named]# chkconfig sendmail off
六、安装zimbra
下载:http://files.zimbra.com/downloads/7.1.3_GA/zcs-7.1.3_GA_3346.RHEL5_64.20110928134520.tgz
[root@mail ~]# tar -zxvf zcs-7.1.3_GA_3346.RHEL5_64.20110928134520.tgz -C /usr/local/src/
[root@mail ~]# cd /usr/local/src/
[root@mail src]# cd zcs-7.1.3_GA_3346.RHEL5_64.20110928134520/
[root@mail zcs-7.1.3_GA_3346.RHEL5_64.20110928134520]# ./install.sh --platform-override
Operations logged to /tmp/install.log.29062
Checking for existing installation...
zimbra-ldap...NOT FOUND
。。。。。。。。(略)
zimbra-core...NOT FOUND
PLEASE READ THIS AGREEMENT CAREFULLY BEFORE USING THE SOFTWARE.
ZIMBRA, INC. ("ZIMBRA") WILL ONLY LICENSE THIS SOFTWARE TO YOU IF YOU
FIRST ACCEPT THE TERMS OF THIS AGREEMENT. BY DOWNLOADING OR INSTALLING
THE SOFTWARE, OR USING THE PRODUCT, YOU ARE CONSENTING TO BE BOUND BY
THIS AGREEMENT. IF YOU DO NOT AGREE TO ALL OF THE TERMS OF THIS
AGREEMENT, THEN DO NOT DOWNLOAD, INSTALL OR USE THE PRODUCT.
License Terms for the Zimbra Collaboration Suite:
http://www.zimbra.com/license/zimbra_public_eula_2.1.html
Do you agree with the terms of the software license agreement? [N] y
Checking for prerequisites...
FOUND: NPTL
。。。。。。。。(略)
Found zimbra-proxy
Select the packages to install
Install zimbra-ldap [Y] y
Install zimbra-logger [Y] y
Install zimbra-mta [Y] y
Install zimbra-snmp [Y] y
Install zimbra-store [Y] y
Install zimbra-apache [Y] y
Install zimbra-spell [Y] y
Install zimbra-memcached [N] y
Install zimbra-proxy [N] n
Checking required space for zimbra-core
checking space for zimbra-store
Installing:
zimbra-core
。。。。。。。。(略)
zimbra-spell
zimbra-memcached
You appear to be installing packages on a platform different
than the platform for which they were built.
This platform is CentOS5_64
Packages found: RHEL5_64
This may or may not work.
Using packages for a platform in which they were not designed for
may result in an installation that is NOT usable. Your support
options may be limited if you choose to continue.
Install anyway? [N] y
The system will be modified. Continue? [N] y
Removing /opt/zimbra
Removing zimbra crontab entry...done.
done.
。。。。。。。。(略).
Finished removing Zimbra Collaboration Suite.
Installing packages
zimbra-core......zimbra-core-7.1.3_GA_3346.RHEL5_64-20110928134520.x86_64.rpm...done
。。。。。。。。(略)
Operations logged to /tmp/zmsetup.01022013-145607.log
Installing LDAP configuration database...done.
Setting defaults...
DNS ERROR resolving MX for mail.zimbra.org
It is suggested that the domain name have an MX record configured in DNS
Change domain name? [Yes] y
Create domain: [mail.zimbra.org] zimbra.org #设置域名
MX: mail.zimbra.org (10.10.10.254)
Interface: 10.10.10.254
Interface: 127.0.0.1
done.
Checking for port conflicts
Main menu
1) Common Configuration:
2) zimbra-ldap: Enabled
3) zimbra-store: Enabled
+Create Admin User: yes
+Admin user to create: [email protected]
******* +Admin Password UNSET
+Anti-virus quarantine user: [email protected]
+Enable automated spam training: yes
+Spam training user: [email protected]
+Non-spam(Ham) training user: [email protected]
+SMTP host: mail.zimbra.org
+Web server HTTP port: 80
+Web server HTTPS port: 443
+Web server mode: http
+IMAP server port: 143
+IMAP server SSL port: 993
+POP server port: 110
+POP server SSL port: 995
+Use spell check server: yes
+Spell server URL: http://mail.zimbra.org:7780/aspell.php
+Configure for use with mail proxy: FALSE
+Configure for use with web proxy: FALSE
+Enable version update checks: TRUE
+Enable version update notifications: TRUE
+Version update notification email: [email protected]
+Version update source email: [email protected]
4) zimbra-mta: Enabled
5) zimbra-snmp: Enabled
6) zimbra-logger: Enabled
7) zimbra-spell: Enabled
8) Default Class of Service Configuration:
r) Start servers after configuration yes
s) Save config to file
x) Expand menu
q) Quit
Address unconfigured (**) items (? - help) 3 #设置网页管理端admin的登录密码
Store configuration
1) Status: Enabled
2) Create Admin User: yes
3) Admin user to create: [email protected]
** 4) Admin Password UNSET
5) Anti-virus quarantine user: [email protected]
6) Enable automated spam training: yes
7) Spam training user: [email protected]
8) Non-spam(Ham) training user: [email protected]
9) SMTP host: mail.zimbra.org
10) Web server HTTP port: 80
11) Web server HTTPS port: 443
12) Web server mode: http
13) IMAP server port: 143
14) IMAP server SSL port: 993
15) POP server port: 110
16) POP server SSL port: 995
17) Use spell check server: yes
18) Spell server URL: http://mail.zimbra.org:7780/aspell.php
19) Configure for use with mail proxy: FALSE
20) Configure for use with web proxy: FALSE
21) Enable version update checks: TRUE
22) Enable version update notifications: TRUE
23) Version update notification email: [email protected]
24) Version update source email: [email protected]
Select, or 'r' for previous menu [r] 4 #设置后台管理密码
Password for [email protected] (min 6 characters): [9XL2caGG] 123456 #密码为:123456
Store configuration
1) Status: Enabled
2) Create Admin User: yes
3) Admin user to create: [email protected]
4) Admin Password set
5) Anti-virus quarantine user: [email protected]
6) Enable automated spam training: yes
7) Spam training user: [email protected]
8) Non-spam(Ham) training user: [email protected]
9) SMTP host: mail.zimbra.org
10) Web server HTTP port: 80
11) Web server HTTPS port: 443
12) Web server mode: http
13) IMAP server port: 143
14) IMAP server SSL port: 993
15) POP server port: 110
16) POP server SSL port: 995
17) Use spell check server: yes
18) Spell server URL: http://mail.zimbra.org:7780/aspell.php
19) Configure for use with mail proxy: FALSE
20) Configure for use with web proxy: FALSE
21) Enable version update checks: TRUE
22) Enable version update notifications: TRUE
23) Version update notification email: [email protected]
24) Version update source email: [email protected]
Select, or 'r' for previous menu [r] r #返回上一层页面
Main menu
1) Common Configuration:
2) zimbra-ldap: Enabled
3) zimbra-store: Enabled
4) zimbra-mta: Enabled
5) zimbra-snmp: Enabled
6) zimbra-logger: Enabled
7) zimbra-spell: Enabled
8) Default Class of Service Configuration:
r) Start servers after configuration yes
s) Save config to file
x) Expand menu
q) Quit
*** CONFIGURATION COMPLETE - press 'a' to apply
Select from menu, or press 'a' to apply config (? - help) a #输入”a”应用配置
Save configuration data to a file? [Yes] y
Save config in file: [/opt/zimbra/config.4354] y
Saving config in y...done.
The system will be modified - continue? [No] y
Operations logged to /tmp/zmsetup.01022013-145607.log
Setting local config values...done.
。。。。。。。。(略)
Checking for default IM conference room...not present.
Initializing default IM conference room...done.
Setting up syslog.conf...done.
You have the option of notifying Zimbra of your installation.
This helps us to track the uptake of the Zimbra Collaboration Suite.
The only information that will be transmitted is:
The VERSION of zcs installed (7.1.3_GA_3346_CentOS5_64)
The ADMIN EMAIL ADDRESS created ([email protected])
Notify Zimbra of your installation? [Yes] no
Notification skipped
Starting servers...done.
Installing common zimlets...
com_zimbra_attachcontacts...done.
。。。。。。。。(略)
Setting up zimbra crontab...done.
Moving /tmp/zmsetup.01022013-145607.log to /opt/zimbra/log
Configuration complete - press return to exit
安装完成,按任意键退出。
七、验证
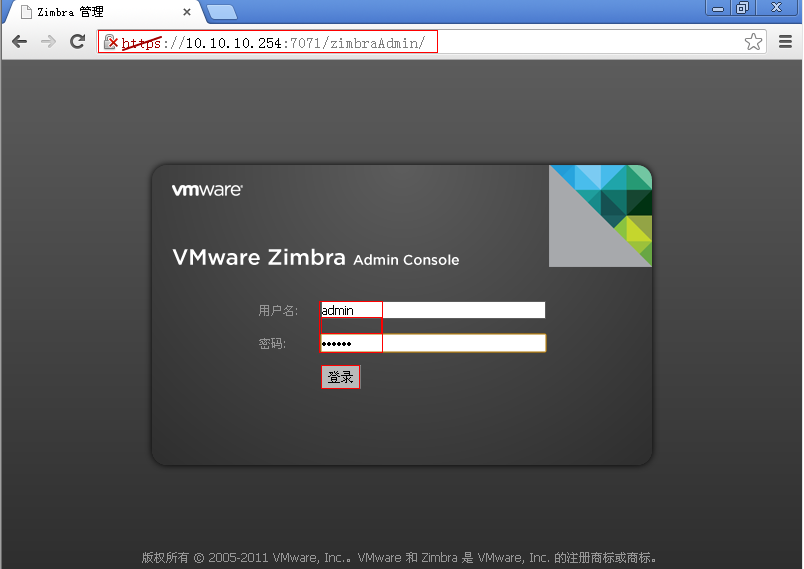
1、登录后台管理
https://mail.zimbra.org:7071 邮件后台管理 (帐户:admin,密码:123456(安装时的设置))
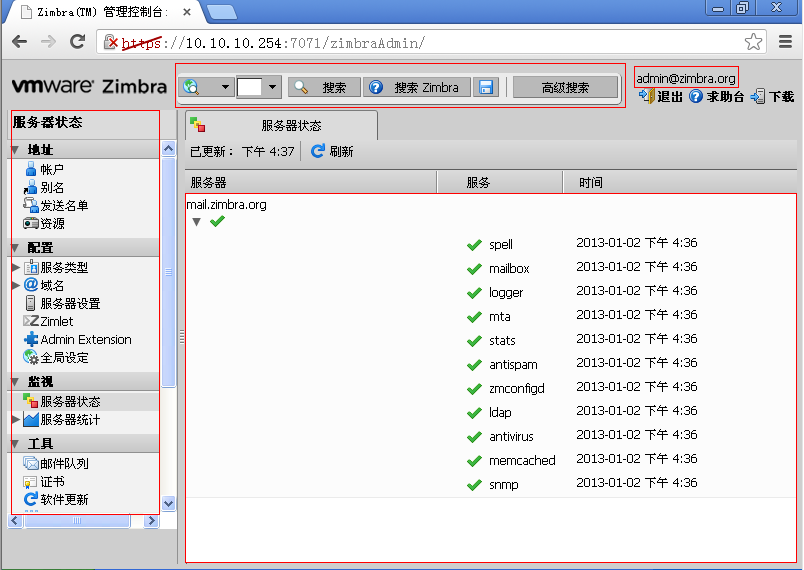
服务正常启动:
2、创建用户
地址-----新建:帐户
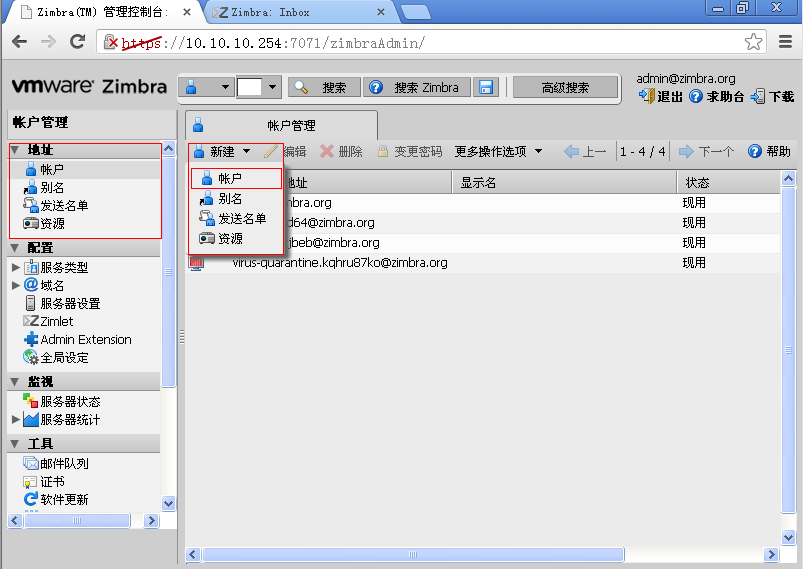
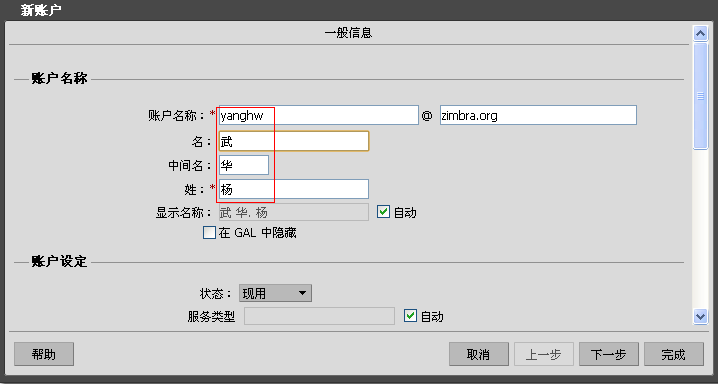
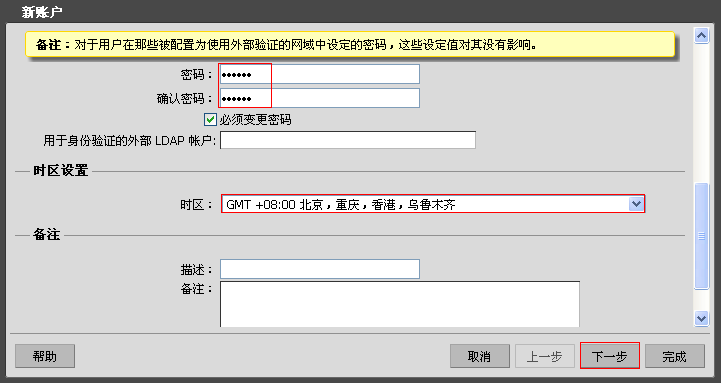
下一步(略)
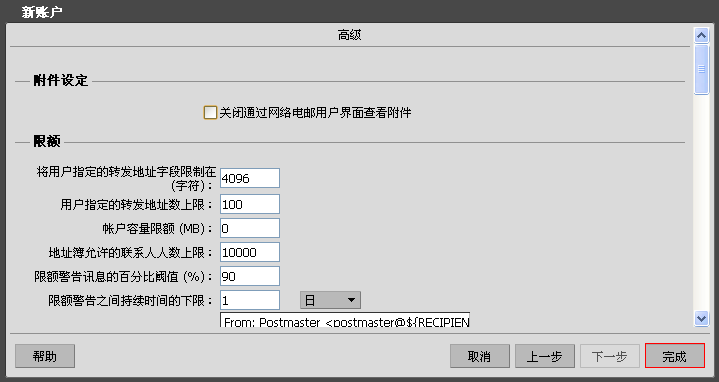


完成。
3、登录客户端
http://mail.zimbra.org
在上面的管理界面我建立了一个名字为yanghw的邮箱账号,用这个账号登录邮箱客户端:

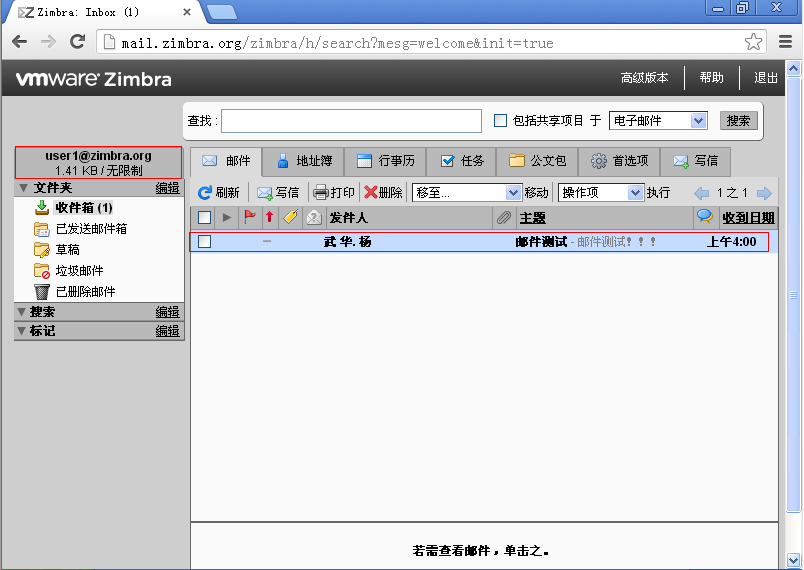
之前yanghw的账号给user1发了一份邮件:
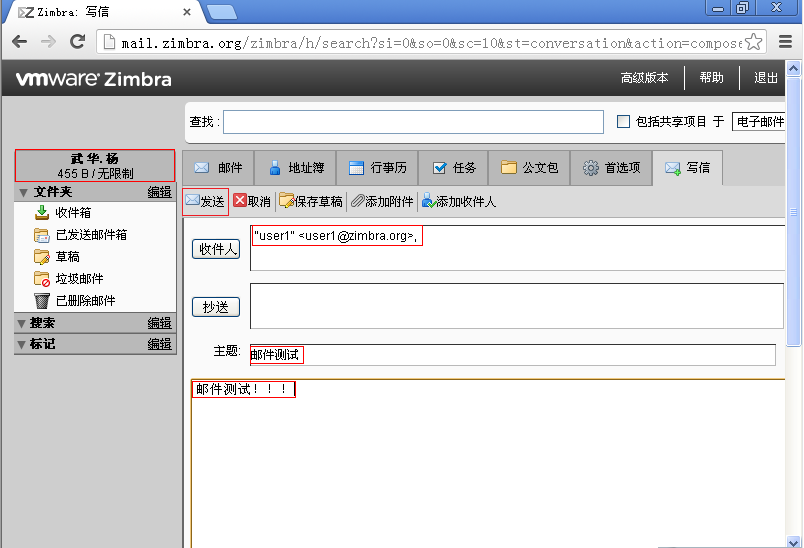
User1收到来自yanghw的邮件:表明收发邮件成功!
zimbra邮件系统搭建完成!!!