Spring Security 学习之X.509认证
一、基本概念
X.509认证:国际证书格式标准,比较常用的一种认证方式,如日常使用的网银和支付宝等都在使用。
SSL:是一种安全协议,目的是为网络通信提供安全及数据完整性保障,SSL在传输层中对网络通信进行加密。
二、X.509证书制作
可以使用JDK自带的keytool工具制作证书,命令参考一下说明,参数值可以修改。
服务器证书生成:
keytool -genkey -keyalg RSA -dname "cn=localhost,OU=java, O=spring, L=landon, ST=YY, C=CN" -alias server1 -keypass stevex -keystore d:\server1.jks -storepass stevex -validity 3650
注:cn=localhost,这里localhost不能随便写,否则客户端认证时会出错。
客户端证书生成(双向认证才需要):
keytool -genkey -keyalg RSA -dname "CN=stevex, OU=gookle, O=goo, L=landon, ST=RR, C=CN" -alias client1 -storetype PKCS12 -keypass stevex -keystore d:\client1.p12 -storepass stevex -validity 3650
添加信任证书(双向认证才需要):
##1.导出客户端证书为cer文件
keytool -export -alias client1 -file d:\client1.cer -keystore  d:\client1.p12 -storepass stevex -storetype PKCS12 -rfc
##2.将导出的文件导入服务器证书
keytool -import -v -alias client1 -file d:\client1.cer -keystore  d:\server1.jks -storepass stevex
客户端导入证书(双向认证才需要):
双击client1.p12然后根据提示操作可以将证书导入到IE;对于Firefox, 可以通过Options-->Advanced-->Certificate-->View Certificate-->Import 导入证书。
三、单向SSL认证
1. Spring 配置:
<?xml version="1.0" encoding="UTF-8"?>
<beans xmlns="http://www.springframework.org/schema/beans"
    xmlns:xsi="http://www.w3.org/2001/XMLSchema-instance" xmlns:security="http://www.springframework.org/schema/security"
    xsi:schemaLocation="http://www.springframework.org/schema/beans http://www.springframework.org/schema/beans/spring-beans-4.0.xsd
        http://www.springframework.org/schema/security http://www.springframework.org/schema/security/spring-security-3.2.xsd">
    <security:http auto-config='true' use-expressions="true">
        <security:intercept-url pattern="/admin" access="hasRole('ROLE_ADMIN')"  requires-channel="https"/>
        <security:intercept-url pattern="/list" access="hasRole('ROLE_USER')" requires-channel="https" />
        <security:intercept-url pattern="/**" requires-channel="https" />
    </security:http>
    <security:authentication-manager>
        <security:authentication-provider>
            <security:user-service id="userService">
                <security:user authorities="ROLE_USER" name="stevex"
                    password="stevex" />
                <security:user authorities="ROLE_USER, ROLE_ADMIN"
                    name="admin" password="admin" />
            </security:user-service>
        </security:authentication-provider>
    </security:authentication-manager>
</beans>
注:每个intercept-url element的requires-channel="https"都需要设置
2. Tomcat配置(server.xml):
在server.xml中增加一个Connector配置
<Connector port="8443"
    protocol="HTTP/1.1"
    SSLEnabled="true" scheme="https" secure="true" clientAuth="false"
    sslProtocol="TLS" keystoreType="JKS" keystoreFile="D:/server.jks" keystorePass="stevex" />
注:原来的HTTP 8080端口的Connector不能注释掉,否则无法启动服务器。这个Connector是新增而不是修改HTTP的,即同时配置两个Connector.
四、双向SSL认证
1. Spring配置:
<?xml version="1.0" encoding="UTF-8"?>
<beans xmlns="http://www.springframework.org/schema/beans"
    xmlns:xsi="http://www.w3.org/2001/XMLSchema-instance"
    xmlns:security="http://www.springframework.org/schema/security"
    xsi:schemaLocation="http://www.springframework.org/schema/beans http://www.springframework.org/schema/beans/spring-beans-4.0.xsd
        http://www.springframework.org/schema/security http://www.springframework.org/schema/security/spring-security-3.2.xsd">
    <security:http auto-config='true' use-expressions="true">
        <security:intercept-url pattern="/admin" access="hasRole('ROLE_ADMIN')"  requires-channel="https"/>
        <security:intercept-url pattern="/list" access="hasRole('ROLE_USER')" requires-channel="https" />
        <security:intercept-url pattern="/**" requires-channel="https" />
        <security:x509/>
    </security:http>
    <security:authentication-manager>
        <security:authentication-provider>
            <security:user-service id="userService">
                <security:user authorities="ROLE_USER" name="stevex"
                    password="" />
                <security:user authorities="ROLE_USER, ROLE_ADMIN"
                    name="admin" password="" />
            </security:user-service>
        </security:authentication-provider>
    </security:authentication-manager>
</beans>
注: 增加<x509/>,密码也不需要了,Spring支持x509已经做得很到位了。
2. Tomcat配置:
在server.xml文件中增加一个Connector配置
<Connector port="8443"
    protocol="HTTP/1.1"
    SSLEnabled="true" scheme="https" secure="true" clientAuth="true"
    sslProtocol="TLS" keystoreType="JKS" keystoreFile="D:/server1.jks" keystorePass="stevex"
    truststoreFile="D:/server1.jks" truststorePass="stevex"/>
注:增加truststoreFile和truststorePass两个属性,同时clientAuth属性的值更改为true。
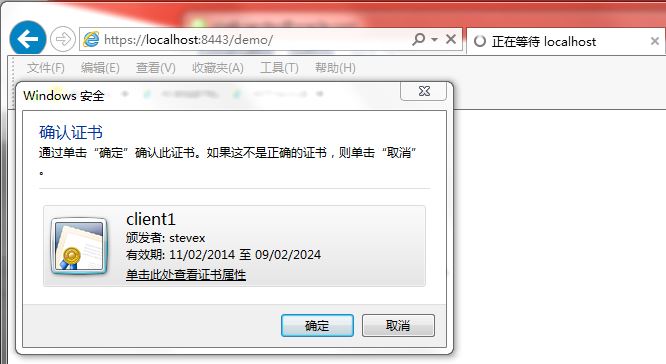
3. 运行结果:
