使用Corosync+Pacemaker+nfs 实现高可用的Web集群
博客大纲:
一、实验环境说明
二、配置前的准备工作
三、安装corosync和pacemaker,并提供配置
四、启动并检查corosync
五、crmsh 的安装及使用简介
六、使用crmsh配置集群资源
七、测试资源
八、关于资源约束的介绍以及使用资源约束定义资源
一、环境说明
1.操作系统
CentOS 6.4 X86 32 位系统
2.软件环境
Corosync 1.4.1
Pacemaker 1.1.8
crmsh 1.2.6
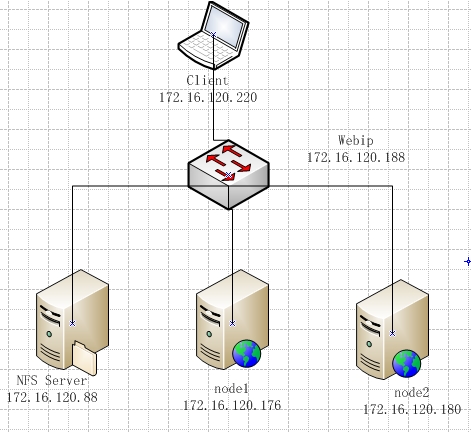
3.拓扑准备

node1 172.16.120.176
node2 172.16.120.180
NFS server:
二、配置前的准备工作
1.配置各节点主机名可以相互解析
2.配置各节点时间同步
3.配置各节点ssh可以基于公私钥通信
4.关闭防火墙和selinux
#以上配置比较简单,不再这里做详细演示
三、安装corosync和pacemaker,并提供配置
1.安装
node1:
[root@node1 ~]#yum install -y corosync*
[root@node1 ~]#yum install -y pacemaker*
node2:
[root@node2 ~]#yum install -y corosync*
[root@node2 ~]#yum install -y pacemaker*
2.提供配置文件
[root@node1~]# cd /etc/corosync/
[root@node1corosync]# ls
amf.conf.examplecorosync.conf.example.udpu uidgid.d
corosync.conf.exampleservice.d
#可以看出,corosync 提供了一个配置文件的样例,我们只需拷贝一份作为配置文件即可:
[root@node1corosync]# cp corosync.conf.example corosync.conf
3.定义配置
配置文件详解:
compatibility: whitetank#是否兼容whitetank(0.8之前的corosync)
totem {#定义集群节点之间心跳层信息传递
version: 2
secauth: on #是否启用安全认证功能,应启动)
threads: 0 #启动几个线程用于心跳信息传递
interface { #定义心跳信息传递接口
ringnumber: 0 #循环次数为几次 0表示不允许循环
bindnetaddr:172.16.120.1# 绑定的网络地址不是主机地址写网卡所在的网络的地址
mcastaddr:226.94.1.1 #多播地址
mcastport: 5405
ttl: 1 #
}
}
logging {#定义日志信息
fileline: off
to_stderr: no #日志信息发往错误输出即发到屏幕
to_logfile: yes
to_syslog: yes #是否记录在/var/log/message 改为no
logfile: /var/log/cluster/corosync.log
debug: off
timestamp: on #当前时间的时间戳关闭可以减少系统调用,节约系统资源
logger_subsys {
subsys: AMF
debug: off
}
}
amf {
mode: disabled
}
service {#定义服务
ver: 0
name: pacemaker #启用pacemaker
}
aisexec { # 定义进程执行时的身份以及所属组
user: root
group: root
}
# 用 man corosync.conf 可以查看所有选项的意思。
4..生成秘钥文件
由于之前定义的secauth: on,所以应提供秘钥文件
[root@node1 corosync]# corosync-keygen
Corosync Cluster Engine Authentication key generator.
Gathering 1024 bits for key from /dev/random.
Press keys on your keyboard to generate entropy.
Press keys on your keyboard to generate entropy (bits = 192).
#注:corosync生成key文件会默认调用/dev/random随机数设备,一旦系统中断的IRQS的随机数不够用,将会产生大量的等待时间,因此,为了节约时间,我们在生成key之前讲random替换成urandom,以便节约时间。
[root@node1corosync]mv /dev/{random,random.bak}
[root@node1corosync]ln -s /dev/urandom /dev/random
5. 为node2提供相同的配置,即将key文件authkey与配置文件corosync.conf复制到node2上
[root@node1corosync]# scp authkey corosync.conf root@node2:/etc/corosync/
authkey 100% 1280.1KB/s 00:00
corosync.conf100% 541 0.5KB/s 00:00
#到此为止corosync 安装配置完毕,
四、启动并检查corosync
1.启动服务
[root@node1 ~]#service corosync start
StartingCorosync Cluster Engine (corosync): [ OK ]
2.查看corosync引擎是否正常启动
[root@node1 ~]#grep -e "Corosync Cluster Engine" -e "configuration file"/var/log/cluster/corosync.log
Feb 26 17:33:28corosync [MAIN ] Corosync Cluster Engine ('1.4.1'): started and ready to provideservice.
Feb 26 17:33:28corosync [MAIN ] Successfully read main configuration file'/etc/corosync/corosync.conf'.
3.查看初始化成员节点通知是否正常发出
[root@node1 ~]#grep TOTEM /var/log/cluster/corosync.log
Feb 26 17:33:28corosync [TOTEM ] Initializing transport (UDP/IP Multicast).
Feb 26 17:33:28corosync [TOTEM ] Initializing transmit/receive security: libtomcryptSOBER128/SHA1HMAC (mode 0).
Feb 26 17:33:28corosync [TOTEM ] The network interface [172.16.120.176] is now up.
Feb 26 17:33:28corosync [TOTEM ] Process pause detected for 616 ms, flushing membershipmessages.
Feb 26 17:33:28corosync [TOTEM ] A processor joined or left the membership and a new membershipwas formed.
Feb 26 17:33:46corosync [TOTEM ] A processor joined or left the membership and a newmembership was formed.
4.检查启动过程中是否有错误产生
[root@node1 ~]#grep ERROR: /var/log/cluster/corosync.log
Feb 26 17:33:28corosync [pcmk ] ERROR: process_ais_conf: You have configured a cluster using thePacemaker plugin for Corosync. The plugin is not supported in this environment and willbe removed very soon.
Feb 26 17:33:28corosync [pcmk ] ERROR: process_ais_conf: Please see Chapter 8 of 'Clustersfrom Scratch' (http://www.clusterlabs.org/doc) for details on using Pacemakerwith CMAN
#上面的错误信息表示packmaker不久之后将不再作为corosync的插件运行,因此,建议使用cman作为集群基础架构服务;此处可安全忽略。
5.查看pacemaker是否正常启动
[root@node1~]# grep pcmk_startup /var/log/cluster/corosync.log
Feb 2617:33:28 corosync [pcmk ] info: pcmk_startup: CRM: Initialized
Feb 2617:33:28 corosync [pcmk ] Logging: Initialized pcmk_startup
Feb 2617:33:28 corosync [pcmk ] info: pcmk_startup: Maximum core file size is:4294967295
Feb 2617:33:28 corosync [pcmk ] info: pcmk_startup: Service: 9
Feb 2617:33:28 corosync [pcmk ] info: pcmk_startup: Local hostname: node1.drbd.com
6.如果上面命令执行均没有问题,接着可以执行如下命令启动node2上的corosync
[root@node1 ~]#ssh node2 "service corosync start"
StartingCorosync Cluster Engine (corosync): [ OK ]
7.查看状态
[root@node1~]# crm_mon
Last updated:Wed Feb 26 17:41:58 2014
Last change:Wed Feb 26 17:33:51 2014 via crmd on node1.drbd.com
Stack: classicopenais (with plugin)
CurrentDC: node1.drbd.com- partition with quorum
Version:1.1.10-14.el6_5.2-368c726
2 Nodesconfigured, 2 expected votes
0 Resourcesconfigured
Online: [node1.drbd.com node2.drbd.com ]
#执行以下命令可以看出服务正常启动,此时node1是DC,但是0Resources configured此时,我们开始定义资源信息
五、crmsh 的安装及使用简介
1.Pacemaker 配置资源方法
(1).命令配置方式
crmsh
pcs
(2).图形配置方式
pygui
hawk
LCMC
pcs
# 注:本文主要的讲解的是crmsh
2.安装crmsh
RHEL自6.4起不再提供集群的命令行配置工具crmsh,转而使用pcs;如果你习惯了使用crm命令,可下载相关的程序包自行安装即可。crmsh依赖于pssh,因此需要一并下载。
crmsh官方网站https://savannah.nongnu.org/forum/forum.php?forum_id=7672
[root@node1 vincent]# ll
total 988
-rwxr--r--. 1vincent vincent 500364 Feb 25 10:06 crmsh-1.2.6-6.1.i686.rpm
-rwxr--r--. 1vincent vincent 14124 Feb 25 10:06 crmsh-debuginfo-1.2.6-6.1.i686.rpm
33.el6.i686.rpm
-rwxr--r--. 1vincent vincent 51128 Feb 25 10:07 pssh-2.3.1-3.2.i686.rpm
-rwxr--r--. 1vincent vincent 3892 Feb 25 10:07 pssh-debuginfo-2.3.1-3.2.i686.rpm
# yum -y--nogpgcheck localinstall crmsh*.rpm pssh*.rpm
[root@node1vincent]# yum localinstall -y crmsh* pssh*
#实验用到的crmsh以及pssh安装包的版本,到此为止,crmsh安装完毕,接下来,我们使用crm配置集群资源,
3. crm 使用简介
[root@node1 ~]# crm#按enter键,进入交互界面
crm(live)# ?
This is crm shell, a Pacemaker command line interface.
Available commands: #在此界面下可以用到的指令
cib manage shadow CIBs
resource resources management
configureCRM clusterconfiguration
node nodes management
options user preferences
history CRM cluster history
site Geo-cluster support
raresource agents information center
statusshowcluster status
help,? show help (help topics for list of topics)
end,cd,up go back one level
quit,bye,exit exit the program
crm(live)# status #输入status 可以查看当前信息
Last updated: Wed Feb 26 17:58:42 2014
Last change: Wed Feb 26 17:33:51 2014 via crmd on node1.drbd.com
Stack: classic openais (with plugin)
Current DC: node1.drbd.com - partition with quorum
Version: 1.1.10-14.el6_5.2-368c726
2 Nodes configured, 2 expected votes
0 Resources configured
Online: [ node1.drbd.com node2.drbd.com ]
crm(live)# configure#进入配置模式
crm(live)configure#help #查看帮助
This level enables all CIB object definition commands.
The configuration may be logically divided into four parts:
nodes, resources, constraints, and (cluster) properties and
attributes. Each of these commands support one or more basic CIB
objects.
Nodes and attributes describing nodes are managed using the
`node` command.
Commands for resources are:
- `primitive`
- `monitor`
- `group`
crm(live)configure# help primitive#查看primitive的使用
Usage:
...............
primitive<rsc>{[<class>:[<provider>:]]<type>|@<template>}
[paramsattr_list]
[meta attr_list]
[utilization attr_list]
[operations id_spec]
[op op_type[<attribute>=<value>...] ...]
attr_list :: [$id=<id>]<attr>=<val> [<attr>=<val>...] | $id
-ref=<id>
id_spec :: $id=<id> | $id-ref=<id>
op_type :: start | stop | monitor
...............
Example:
...............
primitive apcfence stonith:apcsmart \
params ttydev=/dev/ttyS0hostlist="node1 node2" \
op start timeout=60s \
op monitor interval=30m timeout=60s
primitive www8 apache \
params configfile=/etc/apache/www8.conf\
operations $id-ref=apache_ops
primitive db0 mysql \
params config=/etc/mysql/db0.conf \
op monitor interval=60s \
op monitor interval=300sOCF_CHECK_LEVEL=10
crm(live)# ra
crm(live)ra# ? #查看ra下可用的指令
This level contains commands which show various information about
the installed resource agents. It is available both at the top
level and at the `configure` level.
Available commands:
classes list classes and providers
list list RA for a class (and provider)
meta,info show meta data for a RA
providers show providers for a RA and a class
help,? show help (help topics for list of topics)
end,cd,up go back one level
quit,bye,exit exit the program
crm(live)ra# classes#资源代理类型
lsb
ocf/ heartbeat linbit pacemaker redhat
service
stonith
crm(live)ra# list ocf
ASEHAagent.sh AoEtarget AudibleAlarm
CTDB ClusterMon Delay
Dummy EvmsSCC Evmsd
FilesystemHealthCPUHealthSMART
ICPIPaddr IPaddr2
IPsrcaddr IPv6addr LVM
LinuxSCSI MailTo ManageRAID
ManageVE Pure-FTPd Raid1
Route SAPDatabase SAPInstance
SendArp ServeRAID SphinxSearchDaemon
Squid Stateful SysInfo
SystemHealth VIPArip VirtualDomain
WAS WAS6 WinPopup
Xen Xinetd anything
apache apache.sh checkquorum
clusterfs.sh conntrackd controld
db2 drbd eDir88
ethmonitor exportfs fence_scsi_check.pl
fio fs.sh iSCSILogicalUnit
iSCSITarget ids ip.sh
iscsi jboss lvm.sh
lvm_by_lv.sh lvm_by_vg.sh lxc
mysqlmysql-proxy mysql.sh
named.sh netfs.sh nfsclient.sh
nfsexport.sh nfsserver nfsserver.sh
nginxocf-shellfuncs openldap.sh
oracle oracledb.sh orainstance.sh
oralistener.sh oralsnr pgsql
ping pingd portblock
postfix postgres-8.sh proftpd
remote rsyncd samba.sh
script.sh scsi2reservation service.sh
sfex svclib_nfslock symlink
syslog-ng tomcat tomcat-6.sh
vm.sh vmware
crm(live)ra# list ocf heartbeat #查看某种类别下的所用资源代理的列表
crm(live)ra# info ocf:heartbeat:Filesystem #查看某个资源代理的配置方法
[root@node1 ~]# crm configure show#查看当前配置信息
node node1.drbd.com
node node2.drbd.com
property $id="cib-bootstrap-options" \
dc-version="1.1.10-14.el6_5.2-368c726" \
cluster-infrastructure="classic openais (with plugin)" \
expected-quorum-votes="2"
[root@node1 ~]# crm configure showxml #以xml格式查看当前集群配置
<?xmlversion="1.0" ?>
<cibnum_updates="6" dc-uuid="node1.drbd.com"update-origin="node1.drbd.com" crm_feature_set="3.0.7"validate-with="pacemaker-1.2" update-client="crmd"epoch="5" admin_epoch="0" cib-last-written="Wed Feb 2617:33:51 2014" have-quorum="1">
<configuration>
<crm_config>
<cluster_property_set id="cib-bootstrap-options">
<nvpair id="cib-bootstrap-options-dc-version"name="dc-version" value="1.1.10-14.el6_5.2-368c726"/>
<nvpairid="cib-bootstrap-options-cluster-infrastructure"name="cluster-infrastructure" value="classic openais (withplugin)"/>
<nvpairid="cib-bootstrap-options-expected-quorum-votes"name="expected-quorum-votes" value="2"/>
</cluster_property_set>
</crm_config>
<nodes>
<node id="node2.drbd.com"uname="node2.drbd.com"/>
<node id="node1.drbd.com" uname="node1.drbd.com"/>
</nodes>
<resources/>
<constraints/>
</configuration>
</cib>
六、使用crmsh配置集群资源
1. 定义web的ip,我们把此资源命名为Webip
crm(live)# configureprimitive Webip ocf:heartbeat:IPaddr params ip=172.16.120.188
error: unpack_resources: Resource start-up disabled since no STONITH resourceshave been defined
error: unpack_resources: Either configure some or disable STONITH withthe stonith-enabled option
error: unpack_resources: NOTE: Clusters with shared data need STONITH toensure data integrity
Errors foundduring check: config not valid
Do you stillwant to commit?
#配置资源时,会出现报错,主要是因为STONITH resources没有定义,这里没有STONITH设备,所以我们先关闭这个属性
定义全局属性:
crm(live)configure# property stonith-enabled=false
crm(live)configure# primitive Webip ocf:heartbeat:IPaddr paramsip=172.16.120.188
crm(live)configure# show
node node1.drbd.com
node node2.drbd.com
primitive Webip ocf:heartbeat:IPaddr \
params ip="172.16.120.188"
property $id="cib-bootstrap-options" \
dc-version="1.1.10-14.el6_5.2-368c726" \
cluster-infrastructure="classic openais (with plugin)" \
expected-quorum-votes="2" \
stonith-enabled="false" #再次查看配置文件,可以看出stonith属性已经关闭
crm(live)configure# verify #验证配置文件
crm(live)configure# commit #提交
2. 定义apache服务资源,命名为Webserver
crm(live)configure# primitive Webserver lsb:httpd
crm(live)configure# show
node node1.drbd.com
node node2.drbd.com
primitive Webip ocf:heartbeat:IPaddr \
params ip="172.16.120.188"
primitive Webserver lsb:httpd
property $id="cib-bootstrap-options" \
dc-version="1.1.10-14.el6_5.2-368c726" \
cluster-infrastructure="classic openais (with plugin)" \
expected-quorum-votes="2" \
stonith-enabled="false"
crm(live)configure# verify
crm(live)configure# commit
3.查看此时资源状态
crm(live)# status
Last updated: Thu Feb 27 09:45:42 2014
Last change: Thu Feb 27 09:44:25 2014 via cibadmin on node1.drbd.com
Stack: classic openais (with plugin)
Current DC: node1.drbd.com - partition with quorum
Version: 1.1.10-14.el6_5.2-368c726
2 Nodes configured, 2 expected votes
2 Resources configured
Online: [ node1.drbd.com node2.drbd.com ]
Webip (ocf::heartbeat:IPaddr): Started node1.drbd.com
Webserver (lsb:httpd): Started node2.drbd.com
# 通过输出的信息可以得知,Webip和Websever两个资源被自动运行于两个节点上,由于webserver和webip必须结合使用才有意义,所以必须要把两个资源绑定在一起。
绑定资源的方法有两种,一种是定义组资源,将Webip与Webserver加入同一个组中,另一种方法是定义资源约束,以实现将资源运行在同一节点上。此时,采用定义组的方法,实现资源绑定
4.定义组资源
crm(live)# configure group #查看用法帮助
usage: group <name> <rsc> [<rsc>...]
[params <param>=<value>[<param>=<value>...]]
[meta <attribute>=<value>[<attribute>=<value>...]]
crm(live)#configure group Webservice Webip Webserver
crm(live)#configure verify
crm(live)#configure show
nodenode1.drbd.com
nodenode2.drbd.com
primitiveWebip ocf:heartbeat:IPaddr \
paramsip="172.16.120.188"
primitiveWebserver lsb:httpd
groupWebservice Webip Webserver #表名组资源已定义成功
property$id="cib-bootstrap-options" \
dc-version="1.1.10-14.el6_5.2-368c726"\
cluster-infrastructure="classicopenais (with plugin)" \
expected-quorum-votes="2"\
stonith-enabled="false"
crm(live)#
crm(live)#status #此时查看集群资源的状况,发现Webip和Webserver 已经运行在同一个节点上
Last updated:Thu Feb 27 10:01:17 2014
Last change:Thu Feb 27 09:58:51 2014 via cibadmin on node1.drbd.com
Stack: classicopenais (with plugin)
Current DC:node1.drbd.com - partition with quorum
Version:1.1.10-14.el6_5.2-368c726
2 Nodesconfigured, 2 expected votes
2 Resourcesconfigured
Online: [node1.drbd.com node2.drbd.com ]
ResourceGroup: Webservice
Webip (ocf::heartbeat:IPaddr): Started node1.drbd.com
Webserver (lsb:httpd): Started node1.drbd.com
crm(live)#
七、测试资源
1.在node1和node2上安装apache服务,并提供测试页面
[root@node1~]# echo "<h1>node2.drbd.com<h1>" >/var/www/html/index.html
[root@node1~]# service httpd start
[root@node1~]# curl node1.drbd.com
<h1>node1.drbd.com<h1>
[root@node1 ~]# service httpd stop
[root@node1~]# chkconfig httpd off
[root@node2~]# echo "<h1>node2.drbd.com<h1>" >/var/www/html/index.html
[root@node2~]# service httpd start
[root@node2~]# curl node1.drbd.com
<h1>node2.drbd.com<h1>
[root@node2 ~]# service httpd stop
[root@node2~]# chkconfig httpd off
#在node1和node2测试apache服务没问题之后,关闭服务,并保证服务开机不启动
2.测试
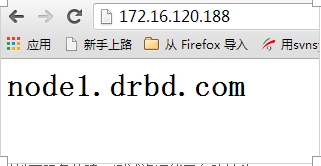
在浏览输入Webip:

3.模拟下服务故障,测试资源能否自动转移
[root@node1 ~]# service corosync stop
crm(live)#status
Last updated:Thu Feb 27 10:34:09 2014
Last change:Thu Feb 27 10:33:27 2014 via crm_attribute on node1.drbd.com
Stack: classicopenais (with plugin)
Current DC:node2.drbd.com - partition WITHOUT quorum
Version:1.1.10-14.el6_5.2-368c726
2 Nodesconfigured, 2 expected votes
2 Resourcesconfigured
Online: [ node2.drbd.com]
OFFLINE: [node1.drbd.com ]
#发现node1虽然在线,但是资源并没有转移,这是为什么呢?
通过查看输出信息,node1.drbd.com - partition WITHOUTquorum,可以得知,此时的集群状态为"WITHOUT quorum,即不符合法定的quorum,所有集群服务本身已经不符合正常运行的条件,这对于只有两节点的集群来讲是不合理的。因此,我们可以定义全局属性来忽略quorum不能满足的集群状态检查。
4.定义全局属性来忽略quorum不能满足的集群状态检查
crm(live)# configure property no-quorum-policy=ignore
crm(live)# configure show #查看配置
node node1.drbd.com \
attributes standby="off"
node node2.drbd.com \
attributes standby="off"
primitive Webip ocf:heartbeat:IPaddr \
params ip="172.16.120.188"
primitive Webserver lsb:httpd
group Webservice Webip Webserver
property $id="cib-bootstrap-options" \
dc-version="1.1.10-14.el6_5.2-368c726" \
cluster-infrastructure="classic openais (with plugin)" \
expected-quorum-votes="2" \
stonith-enabled="false" \
no-quorum-policy="ignore"
crm(live)# verify
ERROR: syntax: verify
crm(live)# configure verify
5.再次测试
启动刚才停止的node1的服务,再次查看状态。
crm(live)#status
Last updated:Thu Feb 27 10:48:24 2014
Last change:Thu Feb 27 10:48:08 2014 via crm_attribute on node1.drbd.com
Stack: classicopenais (with plugin)
Current DC:node1.drbd.com - partition with quorum
Version:1.1.10-14.el6_5.2-368c726
2 Nodes configured, 2 expected votes
2 Resourcesconfigured
Online: [node1.drbd.com node2.drbd.com ]
ResourceGroup: Webservice
Webip (ocf::heartbeat:IPaddr): Started node2.drbd.com
Webserver (lsb:httpd): Started node2.drbd.com
crm(live)#
#查看状态可知,node1和node2正常运行,且资源运行在node2上。
[root@node1~]# ssh node2 "service corosync stop" #停止node2上的corosync
SignalingCorosync Cluster Engine (corosync) to terminate: [ OK ]
Waiting forcorosync services to unload:..[ OK ]
[root@node1~]# crm status #再次查看状态验证
Last updated:Thu Feb 27 10:51:10 2014
Last change:Thu Feb 27 10:48:08 2014 via crm_attribute on node1.drbd.com
Stack: classicopenais (with plugin)
Current DC:node1.drbd.com - partition WITHOUT quorum
Version:1.1.10-14.el6_5.2-368c726
2 Nodesconfigured, 2 expected votes
2 Resourcesconfigured
Online: [node1.drbd.com ]
OFFLINE: [node2.drbd.com ]
ResourceGroup: Webservice
Webip (ocf::heartbeat:IPaddr): Startednode1.drbd.com
Webserver (lsb:httpd): Started node1.drbd.com
#发现此时资源已经自动转移到node1上
八、关于资源约束的介绍
1.资源约束简介
资源约束则用以指定在哪些群集节点上运行资源,以何种顺序装载资源,以及特定资源依赖于哪些其它资源。pacemaker共给我们提供了三种资源约束方法:
1)Resource Location(资源位置):定义资源更倾向于在哪些节点上运行;
2)Resource Collocation(资源排列):排列约束用以定义集群资源可以或不可以在某个节点上同时运行;
3)Resource Order(资源顺序):顺序约束定义集群资源在节点上启动的顺序;
定义约束时,还需要指定分数。各种分数是集群工作方式的重要组成部分。其实,从迁移资源到决定在已降级集群中停止哪些资源的整个过程是通过以某种方式修改分数来实现的。分数按每个资源来计算,资源分数为负的任何节点都无法运行该资源。在计算出资源分数后,集群选择分数最高的节点。INFINITY(无穷大)目前定义为 1,000,000。加减无穷大遵循以下3个基本规则:
1)任何值 + 无穷大 = 无穷大
2)任何值 - 无穷大 = -无穷大
3)无穷大 - 无穷大 = -无穷大
定义资源约束时,也可以指定每个约束的分数。分数表示指派给此资源约束的值。分数较高的约束先应用,分数较低的约束后应用。通过使用不同的分数为既定资源创建更多位置约束,可以指定资源要故障转移至的目标节点的顺序。
前面我们提过,绑定资源的方法有两种,一种是定义组资源,将各个资源加入同一个组中,另一种方法是定义资源约束,以实现将资源运行在同一节点上。
此时,采用定义资源约束的方法,实现资源绑定。各位博友,为了加深印象,这次我们使用资源约束来实现资源的绑定。
2.使用资源约束来实现资源的绑定。
crm(live)resource# stop Webservice #停止原来的资源
crm(live)configure# delete Webservice #删除原来定义的组
crm(live)# status #查看状态,发现组Webip已经被删除,而Webip和Webserver被分配到不同的节点上
Last updated: Thu Feb 27 11:26:59 2014
Last change: Thu Feb 27 11:26:53 2014 via cibadmin on node1.drbd.com
Stack: classic openais (with plugin)
Current DC: node1.drbd.com - partition with quorum
Version: 1.1.10-14.el6_5.2-368c726
2 Nodes configured, 2 expected votes
2 Resources configured
Online: [ node1.drbd.com node2.drbd.com ]
Webip (ocf::heartbeat:IPaddr): Started node1.drbd.com
Webserver (lsb:httpd): Started node2.drbd.com
3.增加共享存储
此时,为实现共享存储,添加了一台NFSserver, NFS共享 172.16.120.88:/web
并在/web目录下建了一个index.html 其内容为 from nfs server
4.查看Filesystem 的参数
crm(live)ra# info ocf:heartbeat:Filesystem
Parameters (* denotes required, [] the default):
device* (string): block device
The name of block device for the filesystem, or -U, -Loptions f
or mount, or NFS mount specification.
directory* (string): mount point
The mount point for the filesystem.
fstype* (string): filesystem type
The type offilesystem to be mounted.
5.添加nfs服务至集群。
crm(live)configure# primitive Webstore ocf:heartbeat:Filesystem paramsdevice="172.16.120.88:/web" directory="/var/www/html"fstype="nfs"
crm(live)configure# show
node node1.drbd.com \
attributes standby="off"
node node2.drbd.com \
attributes standby="off"
primitive Webip ocf:heartbeat:IPaddr \
params ip="172.16.120.188"
primitive Webserver lsb:httpd
primitiveWebstore ocf:heartbeat:Filesystem \
params device="172.16.120.88:/web"directory="/var/www/html" fstype="nfs"
property $id="cib-bootstrap-options" \
dc-version="1.1.10-14.el6_5.2-368c726" \
cluster-infrastructure="classic openais (with plugin)"\
expected-quorum-votes="2" \
stonith-enabled="false" \
no-quorum-policy="ignore"
crm(live)configure# verify
WARNING: Webstore: default timeout 20s for start is smaller than theadvised 60
WARNING: Webstore: default timeout 20s for stop is smaller than theadvised 60
crm(live)configure# commit
6.定义资源约束:
crm(live)configure# colocation Webserver_with_Webstore INFINITY: Webserver Webstore
crm(live)configure# colocation Webip_with_Webserver INFINITY: WebipWebserver
crm(live)configure# verify
WARNING: Webstore: default timeout 20s for start is smaller than theadvised 60
WARNING: Webstore: default timeout 20s for stop is smaller than the advised60
crm(live)configure# commit
crm(live)# status
Last updated: Thu Feb 27 12:39:14 2014
Last change: Thu Feb 27 12:38:09 2014 via cibadmin on node1.drbd.com
Stack: classic openais (with plugin)
Current DC: node1.drbd.com - partition with quorum
Version: 1.1.10-14.el6_5.2-368c726
2 Nodes configured, 2 expected votes
3 Resources configured
Online: [ node1.drbd.com node2.drbd.com ]
Webip (ocf::heartbeat:IPaddr): Started node2.drbd.com
Webserver (lsb:httpd): Started node2.drbd.com
Webstore (ocf::heartbeat:Filesystem): Started node2.drbd.com
# 查看资源状况,可以看出Webip,Webserver,Webstore 运行在同一节点
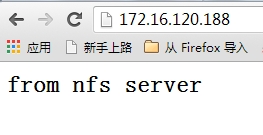
7.测试
测试显示,网页的内容来自NFS server

8.故障模拟
在node2上模拟故障,手动执行standby,可以看出三个资源被自动转移至node1,实验成功
crm(live)node# standby
crm(live)node# cd
crm(live)# status
Last updated: Thu Feb 27 12:42:46 2014
Last change: Thu Feb 27 12:42:40 2014 via crm_attribute on node2.drbd.com
Stack: classic openais (with plugin)
Current DC: node1.drbd.com - partition with quorum
Version: 1.1.10-14.el6_5.2-368c726
2 Nodes configured, 2 expected votes
3 Resources configured
Node node2.drbd.com: standby
Online: [ node1.drbd.com ]
Webip (ocf::heartbeat:IPaddr): Started node1.drbd.com
Webserver (lsb:httpd): Started node1.drbd.com
Webstore (ocf::heartbeat:Filesystem): Started node1.drbd.com