lamp+discuz搭建
构建LAMP网站服务平台
http.conf中的全局配置
ServerRoot:用于设置httpd服务的根目录,该目录中包括运行Web站点必须的目录和文件。默认根目录为:/usr/local/apache2
Listen:用于设置Apache服务器监听的网络端口号,默认为80
User:用于设置运行httpd进程的用户身份。
Group:用于设置运行httpd的进程的组身份
ServerAdmin:用于设置Apache2服务器管理员的E-mail地址,可通过此E-mail地址及时联系Apache服务器的管理员。
ServerName:用于设置Apache服务器的完整主机名
DocumentRoot:用于设置网业文档的在系统中的实际路径。
DirectoryIndex:用于设置网站的默认索引页(首页)
ErrorLog:用于设置错误日志文件的路径和文件名,默认设置为:/logs/error_log
LogLevel:用于设置记录日志的级别,默认为Warm(警告)
CustmoLog:用于设置Apache服务器的访问日志文件的路径和格式类型。
PidFile:用于保存httpd服务器的程序进程号(PID)的文件,默认设置为/logs/httpd.pid
Timeout:用于设置Web服务器与浏览器之间网络连接的超时秒数,默认为300秒
KeepAlive:用于设置是否使用保持连接功能,设置为ON时,将提高服务器响传输文件的效率
MaxKeepAliveRequests:用于设置客户端每次连接允许请求响应的最大文件个数,默认为100个
KeepAliveTimeout:用于设置保持连接的超时秒数,默认是15秒
Include:用于包含另一个配置文件的内容,可以将实现一些特殊功能的配置单独放到一个文件里,再使用Include配置项包含到httpd.conf主配置文件中来,便于独立维护
编译安装apache
1、关闭防火墙
[root@s2 ~]# service iptables stop
2、查看IP
[root@s2 ~]# ifconfig eth0
eth0 Link encap:Ethernet HWaddr 00:0C:29:C5:EC:AC
inet addr:192.168.10.10 Bcast:192.168.10.255 Mask:255.255.255.0
3、查看主机名
[root@s2 ~]# hostname
s2.benet.com
4、编译安装apache
[root@s2 httpd-2.2.9]# ./configure --prefix=/usr/local/apache2 --enable-so --enable-rewrite && make && make install
5、修改主配置文件httpd.conf (/usr/local/apache2/conf/httpd.conf)
在配置文件中添加“ServerName”配置行,设置服务器的域名,设置服务器的侦听端口和IP
ServerName www.benet.com:80
Listen 192.168.10.10:80
6、启动apache服务 (/usr/local/apache2/bin/apachectl start)
[root@s2 httpd-2.2.9]# /usr/local/apache2/bin/apachectl start
7、访问测试

构建虚拟Web主机
1、关闭防火墙
[root@s2 ~]# service iptables stop
2、查看IP
[root@s2 ~]# ifconfig eth0
eth0 Link encap:Ethernet HWaddr 00:0C:29:C5:EC:AC
inet addr:192.168.10.10 Bcast:192.168.10.255 Mask:255.255.255.0
3、查看主机名
[root@s2 ~]# hostname
s2.benet.com
4、编译安装apache
[root@s2 httpd-2.2.9]# ./configure --prefix=/usr/local/apache2 --enable-so --enable-rewrite && make && make install
5、修改httpd.conf文件,添加虚拟主机配置
[root@s2 conf]# cat extra/httpd-vhosts.conf >> httpd.conf
NameVirtualHost 192.168.10.10:80
<VirtualHost 192.168.10.10:80>
DocumentRoot "/usr/local/apache2/htdocs/benetcom"
ServerName www.benet.com
ErrorLog "logs/dummy-host.example.com-error_log"
CustomLog "logs/dummy-host.example.com-access_log" common
</VirtualHost>
<VirtualHost 192.168.10.10:80>
DocumentRoot "/usr/local/apache2/htdocs/accpcom"
ServerName www.accp.com
ErrorLog "logs/dummy-host2.example.com-error_log"
CustomLog "logs/dummy-host2.example.com-access_log" common
</VirtualHost>
6、分别准备两个虚拟站点的网页文件
[root@s2 htdocs]# mkdir benetcom accpcom
[root@s2 htdocs]# echo "www.benet.com" > benetcom/index.html
[root@s2 htdocs]# echo "www.accp.com" > accpcom/index.html
7、修改hosts文件
# Do not remove the following line, or various programs
# that require network functionality will fail.
127.0.0.1 localhost.localdomain localhost
::1 localhost6.localdomain6 localhost6
192.168.10.10 www.benet.com
192.168.10.10 www.accp.com
8、重启apache服务
[root@s2 htdocs]# /usr/local/apache2/bin/apachectl restart
9、用www.benet.com和www.accp.com测试


建立系统用户的个人主页
1、修改httpd文件,启用个人主页功能
UserDir public_html
<Directory "/home/*/public_html">
AllowOverride none
Options none
Order allow,deny
Allow from all
</Directory>
2、建立个人主页测试页
[root@s2 htdocs]# useradd chen
[root@s2 htdocs]# su - chen
[chen@s2 ~]$ mkdir public_html
[chen@s2 ~]$ echo "chen's Home Page" >>public_html/index.html
3、给个人主页添加权限
[root@s2 htdocs]# chmod 777 -R /home/chen/
4、 httpd服务
[root@s2 htdocs]# /usr/local/apache2/bin/apachectl restart
5、测试

使用awstats分析日志
1、关闭防火墙
[root@s2 ~]# service iptables stop
2、查看IP
[root@s2 ~]# ifconfig eth0
eth0 Link encap:Ethernet HWaddr 00:0C:29:C5:EC:AC
inet addr:192.168.10.10 Bcast:192.168.10.255 Mask:255.255.255.0
3、查看主机名
[root@s2 ~]# hostname
s2.benet.com
4、编译安装apache
[root@s2 httpd-2.2.9]# ./configure --prefix=/usr/local/apache2 --enable-so --enable-rewrite && make && make install
5、修改httpd.conf文件,添加虚拟主机配置
[root@s2 conf]# cat extra/httpd-vhosts.conf >> httpd.conf
NameVirtualHost 192.168.10.10:80
<VirtualHost 192.168.10.10:80>
DocumentRoot "/usr/local/apache2/htdocs/benetcom"
ServerName www.benet.com
ErrorLog "logs/dummy-host.example.com-error_log"
CustomLog "logs/dummy-host.example.com-access_log" common
</VirtualHost>
6、解压并释放awstats软件包,执行目录中的awstats_confirure.pl脚步进行安装
[root@s2 ~]# tar -zxvf awstats-6.9.tar.gz
[root@s2 ~]# mv awstats-6.9 /usr/local/awstats
[root@s2 tools]# cd /usr/local/awstats/tools/
[root@s2 tools]# ./awstats_configure.pl
将httpd服务的日志记录格式为“combined”
-----> Check and complete web server config file '/usr/local/apache2/conf/httpd.conf'
Warning: You Apache config file contains directives to write 'common' log files
This means that some features can't work (os, browsers and keywords detection).
Do you want me to setup Apache to write 'combined' log files [y/N] ?y
创建新的配置文件
-----> Need to create a new config file ?
Do you want me to build a new AWStats config/profile
file (required if first install) [y/N] ? y
定义日志的网站名称
-----> Define config file name to create
What is the name of your web site or profile analysis ?
Example: www.mysite.com
Example: demo
Your web site, virtual server or profile name:
www.benet.com
定义awstats配置文件的存放目录(默认为“/etc/awstats”)
7、修改awstats.www.benet.conf的配置文件
[root@s2 tools]# vi /etc/awstats/awstats.www.benet.com.conf
LogFile="/usr/log/apache2/logs/access_log"
8、创建数据库的存放目录,并更新数据库
[root@s2 tools]# mkdir /var/lib/awstats
[root@s2 tools]# perl /usr/local/awstats/wwwroot/cgi-bin/awstats.pl -update -config=www.benet.com
Create/Update database for config "/etc/awstats/awstats.www.benet.com.conf" by AWStats version 6.9 (build 1.925)
From data in log file "/usr/local/apache2/logs/access_log"...
Phase 1 : First bypass old records, searching new record...
Searching new records from beginning of log file...
Jumped lines in file: 0
Parsed lines in file: 0
Found 0 dropped records,
Found 0 corrupted records,
Found 0 old records,
Found 0 new qualified records.
9、访问测试

httpd服务的控制
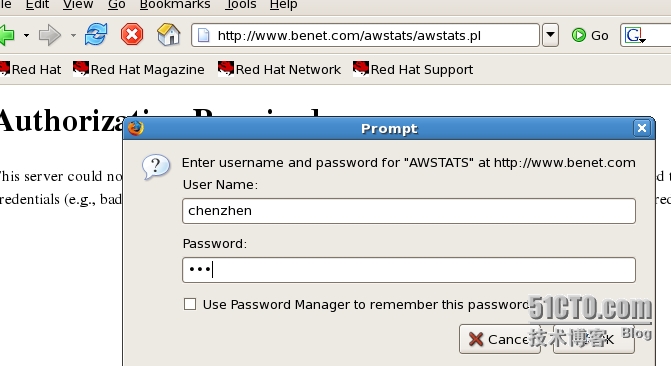
1、编辑httpd.conf配置文件,查找关于awstats的目录区域设置,添加认证授权设置
<Directory />
Options FollowSymLinks
AllowOverride None
Order deny,allow
Deny from all
AuthName "AWSTATS"
AuthType Basic
AuthUserFile /usr/local/awstats/wwwroot/.htpasswd
require valid-user
</Directory>
AuthName:定义受保护的领域名称,将在弹出的认证登陆对话框中显示
AuthType:设置认证的类型,Basic为基本认证
AuthUserFile:设置用于保存用户账号、密码的认证文件路径
require valid-user :授权给认证文件中的所有有效用户。
2、创建存储认证用户及账号口令的文件
[root@s2 ~]# cd /usr/local/apache2/bin/
[root@s2 bin]# ./htpasswd -c /usr/local/awstats/wwwroot/.htpasswd chen
New password:
Re-type new password:
Adding password for user chen
 3、重启httpd服务
[root@s2 ~]# /usr/local/apache2/bin/apachectl restart

1、检测是否安装及卸载:
rpm �Cqa |grep mysql
rpm �Cqa |grep http
rpm �Ce mysql-server --nodeps //强制删除文件,忽略依赖关系文件
2、安装MySql
创建运行Mysql数据库的系统用户、组
[root@s2 ~]# useradd -M -s /sbin/nologin mysql
3、编译安装MySql
[root@s2 mysql-5.0.56]# ./configure --prefix=/usr/local/mysql && make && make install
4、建立配置文件
[root@s2 mysql-5.0.56]# cp -p support-files/my-medium.cnf /etc/my.cnf
5、初始化数据库 并修改相关目录的所有权,边与mysql用户可读写数据库
[root@s2 mysql-5.0.56]# /usr/local/mysql/bin/mysql_install_db --user=mysql
[root@s2 mysql-5.0.56]# chown -R root.mysql /usr/local/mysql/
[root@s2 mysql-5.0.56]# chown -R mysql /usr/local/mysql/var/
6、调整lib库路径
[root@s2 mysql-5.0.56]# echo "/usr/local/mysql/lib/mysql" >> /etc/ld.so.conf
[root@s2 mysql-5.0.56]# ldconfig
7、使用MysQl脚步安全启动服务
[root@s2 mysql-5.0.56]# /usr/local/mysql/bin/mysqld_safe --user=mysql &
[1] 18792
[root@s2 mysql-5.0.56]# netstat -ntpl | grep 3306
tcp 0 0 0.0.0.0:3306 0.0.0.0:* LISTEN 18818/mysqld
8、设置MySQL程序的执行路径
[root@s2 mysql-5.0.56]# export PATH=$PATH:/usr/local/mysql/bin/
[root@s2 mysql-5.0.56]# echo "PATH=$PATH:/usr/local/mysql/bin/" >> /etc/profile
将mysql添加为系统服务
[root@s2 mysql-5.0.56]# cp support-files/mysql.server /etc/init.d/mysqld
[root@s2 mysql-5.0.56]# chmod +x /etc/init.d/mysqld
9、安装PHP软件包
[root@s2 php-5.2.6]# pwd
/usr/src/php-5.2.6
[root@s2 php-5.2.6]# ./configure --prefix=/usr/local/php5 --enable-mbstring --with-apxs2=/usr/local/apache/bin/apxs --with-mysql=/usr/local/mysql --with-config-file-path=/usr/local/php5&& make && make install
--prefix:设置php程序的安装路径
--enable-mbstring:设置php支持多字节字符串
--with-apxs2:设置apache服务器提供的apxs模块支持程序的文件路径位置
--with-configure-file-path:设置php程序的配置文件所在位置
10、复制php.ini配置文件
[root@s2 php-5.2.6]# cp -p php.ini-dist /usr/local/php5/php.ini
11、设置httpd.conf文件
确认添加支持php环境的相关配置行
LoadModule php5_module modules/libphp5.so
AddType application/x-httpd-php .php
调整httpd.conf文件中的首页位置
<IfModule dir_module>
DirectoryIndex index.php index.html
</IfModule>
12、测试php运行环境
编译php网页测试文件
[root@s2 htdocs]# vi index.php
<?php
phpinfo();
?>

13、删除测试文件
[root@s2 htdocs]# rm -rf index.php
14、创建测试php与数据库协同工作的测试文件
[root@s2 htdocs]# vi index.php
<?php
$link=mysql_connect('localhost','test','');
if(!$link) echo "Fail !!";
else echo "Success !!";
mysql_close;
?>

15、架设Discuz!论坛
建立bbs论坛的数据库
[root@pc ~]# /usr/local/mysql/bin/mysql -u root �Cp //登录到数据库
mysql> show databases; //查看数据库
+--------------------+
| Database |
+--------------------+
| information_schema |
| mysql |
| test |
+--------------------+
3 rows in set (0.00 sec)
mysql> create database bbs; // 新建BBS数据库
mysql> show databases;
+--------------------+
| Database |
+--------------------+
| information_schema |
| bbs |
| mysql |
| test |
+--------------------+
4 rows in set (0.00 sec)
16、解压软件包,上传程序文件
[root@s2 ~]# unzip Discuz_6.1.0_SC_UTF8.zip -d discuz
[root@s2 ~]# mv discuz/upload /usr/local/apache2/htdocs/bbs/
[root@s2 ~]# unzip UCenter_1.0.0_SC_UTF8.zip -d ucenter
[root@s2 ~]# mv ucenter/upload/ /usr/local/apache2/htdocs/ucenter
17、设置相关目录及文件的属主、属组,以便httpd服务能对论坛写入数据
[root@s2 ~]# cd /usr/local/apache2/htdocs/ucenter/
[root@s2 ucenter]# chown -R daemon ./data/
[root@s2 ucenter]# cd ../bbs/
[root@s2 bbs]# chmod -R daemon config.inc.php attachments/ forumdata/uc_client/data/cache
18、安装UCenter用户中心程序
浏览器中访问http://www.benet.com/ucenter/install/index.php
浏览器中访问http://www.benet.com/bbs/install/index.php
安装phpMyAdmin数据库管理套件
1、解压并释放phpMyadmin文件包,改名后转移到Web站点的网友文档目录中
[root@s2 ~]# tar zxvf phpMyAdmin-2.11.9.5-all-languages.tar.gz
[root@s2 ~]# mv phpMyAdmin-2.11.9.5-all-languages phpMyAdmin
[root@s2 ~]# mv phpMyAdmin /usr/local/apache2/htdocs/
2、建立配置文件config.inc.php
[root@s2 ~]# cd /usr/local/apache2/htdocs/phpMyAdmin/
[root@s2 phpMyAdmin]# cp -p config.sample.inc.php config.inc.php
[root@s2 phpMyAdmin]# vi config.inc.php
$cfg['blowfish_secret'] = 'pwd123';
3、访问phpMyAdmin的Web管理页面

