CentOS 6.X KVM 虚拟机安装指南
RHEL / CentOS 6.x KVM Virtualization Installation and Configuration Guide
How do I setup and manage a virtualized environment with Kernel based Virtual Machine (KVM) in CentOS or Red Hat Enterpise Linux version 6 server on IBM server? Can you provide step-by-step commands of how to install and manage Virtual Machines (VMs) on a physical server using KVM for RHEL/CentOS version 6.4?
KVM is part of RHEL and CentOS Linux. You can easily install the same using the following commands. Please note that only the package names have changed in RHEL/CentOS 6.x. If you are using RHEL / CentOS 5.x, read our previous CentOS / Redhat (RHEL) v.5.x KVM Virtulization guide for more information.
Install required KVM RPMs/packages
Type the following yum command# yum groupinstall "Virtualisation Tools" "Virtualization Platform"
# yum install python-virtinst
OR# yum install kvm qemu-kvm python-virtinst libvirt libvirt-python virt-manager libguestfs-tools
Sample outputs:
Loaded plugins: product-id, protectbase, rhnplugin
This system is receiving updates from RHN Classic or RHN Satellite.
0 packages excluded due to repository protections
Setting up Install Process
Package libvirt-0.10.2-18.el6_4.15.x86_64 already installed and latest version
Resolving Dependencies
--> Running transaction check
---> Package libguestfs-tools.x86_64 1:1.16.34-2.el6 will be installed
--> Processing Dependency: libguestfs-tools-c = 1:1.16.34-2.el6 for package: 1:libguestfs-tools-1.16.34-2.el6.x86_64
....
..
..
  spice-glib.x86_64 0:0.14-7.el6_4.3
  spice-gtk.x86_64 0:0.14-7.el6_4.3
  spice-gtk-python.x86_64 0:0.14-7.el6_4.3
  spice-server.x86_64 0:0.12.0-12.el6_4.5
  vgabios.noarch 0:0.6b-3.7.el6
  vte.x86_64 0:0.25.1-8.el6_4
Complete!
Turn on libvirtd service
The libvirtd program is the server side daemon component of the libvirt virtualization management system. Type the following chkconfig command to turn it on:# chkconfig libvirtd on
Start the libvirtd service by typing the following service command:# service libvirtd start
Sample outputs:
Starting libvirtd daemon: [ OK ]
You can verify the libvirtd service by tying the following commands:
# service libvirtd status
libvirtd (pid  31128) is running...
# virsh -c qemu:///system list
 Id    Name                           State
----------------------------------------------------
Sample setup
                     +-------------+
                     | CentOS/RHEL |             |-----|
     -->ISP router---+ Box Host w/ +--- eth0 -->-+ br0 +  Private IP
                     | KVM         |             |     |
                     +-------------+--- eth1 -->-+ br1 | Public IP
                                                 |-----|
                                                    |
                                                vm1-+---vm2----vm3---vm4
*** NOTE: each VMs will have two interface i.e. Private and Public *****
Where,
eth0 - KVM servers' LAN interface.
eth1 - KVM servers' WAN/Internet interface.
br0 - KVM servers' bridge interface to give VM direct access to all the resources on the LAN.
br1 - KVM servers' bridge interface to give VM direct access to all the resources on the WAN/Internet. Users can ssh into VMs or you can host HTTPD/SMTPD using this interface.
obsd-vm1 (vm1) - OpenBSD VM name.
rhel-vm1 (vm2) - RHEL VM name.
Install and configure a network bridge
All VMs will only have network access to host and other VMs on same physical server via private network. You need to crate a network bridge so that the VMs can access your LAN and possible the Internet/WAN from outside. Type the following yum command to install bridge-utils package:# yum install bridge-utils
Setup a default gateway
Edit /etc/sysconfig/network as follows# cat /etc/sysconfig/network
NETWORKING=yes
HOSTNAME=kvm-42.cyberciti.biz
## I am routing internet traffic via br1 ##
GATEWAYDEV=br1
Configure bridging
Update /etc/sysconfig/network-scripts/ifcfg-eth0 (private) as follows:# cat /etc/sysconfig/network-scripts/ifcfg-eth0
DEVICE=eth0
ONBOOT=yes
HWADDR=00:30:48:C6:0A:D8
BRIDGE=br0
Update /etc/sysconfig/network-scripts/ifcfg-eth1 (public) as follows:# cat /etc/sysconfig/network-scripts/ifcfg-eth1
DEVICE=eth1
ONBOOT=yes
HWADDR=00:30:48:C6:0A:D9
BRIDGE=br1
Create/edit the /etc/sysconfig/network-scripts/ifcfg-br0 file to setup private/lan ip address for br0:# cat /etc/sysconfig/network-scripts/ifcfg-br0
DEVICE=br0
TYPE=Bridge
BOOTPROTO=static
ONBOOT=yes
## setup LAN/VLAN ips as per your needs ##
IPADDR=10.10.29.66
NETMASK=255.255.255.192
DELAY=0
Create/edit the /etc/sysconfig/network-scripts/ifcfg-br1 file to setup public/wan/internet ip address for br1:# cat /etc/sysconfig/network-scripts/ifcfg-br1
DEVICE=br1
TYPE=Bridge
BOOTPROTO=static
ONBOOT=yes
## setup INTERNET ips as per your needs ##
IPADDR=74.ww.xx.yy
NETMASK=255.255.255.248
GATEWAY=74.ww.xx.yy
DELAY=0
I need to route all lan traffic (subnet 10.0.0.0/8) via 10.10.29.65 gateway. Create/edit file /etc/sysconfig/network-scripts/route-br0 as follows:# cat /etc/sysconfig/network-scripts/route-br0
10.0.0.0/8 via 10.10.29.65
Warning: Restarting network service over the ssh session may result into total loss of the connectivity to the server. So make sure br0 and br1 configuration including routing set correctly.
A note about SELinux
I have not disabled SELinux on CentOS / RHEL. I do not recommend disabling SELinux. So make sure the config file has correct SELinux permissions:# ls -Z /etc/sysconfig/network-scripts/{route-br0,ifcfg-eth?,ifcfg-br?}
Sample outputs:
-rw-r--r--. root root system_u:object_r:net_conf_t:s0  /etc/sysconfig/network-scripts/ifcfg-br0
-rw-r--r--. root root system_u:object_r:net_conf_t:s0  /etc/sysconfig/network-scripts/ifcfg-br1
-rw-r--r--. root root system_u:object_r:net_conf_t:s0  /etc/sysconfig/network-scripts/ifcfg-eth0
-rw-r--r--. root root system_u:object_r:net_conf_t:s0  /etc/sysconfig/network-scripts/ifcfg-eth1
-rw-r--r--. root root system_u:object_r:net_conf_t:s0  /etc/sysconfig/network-scripts/route-br0
Use restorecon command to set or restore file(s) default SELinux security contexts:# restorecon -Rv /etc/sysconfig/
If you are going to reboot the SELinux enabled server, make sure you type the following command:# touch /.autorelabel
# reboot
Restart the networking service
Type the following command to restart networking on RHEL/CentOS/SL:# service network restart
Verify br0/br1 settings
Type the following commands:# brctl show
# ip addr show br0
# ip addr show br1
# ip route
# ping cyberciti.biz
Creating VMs
You need to use virt-install command.
Example: Create OpenBSD VM
Grab, installation media:# cd /var/lib/libvirt/boot/
# wget http://ftp.openbsd.org/pub/OpenBSD/5.4/amd64/install54.iso
In this example, I am using virt-install to create a OpenBSD 5.4_amd64 VM named obsd-vm1 with one virtual CPU, 1 GB memory and 10 GB of disk space:# virt-install \
-n obsd-vm1 \
--description "cyberciti.biz OpenBSD 5.4 64 bit VM1" \
--ram=1024 \
--vcpus=1 \
--cpu host \
--os-variant=openbsd4 \
--accelerate \
--hvm \
--cdrom /var/lib/libvirt/boot/install54.iso \
--network bridge:br0,model=virtio --network bridge:br1,model=virtio \
--graphics vnc \
--disk path=/var/lib/libvirt/images/openbsd-vm1-cyberciti.biz.img,bus=virtio,size=10
virt-install options
-n obsd-vm1 : The name of the VM.
--description "cyberciti.biz OpenBSD 5.4 64 bit VM1" : The long description of the VM.
--ram=1024 : 1024MB is the amount of memory allocated to the VM.
--vcpus=1 : The number of virtual CPU(s) for the VM.
--cpu host : Optimize CPU properties for the VM.
--os-variant=openbsd4 : This is the VM OS type.
--accelerate : Prefer KVM or KQEMU (in that order) if installing a QEMU guest. This option is no longer required.
--hvm : Request the use of full virtualization.
--cdrom /var/lib/libvirt/boot/install54.iso : Install OpeBSD v5.4 from an iso the location parameter.
--network bridge:br0,model=virtio --network bridge:br1,model=virtio : Create a network bridge using br0 and br1 i.e. the VM will have two network interface for LAN and Internet.
--graphics vnc : Use VNC to access installation using vnc server/viewer from your local Linux/OSX/Unix/Windows desktop.
--disk path=/var/lib/libvirt/images/openbsd-vm1-cyberciti.biz.img,bus=virtio,size=10 : This is is the image file for the VM, the size is specified in GBs and I am forcing vio driver. The virtio driver provides support service for paravirtualized devices using the VirtIO protocol.
How do I connect to OpenBSD installer from my local desktop?
Type the following command on your local desktop:# ssh -L 5900:127.0.0.1:5900 root@KVM-Server-IP-Here
OR# ssh -L 5900:127.0.0.1:5900 -N -f -l root kvm-42.cyberciti.biz
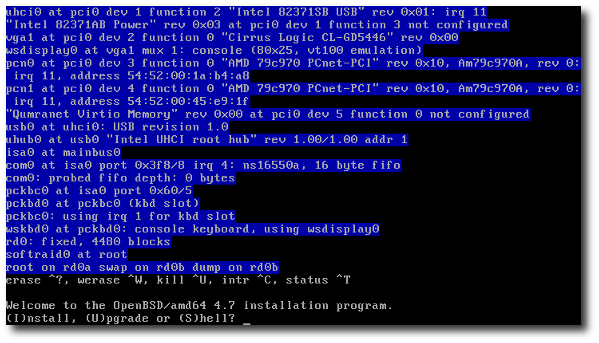
Use VNC client to connect to 127.0.0.1:5900. Now, just follow on-screen instructions:

Fig.01: OpenBSD installation started over the VNC session
Before rebooting the installer make sure you setup com0 console for the VM. For example, for a OpenBSD VM, append the following parameters to the file /etc/boot.conf and then reboot the VM:
stty com0 115200
set tty com0
See how to stup SSH to tunnel VNC traffic though the Internets for more information.
How do I start my VM after OpenBSD install is finished?
The virt-install will create a config file for VM at /etc/libvirt/qemu/obsd-vm1.xml. To start VM called obsd-vm1, enter:# virsh start obsd-vm1
How do I access a VMs console?
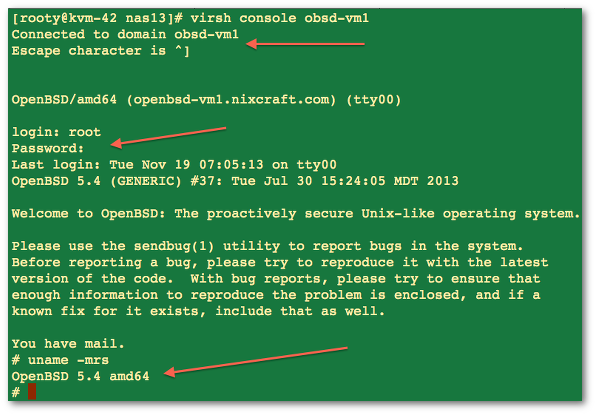
Login to KVM host and type the following command:# virsh console obsd-vm1
Sample outputs:

Fig.02: Getting access to a OpenBSD VM console when networking is down
Final example: Create RHEL VM using DVD
Type the following command:
# virt-install \
--name RHEL-vm1 \
--description "cyberciti.biz RHEL 6.4 64 bit VM1" \
--ram=2048 \
--vcpus=2 \
--disk path=/var/lib/libvirt/images/rhel-vm1-cyberciti.biz.img,size=20 \
--cdrom /var/lib/libvirt/boot/RHEL.6.4.Server-DVD1.iso \
--network bridge:br0 --network bridge:br1 \
--graphics vnc
Before rebooting the installer make sure you setup com0 console for the VM. For example, for a RHEL/CentOS VM, append the following parameters to the kernel boot line in /boot/grub.conf file and then reboot the VM:
console=tty0 console=ttyS1,19200n8
Stay tuned for the following advanced topics in "RHEL/CentOS v6.x KVM" (rss) series:
Firewall, kVM & VMs security configuration.
Attaching storage device to a VM.
Changing VM parameters such as RAM, CPU, Disk and more.
Managing and cloning VMs and more.