zabbix安装
ZABBIX安装配置实验
环境需求信息
官网:www.zabbix.com
实验预装版本 zabbix-2.2.2.tar.gz
Zabbix环境需求LAMP或LNMP
按官方环境要求,源码安装LAMP环境。使用的源码包版本如下:
| 环境 | 官方定义版本 |
实验环境版本 | 使用的包 |
| Apache |
1.3.12 or later |
2.2.27 |
httpd-2.2.27.tar.bz2 |
| Mysql |
5.0.3 or later |
5.5.3 |
mysql-5.5.3-m3.tar.gz |
| Php | 5.3.0 or later |
5.3.28 |
php-5.3.28.tar.bz2 |
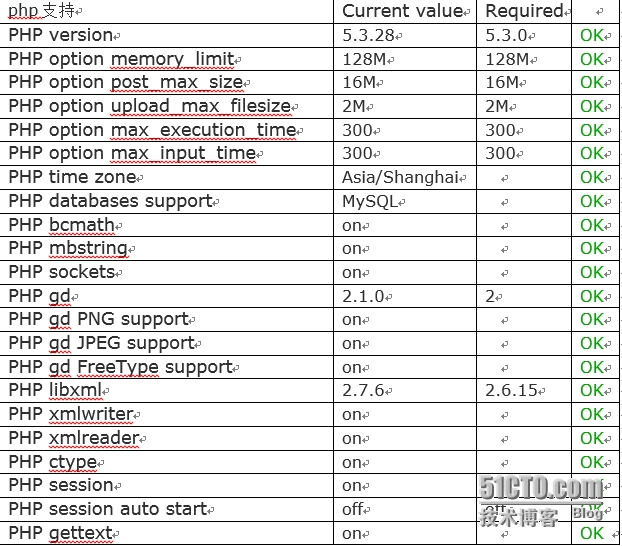
另外,需要php支持......

LAMP环境安装
(一)、创建/install,上传安装包到/install下,编译参数如下
http
./configure --with-mpm=prefork --enable-cache --enable-disk-cache--enable-mem-cache --enable-file-cache --enable-nonportable-atormics--enable-mods-shared=most --enable-so
mysql
./configure --prefix=/usr/local/mysql--enable-assembler --with-extra-charsets=complex --enable-thread-safe-client--with-big-tables --with-readline --with-ssl --with-embedded-server--enable-local-infile --with-plugins=innobase --enable-static--with-client-ldflags=-all-static --with-mysqld-ldflags=-all-static--enable-static --with-client-ldflags=all-static--with-mysqld-ldflags=all-static
php
./configure --prefix=/usr/local/php--with-config-file-path=/usr/local/php/etc --with-mysql=mysqlnd--with-mysqli=mysqlnd --with-apxs2=/usr/local/apache2/bin/apxs--with-iconv-dir=/usr/local/ --with-png-dir --with-jpeg-dir --with-freetype-dir--enable-bcmath --enable-ctype --enable-sockets --enable-mbstring--with-gettext --with-gd --with-curl--enable-xml --disable-rpath --enable-safe-mode --with-curlwrappers--enable-mbregex
make ZEND_EXTRA_LIBS='-liconv'
make install
(二)、安装成功后,配置apache支持php
查看php模块
[root@localhost modules]# ls /usr/local/apache2/modules |greplibphp5.so
libphp5.so
修改conf文件,支持php(增加红色部分)
AddType application/x-compress .Z
AddType application/x-gzip .gz .tgz
<IfModuledir_module>
DirectoryIndex index.html index.php
</IfModule>
(三)、Mysql初始化,创建zabbix用户和库
将mysql的lib文件加载到系统变量中
[root@localhost conf]# cat /etc/ld.so.conf
include ld.so.conf.d/*.conf
/usr/local/mysql/lib/mysql
修改mysql库数据文件路径
mkdir -pv /usr/local/mysql/data
chown mysql.mysql /usr/local/mysql/data
配置文件my.cnf
[mysqld]
port = 3306
socket =/tmp/mysql.sock
datadir = /usr/local/mysql/data
#thread_concurrency= 8 这个要注释掉
初始化
/usr/local/mysql/bin/mysql_install_db --user=mysql
启动创建zabbix用户和库
(四)、Php配置,修改php.ini文件支持zabbix
1、[[email protected]]# cp php.ini-production /usr/local/php/etc/php.ini
2、[root@localhostconf]# vim /usr/local/php/etc/php.ini
date.timezone = Asia/Shanghai
memory_limit = 128M
post_max_size = 16M
max_execution_time = 300
max_input_time = 300
安装zabbixserver
创建zabbix用户
groupadd zabbix
useradd zabbix -g zabbix
连接数据库创建zabbix用户和库
create database zabbix character setutf8;
grant all privileges on zabbix.* tozabbix@localhost identified by 'zabbix';
编译安装zabbix
yum -y installmysql-devel libcurl-devel net-snmp-devel
tar zxfzabbix-2.2.0.tar.gz
cd zabbix-2.2.0
./configure--prefix=/usr/local/zabbix --enable-server --enable-agent --with-mysql--with-net-snmp --with-libcurl
Make
Make install
导入zabbix初始表数据
/usr/local/mysql/bin/mysql-u root zabbix < schema.sql
/usr/local/mysql/bin/mysql-u root zabbix < images.sql
/usr/local/mysql/bin/mysql-u root zabbix < data.sql
修改服务器端配置文件
[root@localhostconf]# vim /usr/local/zabbix/etc/zabbix_server.conf
DBHost=localhost
DBName=zabbix
DBUser=zabbix
DBPassword=zabbix
修改services添加服务端口
[root@localhostconf]# vim /etc/services
zabbix-agent10050/tcp Zabbix Agent
zabbix-agent10050/udp Zabbix Agent
zabbix-trapper10051/tcp Zabbix Trapper
zabbix-trapper10051/udp Zabbix Trapper
启动server
[root@localhostconf]# /usr/local/zabbix/sbin/zabbix_server start
[root@localhostconf]# ps -ef|grep zabbix_server
zabbix 10427 1 0 09:42 ? 00:00:00/usr/local/zabbix/sbin/zabbix_server start
[root@localhostconf]# netstat -natp|grep zabbix_server
tcp 0 0 0.0.0.0:10051 0.0.0.0:* LISTEN 10427/zabbix_server
至此,后台server安装成功。
页面安装
拷贝zabbix自带php页面目录到apache根目录下
cp -Rfrontends/php /usr/local/apache2/htdocs/zabbix
访问http://ip/zabbix,开始页面安装。截图略。。。。。
安装zabbixagent
groupadd zabbix
useradd zabbix -g zabbix
必须要创建zabbix用户,否则启动会报错无法启动。
1、编译安装
[root@localhost zabbix-2.2.2]# ./configure--prefix=/usr/local/zabbix --enable-agent
[[email protected]]# make
[root@localhost zabbix-2.2.2]# make install
2、添加服务端口
[root@localhostconf]# vim /etc/services
zabbix-agent10050/tcp Zabbix Agent
zabbix-agent10050/udp Zabbix Agent
zabbix-trapper10051/tcp Zabbix Trapper
zabbix-trapper10051/udp Zabbix Trapper
3、修改agent配置文件
/usr/local/zabbix/etc/zabbix_agent.conf
/usr/local/zabbix/etc/zabbix_agentd.conf
Server=192.168.20.75
ServerAction=192.168.20.75
启动服务
apache
/usr/local/apache2/bin/apachectl -k start
mysql
/usr/local/mysql/share/mysql/mysql.server start
将上面2个服务能够使用service命令启动。
[[email protected]]# cp /usr/local/apache2/bin/apachectl /etc/init.d/apache
[[email protected]]# cp /usr/local/mysql/share/mysql/mysql.server /etc/init.d/mysql
然后,可以这样
[[email protected]]# service apache stop
[[email protected]]# service mysql stop
Shutting downMySQL..... [ OK ]
Zabbix服务启动停止
Zabbix源码包中自带server和agent的启动脚本
[[email protected]]# cp misc/init.d/fedora/core/zabbix_server /etc/init.d/
[[email protected]]# cp misc/init.d/fedora/core/zabbix_agentd /etc/init.d/
修改启动脚本中根目录:
[[email protected]]# sed -i 's/BASEDIR=\/usr\/local/BASEDIR=\/usr\/local\/zabbix/g'/etc/init.d/zabbix_server
[[email protected]]# sed -i 's/BASEDIR=\/usr\/local/BASEDIR=\/usr\/local\/zabbix/g'/etc/init.d/zabbix_agentd
然后,可以这样。。。。。。
[[email protected]]# service zabbix_server start
Startingzabbix_server: [ OK ]
[[email protected]]# service zabbix_agentd start
Startingzabbix_agentd: [ OK ]
开机自启动
[root@zabbix ~]#chkconfig --add zabbix_server
[root@zabbix ~]#chkconfig --level 5 zabbix_server on
[root@zabbix ~]#chkconfig --list zabbix_server
zabbix_server 0:off 1:off 2:off 3:off 4:off 5:on 6:off
其他服务相同。
此处,apache自启有个问题,需要修改拷贝的apache启动脚本文件。
报错信息:
service apache does not support chkconfig
修改如下:
Vim /etc/init.d/apache
在第二行加入下面的内容:
# chkconfig: 3 91 21
1)第一个数字表示哪些linux启动级别需要启动apache,如果都不想启动,则用横杆(-)代替。此处的3表示网络模式的命令行启动时运行apache;
2)第二个数字表示系统启动时服务的启动顺序,对应着S开头的启动服务脚本。数字越大,启动顺序越靠后;
3)第三个数字表示系统关闭时服务的停止顺序,对应着K开头的停止服务脚本。数字越大,关闭顺序越靠后。
添加自定义item
脚本自己写,例子:http_mode,监控web页返回值。脚本:
#!/bin/bash
code=`curl -o /dev/null -s -w %{http_code} "$1"`
echo $code
修改客户端agent配置文件zabbix_agentd.conf
UnsafeUserParameters=1
UserParameter=http.code[*],/usr/local/zabbix/scripts/http_code$1 (添加)
http.code为key值,[*]代表参数$1
重启agent服务
在zabbix监控前台添加item和trigger,配置完成
问题:
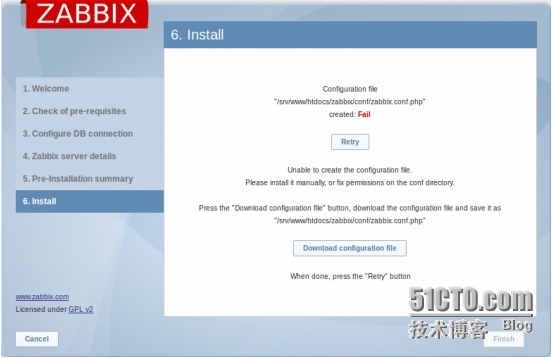
1、安装过程中,无法生成zabbix.conf.php文件。
症结:/var/www/html/zabbix/conf目录没有写权限,需要apache有写权限。
方案:给apache赋权

2、安装完成Admin登陆后,提示zabbix server is no running。图中的值为no
症结:1、检查服务是否正常启动,看进程和端口信息
2、检查防火墙是否关闭或者已经对外开放zabbix的服务端口
3、检查selinux是否关闭
方案:针对症结修改更正,我遇到的是原因是selinux没有关闭造成的。
具体解决:1、查看selinux状态 /usr/sbin/sestatus -v
2、修改文件/etc/selinux/config中SELINUX=enforcing改为SELINUX=disabled
3、临时生效,setenforce 0

3、配置自动发现,使用ping条件Discovery时。一直无法发现设备,查看zabbix_server.log。
症结:报错信息1、1308:20141018:014428.370 /usr/sbin/fping: [2] No such file or directory
报错信息2、1308:20141018:014733.618 fping failed: "/usr/sbin/fping: can't create raw socket (must run as root?) : Operation not permitted"
方案:zabbix Discovery的ping使用fping命令。安装命令,并确保zabbix用户有执行权限。
具体解决:1、下载fping源码包,fping-3.4.tar.gz。编译安装
2、将命令复制或创建软链接到/usr/sbin目录下
3、修改用户组为zabbix,修改权限为710