一次安装tengine的经历
1.Tengine介绍及安装说明
Tengine是由淘宝网发起的Web服务器项目。它在Nginx的基础上,针对大访问量网站的需求,添加了很多高级功能和特性。实验环境说明:
| [root@localhost /]# cat /etc/redhat-release Red Hat Enterprise Linux Server release 5.1 (Tikanga) [root@localhost /]# |
2.安装步骤
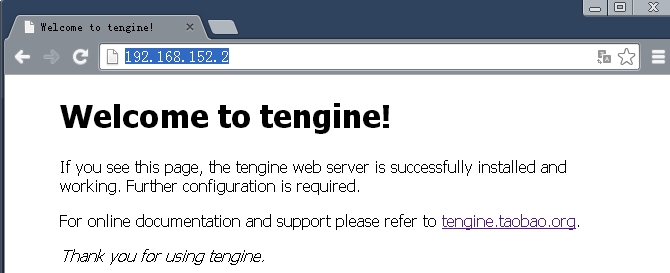
第一步,下载tengine.tar.gz [root@localhost local]# pwd /usr/local [root@localhost local]# ls bin etc games include lib libexec sbin share src tengine.tar.gz [root@localhost local]# 第二步,解压并展开归档 [root@localhost local]# tar -xf tengine.tar.gz [root@localhost local]# ls -l total 1608 drwxr-xr-x 2 root root 4096 Jul 2 05:06 bin drwxr-xr-x 2 root root 4096 Oct 10 2006 etc drwxr-xr-x 2 root root 4096 Oct 10 2006 games drwxr-xr-x 3 root root 4096 Jul 2 05:06 include drwxr-xr-x 3 root root 4096 Jul 2 05:06 lib drwxr-xr-x 2 root root 4096 Oct 10 2006 libexec drwxr-xr-x 2 root root 4096 Oct 10 2006 sbin drwxr-xr-x 6 root root 4096 Jul 2 05:06 share drwxr-xr-x 2 root root 4096 Oct 10 2006 src drwxrwxr-x 10 511 511 4096 Mar 28 00:57 tengine-2.0.2 -rw-r--r-- 1 root root 1552937 Jul 22 05:52 tengine.tar.gz [root@localhost local]# tree -L 1 tengine-2.0.2/ tengine-2.0.2/ |-- AUTHORS.te |-- CHANGES |-- CHANGES.cn |-- CHANGES.ru |-- CHANGES.te |-- LICENSE |-- README |-- README.markdown |-- THANKS.te |-- auto |-- conf |-- configure |-- contrib |-- docs |-- html |-- man 第三步,查看configure脚本帮助信息,执行configure脚本生成makefile文件 [root@localhost tengine-2.0.2]# ./configure --help --help print this message --prefix=PATH set installation prefix --sbin-path=PATH set nginx binary pathname --conf-path=PATH set nginx.conf pathname [root@localhost tengine-2.0.2]# ./configure --prefix=/usr/local/tengine --conf-path=/etc/tengine/tengine.conf 会发现命令执行后,报错: ./configure: error: the HTTP rewrite module requires the PCRE library. You can either disable the module by using --without-http_rewrite_module option, or install the PCRE library into the system, or build the PCRE library statically from the source with nginx by using --with-pcre=<path> option. 其实,上面的错误,原因在于PCRE依赖,我们可以明确指出不需要REWRITE功能特性,从而不需要编译HTTP_REWRITE_MODULE模块,或者直接安装PCRE,解决依赖冲突。 第四步,解决PCRE依赖 采用光盘YUM源的方式。 在/etc/yum.reps.d/目录下,配置客户端连接YUM的信息: [root@localhost yum.repos.d]# cat mytest.repo [my_yumtest1] name=my yum from dvd.iso baseurl=file:///var/Server enabled=1 gpgcheck=0 挂载光盘至/media下,然后复制光盘内容到YUM路径: [root@localhost repodata]# cp -r /media/Server/ /var/ 进入/var/Server目录下,安装createrepo工具: [root@localhost repodata]# rpm -ivh createrepo-0.4.4-2.fc6.noarch.rpm 然后创建YUM仓库: [root@localhost repodata]# createrepo -g /media/Server/repodata/comps-rhel5-server-core.xml /var/Server/ 至此,我们的本地YUM源已经做好了。直接利用yum install pcre-devel即可。 【其实,我们应该确定,我们本机上已经具备基本的编译开发环境,可以 yum groupinstall "Development Libraries" "Development Tools"】 第五步,执行configure [root@localhost tengine-2.0.2]# ./configure --prefix=/usr/local/tengine --conf-path=/etc/tengine/tengine.conf 并没有提示错误。 第六步,执行make 第七步,执行make install [root@localhost local]# cd tengine [root@localhost tengine]# ls -l total 40 drwxr-xr-x 2 root root 4096 Jul 22 06:45 html drwxr-xr-x 2 root root 4096 Jul 22 06:45 include drwxr-xr-x 2 root root 4096 Jul 22 06:45 logs drwxr-xr-x 2 root root 4096 Jul 22 06:45 modules drwxr-xr-x 2 root root 4096 Jul 22 06:45 sbin [root@localhost tengine]# pwd /usr/local/tengine [root@localhost tengine]# 第八步,启动服务 [root@localhost ~]# cd /usr/local [root@localhost local]# ls -l total 80 drwxr-xr-x 2 root root 4096 Jul 2 05:06 bin drwxr-xr-x 2 root root 4096 Oct 10 2006 etc drwxr-xr-x 2 root root 4096 Oct 10 2006 games drwxr-xr-x 3 root root 4096 Jul 2 05:06 include drwxr-xr-x 3 root root 4096 Jul 2 05:06 lib drwxr-xr-x 2 root root 4096 Oct 10 2006 libexec drwxr-xr-x 2 root root 4096 Oct 10 2006 sbin drwxr-xr-x 6 root root 4096 Jul 2 05:06 share drwxr-xr-x 2 root root 4096 Oct 10 2006 src drwxr-xr-x 12 root root 4096 Jul 22 06:47 tengine [root@localhost local]# cd tengine/ [root@localhost tengine]# cd sbin [root@localhost sbin]# ls dso_tool nginx [root@localhost sbin]# ls -l total 4720 -rwxr-xr-x 1 root root 17164 Jul 22 06:45 dso_tool -rwxr-xr-x 1 root root 4792174 Jul 22 06:45 nginx [root@localhost sbin]# 很显然,nginx脚本就是用于启动服务的,为了以后方便而言,可以再/etc/profile文件中修改PATH环境变量。 PATH=$PATH:/usr/local/tengine/sbin export PATH USER LOGNAME MAIL HOSTNAME HISTSIZE INPUTRC 接下来,应该让配置文件生效,可以source /etc/profile或者,我们直接在开一个SSH连接。 [root@localhost ~]# nginx [root@localhost ~]# netstat -tnlp Active Internet connections (only servers) Proto Recv-Q Send-Q Local Address Foreign Address State PID/Program name tcp 0 0 0.0.0.0:111 0.0.0.0:* LISTEN 3769/portmap tcp 0 0 0.0.0.0:80 0.0.0.0:* LISTEN 5523/nginx: master tcp 0 0 0.0.0.0:1009 0.0.0.0:* LISTEN 3795/rpc.statd tcp 0 0 127.0.0.1:631 0.0.0.0:* LISTEN 3041/cupsd tcp 0 0 127.0.0.1:25 0.0.0.0:* LISTEN 4076/sendmail: acce tcp 0 0 :::22 :::* LISTEN 4050/ssh d 可以发现,tengine已经在80端口进行监听了。 第九步,访问浏览器进行验证
如果访问没有结果,可能是由于LINUX防火墙的原因,可以利用下面的命令暂时停止防火墙功能: /etc/init.d/iptables stop 到这里,我们就完成了对Tengine的安装和启动了。 |
