nginx反向代理tomcat集群达到负载均衡,同时使用proxy_cache做web缓存
Nginx最早是作为一款优秀的反向代理软件,以高并发下的卓越性能被越来越多的用户所用户,国内最早研究nginx的是张宴,该大牛的博客地址:http://zyan.cc/ 。但是随着需求的发展,nginx的功能已经不再单单是反向代理,现在已经更倾向作为web容器。
Nginx从0.7.48版本开始,支持了类似Squid的缓存功能。Nginx的Web缓存服务主要由proxy_cache相关指令集和fastcgi_cache相关指令集构成,前者用于反向代理时,对后端内容源服务器进行缓存,后者主要用于对FastCGI的动态程序进行缓存。两者的功能基本上一样。自Nginx 0.8.32版本,proxy_cache和fastcgi_cache已经比较完善,加上第三方的ngx_cache_purge模块(用于清除指定URL的缓存),性能不亚于squid,更为关键的是,您在拥有一个反向代理服务器的同时,还可以同时拥有一个高性能的web缓存服务器,鱼与熊掌兼得的快感自然不言而喻!
先看环境:
hadoop1.updb.com 192.168.0.101 nginx server
hadoop2.updb.com 192.168.0.102 tomcat server
hadoop3.updb.com 192.168.0.103 tomcat server
hadoop4.updb.com 192.168.0.104 tomcat server
hadoop5.updb.com 192.168.0.105 tomcat server
操作系统:
centos
Nginx版本:
nginx-1.7.6.tar.gz,采用源码编译安装
Ngx_cache_purge版本:
ngx_cache_purge-2.1.tar.gz
Tomcat版本:
apache-tomcat-7.0.56.tar.gz
JDK版本:
jdk-7u60-linux-x64.rpm
最终架构:
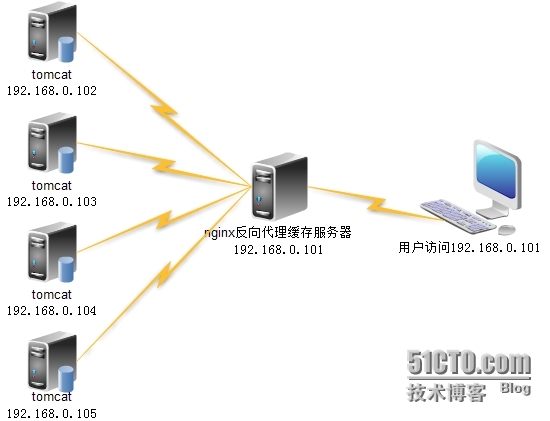
在弄明白架构之后,我们开始着手一步步来实现:
1、安装jdk + tomcat
hadoop2、hadoop3、hadoop4、hadoop5上安装jdk
rpm -ivh jdk-7u60-linux-x64.rpm
配置环境变量
[root@hadoop2 ~]# cat  .bash_profile
# .bash_profile

# Get the aliases and functions
if [ -f ~/.bashrc ]; then
        . ~/.bashrc
fi

# User specific environment and startup programs
PATH=$PATH:$HOME/bin
export JAVA_HOME=/usr/java/jdk1.7.0_60
export JRE_HOME=/usr/java/jdk1.7.0_60/jre
export CLASSPATH=./:/usr/java/jdk1.7.0_60/lib:/usr/java/jdk1.7.0_60/jre/lib
export PATH
使环境变量生效,并验证java环境是否安装成功
[root@hadoop2 ~]# . .bash_profile
[root@hadoop2 ~]# java -version
java version "1.7.0_60"
Java(TM) SE Runtime Environment (build 1.7.0_60-b19)
Java HotSpot(TM) 64-Bit Server VM (build 24.60-b09, mixed mode)
hadoop2、hadoop3、hadoop4、hadoop5上安装tomcat,在webapps下创建测试目录shop和测试文件hadoop.html和test.jsp,测试文件中的内容为每个tomcat节点的主机名和IP地址,方便后边测试负载均衡
[root@hadoop2 ~]# tar xf  apache-tomcat-7.0.56.tar.gz -C /opt/
[root@hadoop2 ~]# cd /opt/apache-tomcat-7.0.56/webapps/
[root@hadoop2 webapps]# mkdir shop
[root@hadoop2 webapps]# vi shop/hadoop.html
hadoop2.updb.com 192.168.0.102
[root@hadoop2 webapps]# vi shop/test.jsp
this is hadoop2 root`s jsp!
将tomcat的bin目录配置到环境变量,并使更改生效,并启动tomcat
## 设置环境变量
[root@hadoop2 ~]# cat .bash_profile
# .bash_profile

# Get the aliases and functions
if [ -f ~/.bashrc ]; then
        . ~/.bashrc
fi

# User specific environment and startup programs
PATH=$PATH:$HOME/bin:/opt/apache-tomcat-7.0.56/bin
export JAVA_HOME=/usr/java/jdk1.7.0_60
export JRE_HOME=/usr/java/jdk1.7.0_60/jre
export CLASSPATH=./:/usr/java/jdk1.7.0_60/lib:/usr/java/jdk1.7.0_60/jre/lib
export PATH

## 使设置生效
[root@hadoop2 ~]# . .bash_profile

## 启动tomcat
[root@hadoop2 ~]# startup.sh
Using CATALINA_BASE:   /opt/apache-tomcat-7.0.56
Using CATALINA_HOME:   /opt/apache-tomcat-7.0.56
Using CATALINA_TMPDIR: /opt/apache-tomcat-7.0.56/temp
Using JRE_HOME:        /usr/java/jdk1.7.0_60/jre
Using CLASSPATH:       /opt/apache-tomcat-7.0.56/bin/bootstrap.jar:/opt/apache-tomcat-7.0.56/bin/tomcat-juli.jar
Tomcat started.
测试tomcat是否正常工作,浏览器中访问,能够正常显示测试页面,表明工作正常。
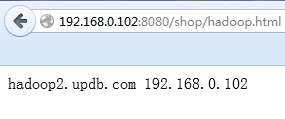
3、4、5节点安装上述方法安装,注意测试文件中的内容改为自己的主机名和IP地址。
2、安装nginx + ngx_cache_purge
首先下载nginx-1.7.6.tar.gz、ngx_cache_purge-2.1.tar.gz到hadoop1服务器上,首先安装ngx-cache_purge,只需要解压tar包就可以了
[root@hadoop1 pub]# tar xf ngx_cache_purge-2.1.tar.gz -C /opt/
安装nginx,过程中需要将ngx_cahce_purge模块编译进来
[root@hadoop1 pub]# tar  xf nginx-1.7.6.tar.gz  -C /opt/
[root@hadoop1 pub]# cd  /opt/nginx-1.7.6/
[root@hadoop1 pub]# ./configure --user=www --group=www --add-module=/opt/ngx_cache_purge-2.1
--prefix=/usr/local/nginx --with-http_stub_status_module --with-http_ssl_module
[root@hadoop1 pub]# make && make install
关于源码安装nginx,比较简单,如果过程中遇到问题可以到网上看看,都能找到答案,也可以在下面留言,一起讨论。
为了方便管理,为nginx编写服务脚本
[root@hadoop1 ~]# vi /etc/init.d/nginx
#!/bin/bash
#
#chkconfig: - 85 15
#description: this script use to manage nginx process.
#

#set -x
. /etc/rc.d/init.d/functions

procnum=`ps -ef |grep "/usr/local/nginx/sbin/nginx"|grep -v "grep"|wc -l`

start () {
        if [ "$procnum" -eq 1 -a -f /usr/local/nginx/logs/nginx.pid ]; then
            echo -n "Starting nginx:"
            success
            echo
        else
            /usr/local/nginx/sbin/nginx
            if [ "$?" -eq 0 ]; then
                echo -n "Starting nginx:"
                success
                echo
            else
                echo -n "Starting nginx:"
                failure
                echo
                exit 4
            fi
        fi
}

stop () {
        if [ "$procnum" -eq 1 -a -f /usr/local/nginx/logs/nginx.pid ]; then
            /usr/local/nginx/sbin/nginx -s stop
            if [ "$?" -eq 0 ]; then
                    echo -n "Stopping nginx:"
                    success
                    echo
            else
                    echo -n "Stopping nginx:"
                    failure
                    echo
                    exit 3
            fi
        else
            echo -n "Stopping nginx:"
            success
            echo
        fi
}

case $1 in

    start)
        start
        ;;

    stop)
        stop
        ;;

    restart)
        stop
        sleep 1
        start
        ;;

    reload)
        if [ "$procnum" -eq 1 -a -f /usr/local/nginx/logs/nginx.pid ]; then
            /usr/local/nginx/sbin/nginx -s reload
        else
            echo "nginx is not running!please start nginx first..."
            exit 2
        fi
        ;;

    status)
        if [ "$procnum" -eq 1 -a -f /usr/local/nginx/logs/nginx.pid ]; then
            echo "nginx is running..."
        else
            echo "nginx is not running..."
        fi
        ;;

        *)
        echo "Usage : nginx [ start|stop|reload|restart|status ]"
        exit 1
        ;;
esac
然后授予脚本可执行权限,并加入chkconfig开机自启动,并测试
[root@hadoop1 ~]# chmod +x /etc/init.d/nginx
[root@hadoop1 ~]# chkconfig nginx on
[root@hadoop1 ~]# /etc/init.d/nginx start
Starting nginx:                                            [  OK  ]
[root@hadoop1 ~]# /etc/init.d/nginx status
nginx is running...
[root@hadoop1 ~]# /etc/init.d/nginx stop
Stopping nginx:                                            [  OK  ]
3、配置nginx,实现反向代理和web缓存
[root@hadoop1 ~]# vi /usr/local/nginx/conf/nginx.conf
user  www www;
worker_processes  8;

error_log  /usr/local/nginx/logs/error.log crit;

pid        /usr/local/nginx/logs/nginx.pid;

##
events {
    use epoll;
    worker_connections  65535;
}

http {
    include       mime.types;
    default_type  application/octet-stream;
    access_log  /usr/local/nginx/logs/access.log;
    charset utf-8;
    sendfile        on;
    tcp_nopush     on;
    keepalive_timeout  60;

    client_body_buffer_size  512k;
    proxy_connect_timeout    5;
    proxy_read_timeout       60;
    proxy_send_timeout       5;
    proxy_buffer_size        16k;
    proxy_buffers            4 64k;
    proxy_busy_buffers_size 128k;
    proxy_temp_file_write_size 128k;

    gzip  on;
    gzip_min_length  1k;
    gzip_buffers     4 16k;
    gzip_http_version 1.1;
    gzip_comp_level 2;
    gzip_types       text/plain application/x-javascript text/css application/xml;
    gzip_vary on;

    ## 设置缓存临时目录
    proxy_temp_path /data/proxy_temp_dir;
    ## 设置缓存目录,并设置Web缓存区名称为cache_one,内存缓存空间大小为200MB,1天没有被访问的内容自动清除,硬盘缓存空间大小为30GB。
    proxy_cache_path /data/proxy_cache_dir levels=1:2 keys_zone=cache_one:200m inactive=1d max_size=30g;

    ## 设置代理的后端tomcat集群
    upstream web_server {
        server 192.168.0.102:8080 weight=1 max_fails=2 fail_timeout=30s;
        server 192.168.0.103:8080 weight=1 max_fails=2 fail_timeout=30s;
        server 192.168.0.104:8080 weight=1 max_fails=2 fail_timeout=30s;
        server 192.168.0.105:8080 weight=1 max_fails=2 fail_timeout=30s;
    }

    server {
        listen       80;            ## nginx监听端口
        server_name  192.168.0.101; ## 设置nginx的主机名或IP地址
        root   html;                ## nginx站点的根目录
        index  index.html index.htm index.jsp;

        location / {
            proxy_pass http://web_server;    ## 这里设置要代理的集群名称
            proxy_set_header Host  $host;
            proxy_set_header X-Forwarded-For  $proxy_add_x_forwarded_for;
            proxy_set_header X-Real-IP  $remote_addr;
            # 如果后端的服务器返回502、504、执行超时等错误,自动将请求转发到upstream负载均衡池中的另一台服务器,实现故障转移
            proxy_next_upstream http_502 http_504 error timeout invalid_header;
            proxy_cache cache_one;
            # 对不同的HTTP状态码设置不同的缓存时间
            proxy_cache_valid  200 304 12h;
            # 以域名、URI、参数组合成Web缓存的Key值,Nginx根据Key值哈希,存储缓存内容到二级缓存目录内
            proxy_cache_key $host$uri$is_args$args;
        }

        ## 用于清除缓存,访问http://192.168.0.101/purge/shop/hadoop.html来清除http://192.168.0.101/shop/hadoop.html的页面缓存
        location ~ /purge(/.*) {
            allow 127.0.0.1;
            allow 192.168.0.0/16;
            deny all;
            proxy_cache_purge    cache_one   $host$1$is_args$args;
        }

        ## 扩展名以.php、.jsp、.cgi、.jhtml结尾的动态应用程序不缓存。
        location ~ .*\.(php|jsp|cgi|jhtml)?$ {
            proxy_pass http://web_server;
            proxy_set_header Host  $host;
            proxy_set_header X-Forwarded-For  $proxy_add_x_forwarded_for;
            proxy_set_header X-Real-IP  $remote_addr;
            proxy_cache cache_one;
            proxy_cache_valid  200 304 12h;
            proxy_cache_key $host$uri$is_args$args;
        }
        ## 关闭访问日志
        access_log off;
    }
}
然后重启nginx
[root@hadoop1 ~]# /etc/init.d/nginx   restart
Stopping nginx:                                            [  OK  ]
Starting nginx:                                            [  OK  ]
4、效果测试
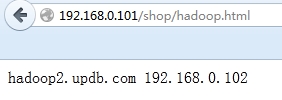
测试静态页面的负载均衡和缓存,第一次访问http://192.168.0.101/shop/hadoop.html
然后清除缓存,并再次访问http://192.168.0.101/shop/hadoop.html

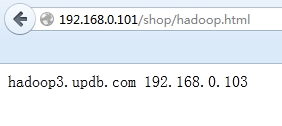
可以看出,当第一次访问时,通过nginx的反向代理,请求被转发到了hadoop2上的tomcat上。而且对于这次请求,nginx已经成功缓存到了静态页面,当清楚缓存后,再次访问相同的地址,请求则被转发到了hadoop3上的tomcat上,说明已经实现了负载均衡。
测试图片能否被缓存,第一次访问http://192.168.0.101/shop/QQ.jpg


可见,上面nginx的配置,已经成功的缓存到了图片和静态页面,下面我们测试动态页面能否被缓存
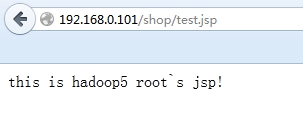
访问192.168.0.101/shop/test.jsp,发现每刷新一次,页面内容都会发生改变,说明请求在后端tomcat集群上轮询,并不是去的缓存,说明动态程序并没有没被缓存,也可以使用purge来验证,如下:

说明动态程序并没有被缓存到nginx中来,验证了上面nginx的配置文件是正确的,至此,已经实现了nginx反向代理后端tomcat集群实现负载均衡,同时使用proxy_cache来缓存网站的静态文件,一箭双雕!
5、总结
从上面的配置中可以看到使用nginx来做为反向代理和web缓存是如此的轻松,而且功能是如此的强大。比较关键的是,在满足需求的情况下,不用单独的使用缓存层(比如用squid实现),降低了运维的成本,而且在系统出现故障的时候,可以快速的定位故障点,当应用不可用时,只需要分别访问后端的tomcat和nginx就可以判断问题出现在哪一层上。而且在性能上,Nginx对多核CPU的利用,胜过Squid不少。另外,在反向代理、负载均衡、健康检查、后端服务器故障转移、Rewrite重写、易用 性上,Nginx也比Squid强大得多,可以考虑使用nginx来替换你的squid。
本文出自 “勇敢向前,坚决向左” 博客,转载请与作者联系!