nginx服务+LEMP搭建
Nginx
nginx的配置运行需要pcre、zlib等软件包支持。所以先搭建好环境,确保nginx安装顺利。以红冒企业版RHEL6为例,搭建Nginx。
yum -y install pcre-devel zlib-devel
创建运行用户、组
useradd -M -s /sbin/nologin nginx
解压文件,编译安装。指定安装用户、组、模块等
tar zxf nginx-1.0.8.tar.gz
cd nginx-1.0.8
./configure --prefix=/usr/local/nginx --user=nginx --group=nginx ―with-http_stub_status_module
make && make install
为主程序nginx创建
在浏览器上输入服务器IP,可以看到如下,说明nginx起来了!

netstat -anpt | grep nginx
tcp 0 0 0.0.0.0:80 0.0.0.0:* LISTEN 5612/nginx: master
编写Nginx服务脚本,用来启动、停止、重载等操作。
vim /etc/init.d/nginx
#!/bin/bash
#chkconfig : -99 20
#description: Ngins Service Control Script
PROG="/usr/local/nginx/sbin/nginx"
PIDF="/usr/local/nginx/logs/nginx.pid"
case "$1" in
start)
$PROG
echo "nginx service start!!"
;;
stop)
kill -s QUIT $(cat $PIDF)
echo "nginx service stop!!"
;;
restart)
$0 stop
$0 start
;;
reload)
kill -s HUP $(cat $PIDF)
echo "stop...start...!!"
;;
*)
echo "Usage: $0 {start|stop|restart|reload}"
exit 1
;;
esac
exit 0
chmod +x /etc/init.d/nginx
chkconfig --add nginx
2.配置文件nginx.conf
配置文件位于/usr/local/nginx/conf
vim /usr/local/nginx/conf/nginx.conf
#user nobody;//运行用户
worker_processes 1;//工作进程数量
#error_log logs/error.log;//错误日志
#error_log logs/error.log notice;
#error_log logs/error.log info;
#pid logs/nginx.pid;//PID文件位置
//内核2.6以上,建议使用epoll模型提高性能。根据实际来定,一般10 000一下,默认1024
events {
use epoll;
worker_connections 1024;
}
http {
include mime.types;
default_type application/octet-stream;
#log_format main '$remote_addr - $remote_user [$time_local] "$request" '
# '$status $body_bytes_sent "$http_referer" '
# '"$http_user_agent" "$http_x_forwarded_for"';
#access_log logs/access.log main;//访问日志位置
sendfile on;//支持文件下载
#tcp_nopush on;
#keepalive_timeout 0;
keepalive_timeout 65;//链接超时
#gzip on;
server {
listen 80;//监听端口
server_name localhost;//网站名称
charset utf-8;//页面默认字符集
#access_log logs/host.access.log main;
location / {//根目录配置
root html;//网站根目录的位置
index index.html index.htm;//默认首页
}
location ~ /status {//编译时添加了模块,所以启用模块可以统计状态
stub_status on;
access_log off;
}
#error_page 404 /404.html;
# redirect server error pages to the static page /50x.html
#
error_page 500 502 503 504 /50x.html;//错误页
location = /50x.html {
root html;
}
}
通常有以上配置即可。
保存退出。重启服务。
service nginx stop
service nginx start

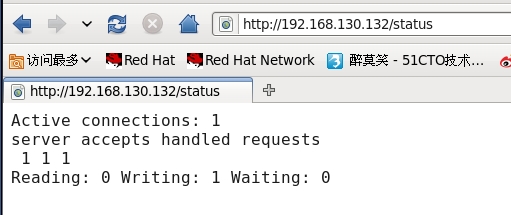
可以在浏览器上查看网站状态:
nginx虚拟主机的配置。
与apache一样,都可以配置基于IP、基于域名、基于端口的虚拟主机
现基于域名,DNS的配置不再罗嗦。
建立两个根目录、测试首页
mkdir -p /wwwroot/test
echo "<h1>here is test.com!!</h1>" > /wwwroot/test/index.html
mkdir -p /wwwroot/web/
echo "<h1>web~~web~~com~~</h1>" > /wwwroot/web/index.html
编辑nginx.conf配置文件
vim /usr/local/nginx/conf/nginx.conf
//虚拟主机配置在server{}上,一台虚拟主机为一个servier{}.
http {
include mime.types;
default_type application/octet-stream;
sendfile on;
keepalive_timeout 65;
server {
listen 192.168.130.132:80;//虚拟主机IP
server_name www.test.com;//网站名称
charset utf-8;
location / {
root /wwwroot/test;//网站目录
index index.html index.htm;
}
location ~ /status {//统计网站状态,可以省略
stub_status on;
access_log off;
}
error_page 500 502 503 504 /50x.html;
location = /50x.html {
root html;
}
}
server {
listen 192.168.130.132:80;//虚拟主机IP
server_name www.web.com;//网站名称
charset utf-8;
location / {
root /wwwroot/web;//网站目录
index index.html index.htm;
}
location ~ /status {
stub_status on;
access_log off;
}
error_page 500 502 503 504 /50x.html;
location = /50x.html {
root html;
}
}
}
保存退出,重启服务后在浏览器上验证。


基于域名的虚拟主机配置完毕。如果基于IP、端口的,配置大同小异。此处略。
LEMP构架
LEMP,既是用nginx做服务器,和lamp的意思一样,因为nginx发音缘故,所以是LEMP。
删除原先rpm包安装的httpd、myql、php等,避免冲突
rpm -e httpd httpd-manual webalizer subversion mod_python mod_ssl mod_perl system-config-httpd php php-cli php-ldap php-common mysql dovecot --nodeps
解压mysql,并编译安装
tar zxf mysql-5.1.55.tar.gz

cd mysql-5.1.55
./configure --prefix=/usr/local/mysql --with-charset=utf8 --with-collation=utf8_general_ci --with-extra-charsets=gbk,gb2312 && make && make install
优化调整
cp support-files/my-medium.cnf /etc/my.cnf
cp support-files/mysql.server /etc/init.d/mysqld
chmod a+x /etc/rc.d/init.d/mysqld
chkconfig --add mysqld
ln -s /usr/local/mysql/bin/* /usr/local/bin/
ln -s /usr/local/mysql/lib/mysql/* /usr/lib/
ln -s /usr/local/mysql/include/mysql/* /usr/include/
初始化数据库
 useradd -M -u 27 -s /sbin/nologin mysql
cd /usr/local/mysql/bin/
./mysql_install_db --user=mysql
chown -R root.mysql /usr/local/mysql/
chown -R mysql /usr/local/mysql/var/
启动数据库
service mysqld start
为root用户设置密码:
mysqladmin -u root password 'pwd123'
//若弹出error: 'Can't connect to local MySQL server through socket '/tmp/mysql.sock' (2)错误,检查/tmp/有没有文件,没有就创建软链。
ln -s /home/mysql/data/my.sock /tmp/mysql.sock
安装PHP解析环境
tar zxf php-5.3.6.tar.gz
cd php-5.3.6
./configure --prefix=/usr/local/php5 --with-gc --with-zlib --with-mysql=/usr/local/mysql --with-config-file-path=/usr/local/php5 --enable-mbstring --enable-fpm && make && make install
安装过程中,如果出现错误,多半是环境没搭建好,一般按照提示,装上需要的环境即可。
安装后调整
cp php.ini-development /usr/local/php5/php.ini
ln -s /usr/local/php5/bin/* /usr/local/bin/
ln -s /usr/local/php5/sbin/* /usr/local/sbin
安装ZendGuardLoader,提高PHP解析效率。
tar zxf ZendGuardLoader-php-5.3-linux-glibc23-i386.tar.gz
cd ZendGuardLoader-php-5.3-linux-glibc23-i386/php-5.3.x/
cp ZendGuardLoader.so /usr/local/php5/lib/php/
vim /usr/local/php5/php.ini
......//略
zend_extension=/usr/local/php5/lib/php/ZendGuardLoader.so
zend_loader.enable=1
保存退出
配置Nginx支持PHP环境
启用PHP-fpm进程
cd /usr/local/php5//etc/
cp php-fpm.conf.default php-fpm.conf
编辑php-fpm.conf,找到一下几项并修改。
vim php-fpm.conf
......//略
pid = run/php-fpm.pid//确认pid文件位置
user = nginx//运行用户
group = nginx//运行组
pm.start_servers = 20//启动时开启到进程数
pm.min_spare_servers = 5//最少空间进程数
pm.max_spare_servers = 35//最多空间进程数
保存退出。
启动
/usr/local/sbin/php-fpm -c /usr/local/php5/php.ini
netstat -anpt | grep php-fpm
tcp 0 0 127.0.0.1:9000 0.0.0.0:* LISTEN 13149/php-fpm.conf)
在nginx启动脚本上修改,使nginx启动或关闭时,php-fpm页自动启动或关闭。
#!/bin/bash
#kconfig : -99 20
#description: Ngins Service And PHP-fpm Control Script
PROG="/usr/local/nginx/sbin/nginx"
PIDF="/usr/local/nginx/logs/nginx.pid"
PROG_FPM="/usr/local/sbin/php-fpm"
PIDF_FPM="/usr/local/php5/var/run/php-fpm.pid"
case "$1" in
start)
$PROG
$PROG_FPM -c $PIDF_FPM
echo "nginx service and php-fpm start!!"
;;
stop)
kill -s QUIT $(cat $PIDF)
kill -s QUIT $(cat $PIDF_FPM)
echo "nginx service and php-fpm stop!!"
;;
restart)
$0 stop
$0 start
;;
reload)
kill -s HUP $(cat $PIDF)
echo "stop...start...!!"
;;
*)
echo "Usage: $0 {start|stop|restart|reload}"
exit 1
;;
esac
exit
配置nginx支持PHP解析,有两种方法,但都是在server中配置!!
第一种方法:转交给其他WEB服务器处理,比如交给LAMP服务器(192.168.1.254:80)处理
vim /usr/local/nginx/conf/nginx.conf
http{
......略
server {
......略
location ~ \.php${//访问.php页面到配置段
proxy_passhttp://192.168.1.254:80;
//Apache服务器到监听地址
}
......略
......略 }
}
第二种方法:调用本机php-fpm进程。
vim /usr/local/nginx/conf/nginx.conf
http{
......略
server {
......略
location ~ \.php$ {
root/var/www/test;//访问.php页面配置段
fastcgi_pass127.0.0.1:9000;//PHP网页文档根目录
fastcgi_indexindex.php;//php-fpm到监听地址
includefastcgi.conf;//包括fastcgi.conf样本配置
}
......略
}
......略
}
现以第二种方法实验!!!!!
测试PHP页面访问
vim /wwwroot/test/test.php
<?php
$link=mysql_connect('localhost','root','pwd123');
if ($link) echo "<h1>链接数据库成功!!</h1>";
mysql_close();
?>
保存退出。如果打开网页发现错误:
Can't connect to local MySQL server through socket '/tmp/mysql.sock' (2)
1.杀掉所有mysql进程,重启服务。
ps -A |grep mysql
kill -9 xxxx
service mysqld restart
2.修改权限,重启服务
chown -R mysql.mysql /var/lib/mysql
service mysqld restart
3.修改/etc/my.cf (根据名称,可能是my.conf)
[mysql]
socket=/tmp/mysql.sock
保存退出。
ln -s /var/lib/mysql/mysql.sock /tmp/mysql.sock
重启服务
service mysqld restart
看看即可!
