munin监控服务器
选择munin的原因并非是觉得这个工具好读,而是简单,server-node形式,容易上手。
下面详细的介绍munin的安装,配置,自定义脚本插件,这里写的时候我选择的是shell,因为其他的语言都不熟。
一、安装
我这里的环境是centos6.6 64位
#rpm -Uvh http://download.fedoraproject.org/pub/epel/6/x86_64/epel-release-6-8.noarch.rpm
#rpm --import /etc/pki/rpm-gpg/RPM-GPG-KEY-EPEL-6
#vi /etc/yum.repos.d/epel.repo #这个就是上面安装包安装后生成的文件
替换[epel]中的路径为mirrorlist=
贴出最终的文件来给大家看如下
[epel]
name=Extra Packages for Enterprise Linux 6 - $basearch
#baseurl=http://download.fedoraproject.org/pub/epel/6/$basearch
#mirrorlist=http://mirrors.fedoraproject.org/metalink?repo=epel-6&arch=$basearch
mirrorlist=http://mirrors.fedoraproject.org/mirrorlist?repo=epel-6&arch=$basearch
failovermethod=priority
enabled=1
gpgcheck=1
gpgkey=file:///etc/pki/rpm-gpg/RPM-GPG-KEY-EPEL-6

[epel-debuginfo]
name=Extra Packages for Enterprise Linux 6 - $basearch - Debug
#baseurl=http://download.fedoraproject.org/pub/epel/6/$basearch/debug
mirrorlist=http://mirrors.fedoraproject.org/metalink?repo=epel-debug-6&arch=$basearch
failovermethod=priority
enabled=0
gpgkey=file:///etc/pki/rpm-gpg/RPM-GPG-KEY-EPEL-6
gpgcheck=1

[epel-source]
name=Extra Packages for Enterprise Linux 6 - $basearch - Source
#baseurl=http://download.fedoraproject.org/pub/epel/6/SRPMS
mirrorlist=http://mirrors.fedoraproject.org/metalink?repo=epel-source-6&arch=$basearch
failovermethod=priority
enabled=0
gpgkey=file:///etc/pki/rpm-gpg/RPM-GPG-KEY-EPEL-6
gpgcheck=1
修改完毕后安装munin
#yum clean
#yum install munin munin-node #这地方如果你只是node端就没必要装munin了,可以省了
安装完成!
二、配置
munin上面安装后会在以下目录产生文件(夹)
/usr/share/doc/munin-common-2.0.25
/usr/share/perl5/vendor_perl/Munin
/var/run/munin
/etc/logrotate.d/munin-node
/etc/munin
/etc/rc.d/init.d/munin-node
/usr/sbin/munin-node
/usr/sbin/munin-node-configure
/usr/sbin/munin-run
/usr/share/munin
/var/lib/munin
/var/lib/munin-node/plugin-state
/etc/cron.d/munin
/etc/httpd/conf.d/munin.conf
/etc/logrotate.d/munin
/etc/munin
/usr/bin/munin-check
/usr/bin/munin-cron
/usr/bin/munindoc
/usr/sbin/munin-sched
/var/log/munin
/var/www/cgi-bin/munin-cgi-graph
/var/www/cgi-bin/munin-cgi-html
/var/www/html/munin
其中,/etc/munin是munin的配置文件集中地,其中munin.conf是munin的server的配置文件,而node的配置文件都在/etc/munin/plugin-conf.d成都文件夹中。
我的munin server的配置文件如下
dbdir	/var/lib/munin
htmldir /var/www/html/munin
logdir /var/log/munin
rundir  /var/run/munin
tmpldir	/etc/munin/templates
includedir /etc/munin/conf.d
graph_strategy cron
cgiurl_graph /munin-cgi/munin-cgi-graph
max_size_x 50
max_size_y 50
html_strategy cron
max_processes 90
[localhost.localhost]     #node的名称
    address 127.0.0.1
    use_node_name yes
    df._dev_sda1.warning 1
    users.warning 1
contacts other
contact.other.command mail -s "Munin notification ${var:host}" 476556**[email protected] #发送告警邮件
contact.other.always_send warning critical
另外,我的node端没有做太大的配置,除了刚开始实验memecache的监控做了如下配置外,自定义监控脚本根本没有配置。
[diskstats]        #默认
user munin

[iostat_ios]
user munin

[memcached_*]        #我自己照着网上给的添加的
env.host 127.0.0.1
env.port 11211
env.timescale 3
好了,上述的配置已经完成,但是,这里需要提示是munin是需要web容器的支撑的,所以一定记得安装nginx或者apache或者其他,在这里我选择nginx,因为小而强大,下面贴出nginx的配置,其实只需要改nginx的目录路径即可,如下
location / {
            root   /var/www/html/munin/;        #你没看错,就是这句
            index  index.html index.htm index.php;
        }
好了,用下面的命令把nginx,munin启动起来
/usr/local/nginx/sbin/nginx
/etc/init.d/munin-node start
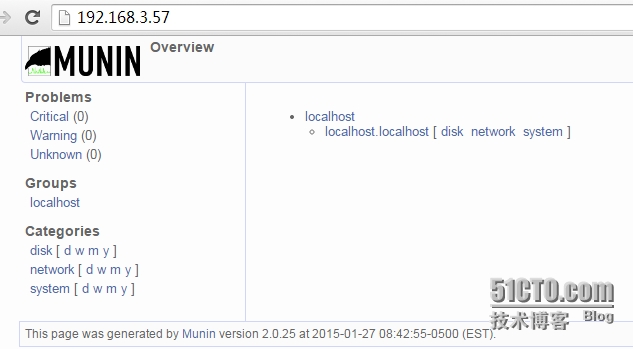
启动起来之后访问页面,如下

好啦,已经可以访问啦,如果不能访问,请检查网络,防火墙,密码等设置。
三、自定义脚本
munin的简单之处在于自定义脚本能写能用,它的脚本在/usr/share/munin/plugins/下
[root@localhost munin]# ll /usr/share/munin/plugins/
total 1516
-rwxr-xr-x. 1 root root  1624 Nov 26 14:37 acpi
-rwxr-xr-x  1 root root  2749 Jan 14 18:58 alive_test
-rwxr-xr-x. 1 root root  3258 Nov 26 14:37 amavis
……
我写的是网站的监控码的监控,如下所示
#!/bin/sh
#www_chengdu_cn.sh is written by juanfa

if [ "$1" = "config" ]; then

      echo "graph_title website status"
      echo 'graph_args --base 1000 -l 0'
      echo 'graph_vlabel status code'
      echo 'www_chengdu_cn.label www.chengdu.cn'
      echo 'graph_category system'        #这是图像的归属地,分类啦
      exit 0
fi
www_chengdu_cn=`curl -o /dev/null -s -w "%{http_code}"
echo "www_chengdu_cn.value ${www_chengdu_cn}"
这样,简单的数据采集就形成啦,写完后要做软链接如下
ln -sf /usr/share/munin/plugins/www_chengdu_cn.sh www_chengdu_cn
chmod 755 /usr/share/munin/plugins/www_chengdu_cn.sh
不过在写脚本的过程中你可以进行排查错误,比如上面的我们写的得到网站的状态码可以通过telnet进行测试
telnet 127.0.0.1 4949        #munin默认的端口是4949
[root@localhost plugins]# telnet 127.0.0.1 4949
Trying 127.0.0.1...
Connected to 127.0.0.1.
Escape character is '^]'.
# munin node at localhost.localdomain
fetch www_chengdu_cn
www_chengdu_cn.value 200
.
就是这样,说明已经可以采集到数据,尽情等待网页上面的显示吧,不过等待时间略长,5分钟。
网上说的是可以在定时任务中修改时间限制就可以让时间缩短,但是我这边没有生效,还是5分钟,知道在哪修改的同学可以联系我,万分感谢。
[root@localhost plugins]# more /etc/cron.d/munin
#
# cron-jobs for munin
#
MAILTO=root
*/1 * * * *     munin test -x /usr/bin/munin-cron && /usr/bin/munin-cron
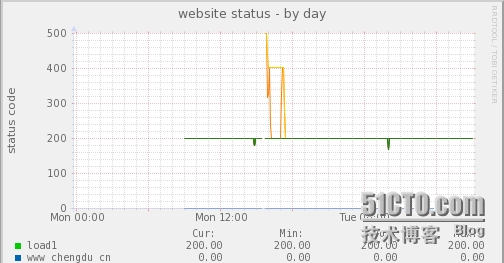
好了,等待显示出来

中途修改了host定向到其他的网站以或得不同的状态码。说明成功。ps因为是从load脚本修改过来的,所以会有个load啦。
好了,抛砖引玉到此为止。
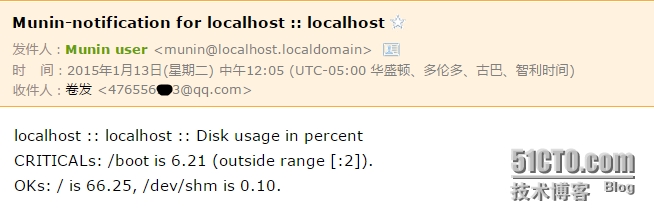
我的邮件报警时好时坏,等我把告警弄彻底了再来发文。

这就是简单的报警,我要的不是这么简陋的啦,所以要认真研究。
还有,如果不明白的网上有官网啦,当然,可以问我^^,我会的帮你解答啦。