ubuntu、Centos、win2003开启snmp服务
系统介绍:
root@ubuntu:~# cat /etc/issue
Ubuntu 12.04.1 LTS \n \l
安装:
apt-get install snmpd
配置:
修改/etc/snmp/snmpd.conf文件;
屏蔽第15行
#agentAddress udp:127.0.0.1:161
打开第17行
agentAddress udp:161,udp6:[::1]:161
最下面添加如下信息:
com2sec notConfigUser default public
group notConfigGroup v1 notConfigUser
group notConfigGroup v2c notConfigUser
view systemview included .1
access notConfigGroup "" any noauth exact systemview none none
syslocation 7 floor room 192.168.1.191
syscontact Root xzy
pass .1.3.6.1.4.1.4413.4.1 /usr/bin/ucd5820stat
启动snmpd服务
service snmpd restart
安全:
为了更好做到安全策略,我们现在配置snmp只允许某个ip连接。
vim /etc/hosts.allow文件,添加如下信息:
snmpd:xx.xx.xx.xx:allow
snmpd:all:deny
系统介绍:
[root@localhost~]# cat /etc/issue
CentOS release 6.5 (Final)
Kernel \r on an \m
安装:
yum install -y net-snmp
yum install -y net-snmp-libs
yum install -y net-snmp-perl
yum install -y net-snmp-utils
启动:
service snmpd restart
修改配置文件:
cd /etc/snmp
mv snmpd.conf snmpd.conf.sav
vim snmpd.conf
###############################################################################
#
# EXAMPLE.conf:
#   An example configuration file for configuring the Net-SNMP agent ('snmpd')
#   See the 'snmpd.conf(5)' man page for details
#
#  Some entries are deliberately commented out, and will need to be explicitly activated
#
###############################################################################
#
#  AGENT BEHAVIOUR
#

#  Listen for connections from the local system only
#agentAddress  udp:127.0.0.1:161
#  Listen for connections on all interfaces (both IPv4 *and* IPv6)
agentAddress udp:161,udp6:[::1]:161


###############################################################################
#
#  SNMPv3 AUTHENTICATION
#
#  Note that these particular settings don't actually belong here.
#  They should be copied to the file /var/lib/snmp/snmpd.conf
#     and the passwords changed, before being uncommented in that file *only*.
#  Then restart the agent

#  createUser authOnlyUser  MD5 "remember to change this password"
#  createUser authPrivUser  SHA "remember to change this one too"  DES
#  createUser internalUser  MD5 "this is only ever used internally, but still change the password"

#  If you also change the usernames (which might be sensible),
#  then remember to update the other occurances in this example config file to match.


###############################################################################
#
#  ACCESS CONTROL
#

                                                 #  system + hrSystem groups only
view   systemonly  included   .1.3.6.1.2.1.1
view   systemonly  included   .1.3.6.1.2.1.25.1

                                                 #  Full access from the local host
#rocommunity public  localhost
                                                 #  Default access to basic system info
#rocommunity public  default    -V systemonly

                                                 #  Full access from an example network
                                                 #     Adjust this network address to match your local
                                                 #     settings, change the community string,
                                                 #     and check the 'agentAddress' setting above
#rocommunity secret  10.0.0.0/16

                                                 #  Full read-only access for SNMPv3
 rouser   authOnlyUser
                                                 #  Full write access for encrypted requests
                                                 #     Remember to activate the 'createUser' lines above
#rwuser   authPrivUser   priv

#  It's no longer typically necessary to use the full 'com2sec/group/access' configuration
#  r[ou]user and r[ow]community, together with suitable views, should cover most requirements


###############################################################################
#
#  SYSTEM INFORMATION
#

#  Note that setting these values here, results in the corresponding MIB objects being 'read-only'
#  See snmpd.conf(5) for more details
sysLocation    Sitting on the Dock of the Bay
sysContact     Me <[email protected]>
                                                 # Application + End-to-End layers
sysServices    72


#
#  Process Monitoring
#
                               # At least one  'mountd' process
proc  mountd
                               # No more than 4 'ntalkd' processes - 0 is OK
proc  ntalkd    4
                               # At least one 'sendmail' process, but no more than 10
proc  sendmail 10 1

#  Walk the UCD-SNMP-MIB::prTable to see the resulting output
#  Note that this table will be empty if there are no "proc" entries in the snmpd.conf file


#
#  Disk Monitoring
#
                               # 10MBs required on root disk, 5% free on /var, 10% free on all other disks
disk       /     10000
disk       /var  5%
includeAllDisks  10%

#  Walk the UCD-SNMP-MIB::dskTable to see the resulting output
#  Note that this table will be empty if there are no "disk" entries in the snmpd.conf file


#
#  System Load
#
                               # Unacceptable 1-, 5-, and 15-minute load averages
load   12 10 5

#  Walk the UCD-SNMP-MIB::laTable to see the resulting output
#  Note that this table *will* be populated, even without a "load" entry in the snmpd.conf file


###############################################################################
#
#  ACTIVE MONITORING
#

                                    #   send SNMPv1  traps
 trapsink     localhost public
                                    #   send SNMPv2c traps
#trap2sink    localhost public
                                    #   send SNMPv2c INFORMs
#informsink   localhost public

#  Note that you typically only want *one* of these three lines
#  Uncommenting two (or all three) will result in multiple copies of each notification.


#
#  Event MIB - automatically generate alerts
#
                                   # Remember to activate the 'createUser' lines above
iquerySecName   internalUser
rouser          internalUser
                                   # generate traps on UCD error conditions
defaultMonitors          yes
                                   # generate traps on linkUp/Down
linkUpDownNotifications  yes


###############################################################################
#
#  EXTENDING THE AGENT
#

#
#  Arbitrary extension commands
#
 extend    test1   /bin/echo  Hello, world!
 extend-sh test2   echo Hello, world! ; echo Hi there ; exit 35
#extend-sh test3   /bin/sh /tmp/shtest

#  Note that this last entry requires the script '/tmp/shtest' to be created first,
#    containing the same three shell commands, before the line is uncommented

#  Walk the NET-SNMP-EXTEND-MIB tables (nsExtendConfigTable, nsExtendOutput1Table
#     and nsExtendOutput2Table) to see the resulting output

#  Note that the "extend" directive supercedes the previous "exec" and "sh" directives
#  However, walking the UCD-SNMP-MIB::extTable should still returns the same output,
#     as well as the fuller results in the above tables.


#
#  "Pass-through" MIB extension command
#
#pass .1.3.6.1.4.1.8072.2.255  /bin/sh       PREFIX/local/passtest
#pass .1.3.6.1.4.1.8072.2.255  /usr/bin/perl PREFIX/local/passtest.pl

# Note that this requires one of the two 'passtest' scripts to be installed first,
#    before the appropriate line is uncommented.
# These scripts can be found in the 'local' directory of the source distribution,
#     and are not installed automatically.

#  Walk the NET-SNMP-PASS-MIB::netSnmpPassExamples subtree to see the resulting output


#
#  AgentX Sub-agents
#
                                           #  Run as an AgentX master agent
 master          agentx
                                           #  Listen for network connections (from localhost)
                                           #    rather than the default named socket /var/agentx/master
#agentXSocket    tcp:localhost:705
com2sec notConfigUser default XXX
group notConfigGroup v1 notConfigUser
group notConfigGroup v2c notConfigUser
view systemview included .1
access notConfigGroup "" any noauth exact systemview none none
syslocation 7 floor room XXX
syscontact Root xzy
pass .1.3.6.1.4.1.4413.4.1 /usr/bin/ucd5820stat
安全:
修改服务器iptables防火墙:
vim /etc/sysconfig/iptables
-A INPUT -s xxxx/xx -p udp -m udp --dport 161 -j ACCEPT
修改snmp的允许连接的ip:
vim /etc/hosts.allow
snmpd:xx.xx.xx.xx:allow
snmpd:all:deny
系统介绍:

安装:
开始-->控制面板-->添加或删除程序
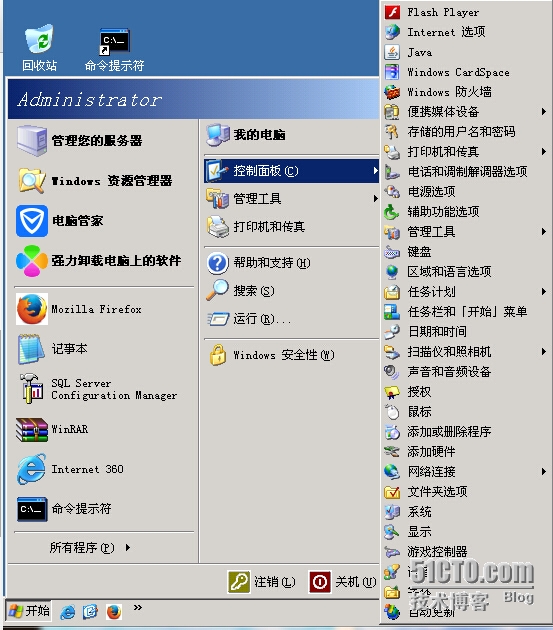
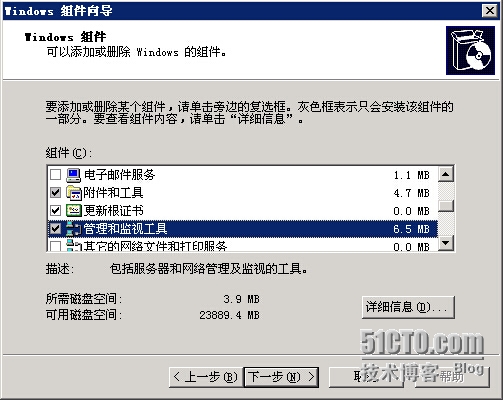
添加/删除Windows组建(A)-->管理和监视工具
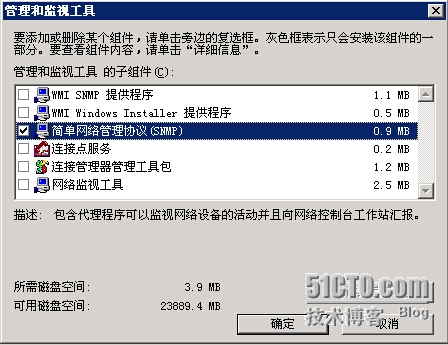
简单网络管理协议(SNMP) 打勾-->确定
中途可能会提示放入光盘,在光驱内放入win2003光盘即可
配置:
我点电脑-->右键-->管理
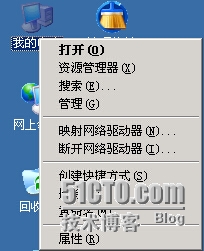
服务和应用程序-->服务
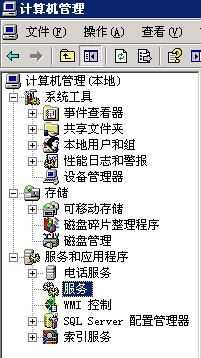
找到右边的SNMP Service服务双击选择属性-->安全分别添加团体名和信任主机ip
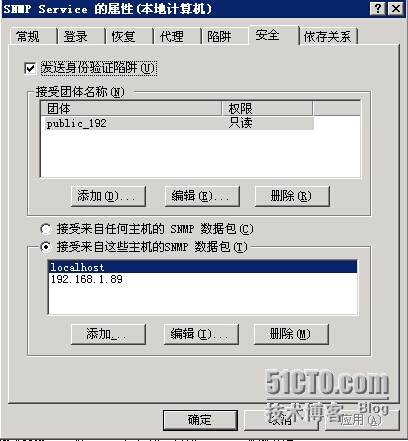
安装配置完成
本文出自 “精忠报国” 博客,谢绝转载!